Home

Falling out.

Leave a comment

Chit chat

======

Again not much going on.

———————————————————

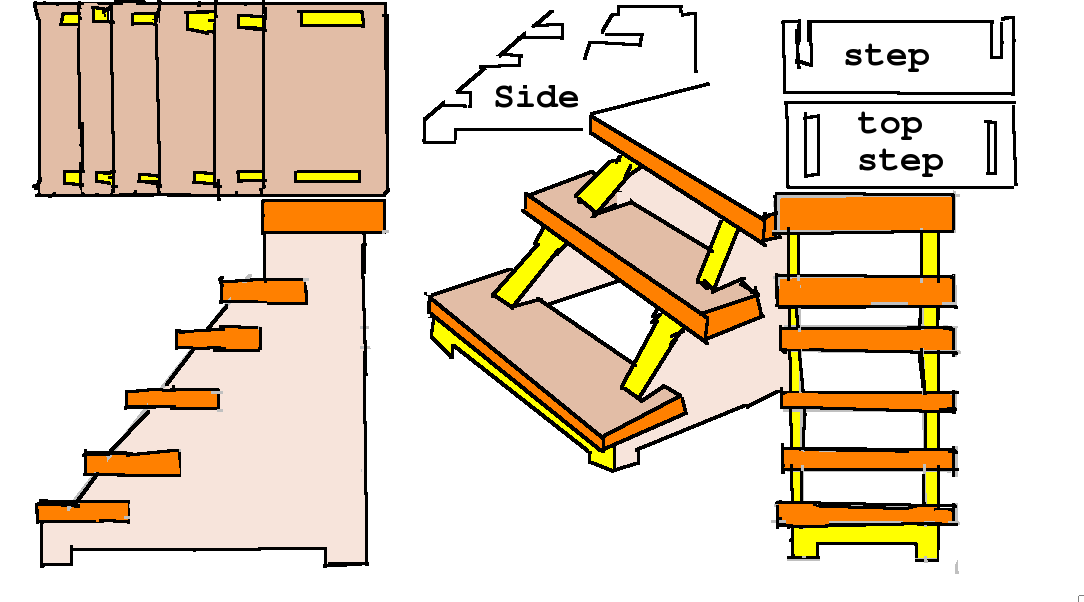
Tuxpaint can be good for drawing pictures, cartoons, and the like, but if we let it stretch it’s muscles there is more that can be done. Maybe use it as a sort of drafting program. A drawing usually has at least four views. They are the front, side, top, and isometric (roughly translated at an angle).  If you needed a simple step stool, you certainly can make a drawing to reflect that. In this case you only have a partial isometric, but the point gets across.

https://computothought.files.wordpress.com/2014/09/56985-stairs.png

Maybe you could do a floor plan:

A 3d object in 2d.

Then all the rest….


Circuit design.


Have fun.

———————————————————

Linux commandment: Thall shall not login remotely as root.

If your a good linux admin, you did this when you first set up the machine.

$ cd /etc/ssh
$ sudo vim sshd_config

Change the line that says permit Root login to no
/Roo
in vim should find the line quickly

# Authentication:
LoginGraceTime 120
# PermitRootLogin yes
PermitRootLogin no
StrictModes yes

Save and exit the file.

Restart the service:

$ sudo service ssh restart

——————————————————-

When I first made the following cartoon it was pretty much tongue in cheek. But really when you think about it, it is a blessing in disguise. What if you could localize a lot of the web you use a lot without having to use any bandwidth.

Actually we already do it with our local web server now that I think about it.

If you were a traveling chef you could go choose a food menu.
and from that menu, you could do several things. Such as use several calculators.
Such a a food conversion chart.
Or even have your recipe book with you.
And the neatest of all things you could have a virtual site from the same server to show your clients what they could have for dinner.
Is that not all awesome! All from that little server without having to go to the internet.

———————————————————

General steps for operating system upgrade.

1. Backup
A. Save data files and program settings.
B. Make a system image aka duplicate if possible.  (requires special software)
C. Get list of installed files.
2 Get operating system.
A.Traditional method.
1, Download new media. (up to several gigabytes.)
In some cases this could take several hours.
2. Burn new operating system to media.
3. Install operating system,
B. Ipxeboot. (MSWindows may require a special server, but Linux and BSD do not)
1. Boot with minimal media. (i.e. floppy, usb stick, or minimal cd)
2. Downloads and installs minimal OS for install control.
3. Downloads and installs the rest of the OS at the same time.
(optional on some OS’s you can install a basic system and finish the install
later)
3. Configure system.
4. Install any additional software third party or from OS vendor as needed.
5. Restore any data and settings if possible.
6. Back up to a new system image.
7. Test system
9. Make adjustments if required.

If you made that original backup, you can always restore the system back to the way it was if your new OS fails.

Examples of ipxe boot installs for linux http://www.instructables.com/id/Linux-hints-II/

———————————————————

Couple of definitions first. Some people may disagree with this.

Network hub: A network hub is a network device that a single network of the same  media types. but paths are intermingled (obsolete)

Network switch: A network switch is a network device that a single network of the same  media types. but paths are separated.

Network bridge: A network bridge is a network device that connects a single or multiple network segments of different media types.

Network router: A network router is a network device that connects multiple network segments of the same media types.

Now to get confusing. Many network devices can be a combination of the above. Take for instance what a lot of people call a router is actually a combination of of a bridge and a router.

These we all pretty much know about, but what if we wanted to connect some legacy devices such as dumb terminals so they would have virtual access to the network. Actually they are just acting as an extra keyboard and screen for the host system.

Now you have turned one system into four systems. Everything would pretty much be in the text only mode, but there are a host of programs available for this type of access.  Those older systems could be put back to use in a pinch.

  • Links2, lynx, elinks – internet
  • Bashpodder – audio podcast collector
  • Alpine – email client
  • Irssi – inter relay chat
  • Centerim – instant messaging client
  • Oleo or Sc – spreadsheet
  • Vim, emacs, nani, joe, or a dozen other programs – word processing
  • Antiword – deals with office based documents
  • Putty – secure accessing tool
  • Screen -multiple seesion tool
  • Ledger – accounting (seems to be based on gnucash)
  • gpm, mc, synaptic, sed, awk, sort, ncurses, bash ,ssh, wget, curl
  • Sqllite, mysql, psql, plus man other – databases
  • Hnb – outliner to organize ideas
  •  freebasic, gcc, python, pgp, pgp-cli, perl and etc programming language tools.
  • Too many to list here – games. (i.e ninvaders)
  • Moc, aplay, mplayer, cmis and may others – music players
  • Espeak or Festival – voice synthesizer.
  • Nget and may others – news readers.
  • Cdrecord – cd buring program.
  • wird – nice calendar tool.

Just think a Sega Dreamcast running netbsd could be a computer terminal.

You can get some rs232 to ethernet devices specific for this task, but for the price, you are better off getting a Raspberry Pi or the like Unless you want to use an old computer.  More ore information on interfacing at: http://www.instructables.com/id/Direct-connecting-two-old-fashioned-modems-or-te/

———————————————————

One of the things I like to do is port software from one system to another. That is take the source code of a program and allow it to work on another system. Why reinvent the wheel if yo u have something that works. Just because you have a new and different system should keep from using that software. Coming from a school that says within reason if it is not broke, do not fix it then you know what to do. If I have a perfectly working system why convert it to a virtual machine and not know what the challenges might be. If I did not have an existing system, then off to the races to build a virtual machine.

What is this all leading up to. With the terminated support of Microsoft Windows XP.  XP per se is no longer viable. Mainly because of security issues. Everyone says upgrade or chunk the system. Invested too much in the system to lightly just chunk it and like most upgrades old software just no longer works after the upgrade.  So using a virtual machine does not always work for testing old software to make sure it works before moving to a new system.

Had an application of which I moved over to a new system. Could not get the new software to work in the development environment. Thought maybe there was a problem with the software. If I had chunked the old XP system, there never would have been a way to test the software to make sure it work to begin with. Fortunately the software did work with the original system.

There lies the dilemma. How do you use the old system without causing problems for your network or the original system? Since the original system was not corrupted in any way, then all I had to do was just segregate it from the internet and any potential issues.

Well what would you need?  An extra router, a host machine with an extra network interface card aka nic, the XP machine, and the appropriate cables.  First you would set up the extra router with a different lan or network than the one that connects to the internet. Say “192.168.8.x”. This is to prevent any conflict and mixing of packets between the two networks. Hook you XP machine with the second router and the “192.168.8.x” network. Next hook the second port of the host machine to that second router. Set the host machine to get an ipaddress from that router. Make sure that the second nic is not joined in any way to the first nic. so the original nic will get it’s ipaddress from router 1.

[Note you could use a crossover cable and static ipaddresses, but that is not elegant enough for me.]

Once you have that setup and connected, you can set up sharing between the host machine and the xp machine via the second nic only. You should be able to work securely between the two systems.  So now if you need any files from the internet, you can download them to the host and then in a second step transfer the file to the XP machine. That may see like a hassle, but it is pretty easily automated.

Also for XP, if you needed some update, you can download administrative packages that can be installed without using the internet. That is the way we used to do it. Download the package and then have it run on all the machines at the same time, so upgrading many machines was not that much of a hassle.

Eventually I will probably either chunk or find another operating system for the XP amchine. But for the time being ROI (return on investment) can still be extracted from that system.

———————————————————

Blinking lights have been used on computers for years. What they mean varies from system to system.Manuals for the systems will hae documention on what all the variations mean.  Even on the home computer they most all have an led that signifies whether the power is turned on to the machine

Maybe we could attach led to a local computer and then they are lit could mean one of ervera things depending on how ht e system is programmed.. You could start off with just two leds that you give you four possibilities.  Back then there were no computer screens to get information.

You could even add even more light for more possibilities.The traditional way was to add led]s to the parallel port. Eight leds would give you 2^8 or 256 possibilities. Possibly more than you would ever need. First setup we did like this was for the Atari ST computer. The picture is using a 32 bit computer.

One could go a step further and instead of lights being on or off, a message could be sent in one form or another. A traditional choice might be to use something like the Morse code. You could use just use one led to get out the message. the message would be consecutive flashing of long and short lights. Since there is more than one version of the code yo would have to decide  ahead of time which version to use.

Once that is decide you sould have to decide how long for a dit (short flash( and a dah (long flash). or n alternative could be using two leds eith one lamp lidt for a dit and two lamps lit for a dah.

Though I might prefer the traditional method as it would lend it self to using. infrared signal between two systems. Then two systems could use the infrared as a backup if all other communication lines were not active.This is really tue if your monitor fails.

– …. .. … / .. … / .- / — . … … .- –. . / .. -. / — — .-. … . / -.-. — -.. . .-.-.-

———————————————————

Random numbers can be very important in games. No matter whether you use it for possible outcomes or graphics characters, you can have a bit of fun. If you look for the oracle on this blog, you can one way a random number can be used.

loop
Print a random ascii character to the screen sequentially without a linefeed.
until done.

First let’s consider freebasic to print out random characters to a screen to make the computer it has gone haywire, it is basically the same code. Some people used to use code similar to this on the old TRS-80 to confuse sales people.

for x = 1 to 2000
    Randomed = INT(RND * ((255 + 1) - MIN) + MIN)
    ?chr$(Randomed);
next x

Output finale:

Now let us look at how it might be done in C.

#include <stdio.h>
#include <stdlib.h>

int main() {
  int c, n;

  for (c = 1; c <= 1000; c++) {
     n = rand() % 255 + 1;
     printf("%c ",n); 
  }

  return 0;
}

Output finale:

In some ways the code for both look alot alike. Crequired a bit more information for the stup of the code..

———————————————————

 We are going to setup a simple flat file or two dimensional spreadsheet.

What do we want to do with the database

I. Design

Let us look at the data we might want to collect. Of course file names and the data we want to collect.

Simple database
Datafile: datafile            Metadata: metadat

Name    :
Address :
City    :
State   :
Zip     :

The data we want to collect is described in the meta data file. Sometimes called a data dictionary. With a data dictionary we ca write  a generic routine that will handle different data bases without having to write separate code for each one.

5
Name
Address
City
State
Zip
30
30
30
30
5
a
n
c
d
s

Which means we want five data fields known as Name, Address, City, State,
and Zip. The first four data fields can hold up to 30 characters  and the last one will only hold four, The next data fields will described by the kind of data it will hold such as n for numeric.

Dummy data:

Your name
1234 Street
Sometown
ST
12345

II. Build

With this database well need to look at the tools we need to create and alter the database. First is the organizer menu. Of course you will have to a database file to work with first.

(A)ppend       Add record.
(B)ehold        Examine and existing record with the option to alter a record.
(C)hange       Alter a record.
(D)elete         Remove a record.

III. Sort and extract

You will want to arrange the data in a meaningful order based on one of the database fields so that for a mailing list you might want to arrange the data by the name so that it is easier to look up data. The again you might want to arrange it by zip code to make mail outs easier.

Original list:

Tutuola
Benson
Hargraves
Tartican

New list:

Benson
Hargraves
Tartican
Tutuola

Even then you may only want a portion of the list say only last names that start with T

Newest list

Tartican
Tutuola

IV. Report

Lastly you will want to present the data in a meaningful form as a document for presentation as a printout or even an html page.

Headers

Body > Data

Footers

Notes
Etc

Mail merge is probbly one of the oldest reports.

This is it in a nutshell. Very much oversimplified, but you get the gist of it.

———————————————————

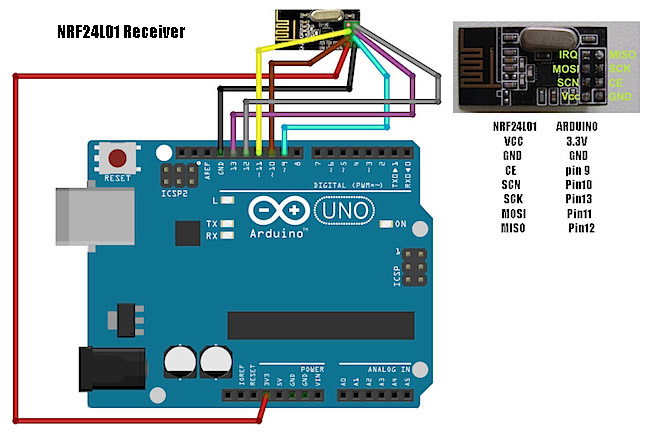
Here we want to interface an rc controller to a computing device so that we do not have to manually manage it. You can use all kinds of external sensors or just pre-program the computer or micro-controller for a specific task.You can use everything from robot arms to controlling RC models.

Computer/micro-controller interface Probably the easiest way to use a computer is to use the standard parallel port (not usb).

The micro-controllers are varied so you have to look for the digital type interfaces as to what to use. I.E. for the Raspberry Pi you would use the GPIO You will need to see the manuals as the pins vary between units even of the same vendors. But for the original Arduino  looks something like this:

The computer/microcontroller interface, uses 4 inexpensive npn transistors and 4 resistors.

RC controller You can disable the power lines, because you will be using the power lines from the interface. Took my controllers joystick portion from the unit for it to be easier to solder the control lines.

Even if you get this all set up, you will need software to control the computer and or micro-controller. That is  a subject for another post, There are tons of examples on the internet to be used as examples.

You could use the same idea to control other things with a bit more circuitry

———————————————————

No  longer spend time burning #linux cd’s. Do not need to do that anymore. You can even do the same thing with bsd. By the time you spend downloading the cd image and burn the cd, and then do the install, I can do an ipxeboot from floppy and have the job done. Though to save time sometimes I will do a minimal install and then later add whatever is needed. Done this even with a Pentium 1 to install Slackware 14.1. Pentium 2’s or better get Debian. Bought a Sony double speed usb floppy drive from a local office retailer for 5 dollars. Been a good investment.There is a rare instance when I can not install linux on a system, Floppies are not dead…. You can even use the virtual floppy images to load linux into a virtual machine. Search ipxe in this blog for more details..

Floppies can also load terminal programs or modem programs as we used to know them. Terminal programs will easily work on older equipment where the old fashioned rs232 ports (or an adapter for usb with emulation). This is done quite a bit with networking equipment such as routers and switches. It is also used with monitor free computers. for example. We have done this with the Nslu2 and the Pogoplug converted computers. You could also attach this type of terminal to your properly set up linux box, or server, and or desktop management from the command line. There is an article here in the blog on that setup also.

Last of all where network communication might be compromised, you can use a floppy disk to upload small but critical files.

All for now. (A floppy can be used like a ninja star….(tic))


———————————————————

Miss the good old trs-80 III. So do I even thought about trying to find a used one but this emulator popped up and is just the ticket.

You will need to create an html file that will start the whole process up.

TRS-80.html


<pre>&lt;!DOCTYPE html&gt;
&lt;html&gt;
&lt;head&gt;
&lt;script type="text/javascript" src="trsemu-1.4.js"&gt;&lt;/script&gt; 
&lt;head&gt;
&lt;body
onload="trsEmu.screen('scrn').button('btn').perf('graph').focus();"&gt; 
&lt;div id="scrn"&gt;
&lt;canvas width="512" height="384" style="background:black"&gt;
&lt;/canvas&gt;&lt;/div&gt;&lt;br&gt;
&lt;div id="graph"&gt;
&lt;canvas width="512" height="100" style="background:black"&gt;
&lt;/canvas&gt;&lt;/div&gt;&lt;br&gt;
&lt;input type="button"id="btn" value="Run"
  onClick="trsEmu.run('toggle');"&gt;
&lt;input type="button" value="Reset"
  onClick="trsEmu.run('reset');"&gt;
&lt;body&gt;
&lt;html&gt;</pre>

You will need to download the javascript code and put it the same folder that has the html.
$ wget http://people.cs.ubc.ca/~pphillip/trsemu-1.4.js
Then you will want to make a folder called tx in the same directory
go into the folder and download the following files:

$ wget http://people.cs.ubc.ca/~pphillip/tx/m3.png
$ wget http://people.cs.ubc.ca/~pphillip/tx/wdot.png
$ wget http://people.cs.ubc.ca/~pphillip/tx/red.png
$ wget http://people.cs.ubc.ca/~pphillip/tx/grn.png

Do not forget to change the ownership and permissions.

You should now be able to run the html file:

Installed on my web server:

Here are some notes to look at: Should work well from a web server,

What is this?

The TRS-80 Model III is an old 8-bit home computer. This web page emulates it using only Javascript. You’ll need a web browser with a fast Javascript engine. The latest (mid 2010) versions of Chrome, Safari and Opera will work well on a reasonably fast machine (2 GHz processor) Firefox will run, but not real-time, and IE is very slow (both should get faster within a year or so).
Click on the Run button to start the BASIC interpreter. You will need to press ENTER twice to get the actual BASIC ready prompt.
You can also try out a few other programs by selecting them in the table above. Note that the backslash (\) key is the TRS-80 clear key, needed to start Super Nova.
Oh, and, sorry in advance, the backspace button won’t leave the page because it is too useful for deleting characters. In fact, most short-cut keys won’t work as the emulator needs to intercept most key presses.

Technical Details

This emulator is really a testament to the extreme speed of modern computers and the astounding new Javascript interpreters. The combination can easily emulate the function of the TRS-80 running at 2 MHz. That’s well over 100,000 emulated instructions per second! The code here came from converting the C code my twin brother wrote for trs80gp into Javascript. That would have been easy except that he used features of C (like pointers) and I had to spend some time undoing all that cleverness.
Most TRS-80 games had sound effects by using the cassette port. But this emulator doesn’t have any sound effects because I don’t know of a portable way to play dynamically generated sound in Javascript.
I haven’t spent a great deal of time testing it although I’ve ran about a dozen different programs with no noticable problems.
It was a hassle to get the emulator running on a selection of browsers. Some didn’t support the <canvas> tag (IE and Opera) and the workaround version using CSS sprites required a horrific amount of fiddling. There’s a bit of VBScript in here to allow IE to load binary data using AJAX. And, finally, the key codes generated varies a bit from browser to browser. I could have used JQuery or some other library but doing it by myself was educational. (Although I’ll admit I haven’t tried to cover a very wide range of browsers at all). At one point the emulator did function using Opera for the Wii and the PS3’s internal browser–but far too slow to be usable. Owners of iPads or iPhone 3GS or better should be able to get the Cass? prompt going, again, a bit slowly.
About the keyboard. The original TRS-80 keyboard is somewhat different from contemporary PC keyboards and does not support as many keys. The emulator tries to map the key you press to the appropriate TRS-80 combination. The old BREAK key is available by typing ESC and the CLEAR key is available via backslash. Here’s the original keyboard layout with the shift keys. (Assuming you have a PC keyboard–but it should work pretty similar on a Macintosh)

TRS-80 keyboard layout
1  2  3  4  5  6  7  8  9  0  :  -  BK
 up Q  W  E  R  T  Y  U  I  O  P  @  lf rt
  dn A  S  D  F  G  H  J  K  L  ;  EN CL
   sh Z  X  C  V  B  N  ,  .  /  sh
           S P A C E B A R

Holding shift:

!  "  #  $  %  &  '  (  )  01 *  =  BK
 up Q  W  E  R  T  Y  U  I  O  P  `  lf rt2
  dn A  S  D  F  G  H  J  K  L  +  EN CL
   sh Z  X  C  V  B  N  <  >  ?  sh
           S P A C E B A R

Notes:

  1. Shift-Zero toggles between upper case only/lower case input. Use underscore on your keyboard to get this function.
  2. Shift-right arrow switches to 32 character wide mode.

Multiple emulators can be created on a page. Use trsEmu.mknew() to create a new emulator and then give it its own .screen(). You will have to deal with the focus, perhaps via an onclick callback. Run binaries with the trsEmu.run() command. Just pass it a URL fragment and it will load the executable from your site using AJAX. It supports the .cmd, .hex (zmac output), .3bn (system tapes) and .bas formats. The .bas format is just an ASCII text version of a BASIC program.
Version 1.3 added support for the .cas cassette tape format and binary basic programs.
The .run() command also works as a macros if the string contains one of the |, [] or {} characters. Here are the meanings (and look at this page for examples):

  • | resets the machine.
  • {filename} loads filename into memory (and executes if binary)
  • [count] delays for count frames.
  • ~ is ignored but forces macro mode.
  • other characters are typed literally to the keyboard.

For example, the following statement will reset, load foo.bas, and run it:

trsemu.run("|[1]_\r0\r[1]{foo.bas}RUN\r")

(Which, BTW, is done automatically when run is passed a string ending in .bas).

That’s all

———————————————————

#1

Admin hint for the day. Keep a list of mac addresses for the network interfaces., Reason I say this is that people will invariably want to use their own equipment on your network i .e. using your bandwidth among other things. Usually if you only use a standard type of network interface, you can go to the dhcp server and see the nonstandard nic mac address stick out like a sore thumb allowing you to pursue the matter further. If there are no oddball mac addresses, you can also compare all network connects against the existing database. If a nic mac address does not match, your off to investigate. You could exclude the non-standard interfaces, but on a public network that is not always practical.

If something nefarious was definitely going on, we would shut down the port at the switch. But then they would know you are on to them. Takes judgment.

#2


Have seen several articles about ow MSAdmins are balking about having to use the command line. It amuses me quite a bit. Not so long ago a company called Sysinternals (since bought by Microsoft) came out with a set of commands called pstools, psexec, and etc, At that particular time., I was working for a company that had a campus of several square miles. During the summer, doing sneaker support. could be a real challenge. With the Sysinternals software,you could add, remove, and change software all from one point without running around during bad weather days, plus it saved a lot of time.

Eventually the company I worked for eventually acquired gui based software that did pretty much the same thing but was godly expensive and tremendously not foolproof, The Issues may have been resolved by now, but I have not kept up with it. Left my employer not long after that.

It is interesting now that M$ is using that kind of command line methodology with their new servers. This makes sense because you can script aka make  batch files to not only automate many tasks but easily document exactly what is done. Easily repeatable and easily do it remotely. You can then take those files and easily edit them for other tasks. You can not really do that with the mouse aka gui environment

———————————————————

Went to run the nfl score scraper and notice that if did not run anymore.   Found a web page that pretty much does it for you. So you can get the scores from the command line.

links2 -dump “http://scoresline.com/scores.asp?Date=9/13/2015&F=NFL&#8221;

———————————————————

Admin hint of the day: Understanding permissions on linux at first can be unsettling. There are several applications that you can access on-line to make it easier. If you have your own server, you can setup the application there and not be dependent on the net.

For more information see: http://catcode.com/teachmod/

———————————————————

(Updated with correct code. copied wrong code!)

Ever wanted to quickly whether a web server is up without going to the web page. Here is a quickie static cgi-bin script to do that. You can even check not only on local servers but most any web server on the net. The lines that do not have an ip address are virtual hosts from the last mentioned IP address. You will need to refresh the page to get the latest status.

The code is written in PHP, so PHP will need to be installed as well as the cgi-bin directory enabled. Most lamp servers have this already setup. There are probably better scripts but this one was quick and dirty.

)corrected)

&amp;nbsp;&amp;lt;html&amp;gt;
&amp;lt;body&amp;gt;

&amp;lt;hr&amp;gt;
&amp;lt;center&amp;gt;
&amp;lt;h2&amp;gt;
Web Server status
&amp;lt;/h2&amp;gt;
&amp;lt;/center&amp;gt;
&amp;lt;hr&amp;gt;
&amp;lt;br /&amp;gt;
&amp;lt;table border="1" cellpadding="10"&amp;gt;
&amp;lt;tr&amp;gt;
&amp;lt;td&amp;gt;
Ipaddress
&amp;lt;/td&amp;gt;
&amp;lt;td&amp;gt;
Site (and link)
&amp;lt;/td&amp;gt;
&amp;lt;td&amp;gt;
Description
&amp;lt;/td&amp;gt;
&amp;lt;td&amp;gt;
Server status
&amp;lt;/td&amp;gt;
&amp;lt;/tr&amp;gt;
&amp;lt;tr&amp;gt;
&amp;lt;tr&amp;gt;
&amp;lt;td&amp;gt;
192.168.1.31
&amp;lt;/td&amp;gt;
&amp;lt;td&amp;gt;
&amp;lt;a href="http://oesrvr1"&amp;gt;Offshore Educators&amp;lt;/a&amp;gt;
&amp;lt;/td&amp;gt;
&amp;lt;td&amp;gt;
Old school site
&amp;lt;/td&amp;gt;
&amp;lt;td&amp;gt;
&amp;lt;?php
if (fsockopen('oesrvr1', 80)){
echo('Online');
} else{
echo('The server is offline');
}
?&amp;gt;
&amp;lt;/td&amp;gt;
&amp;lt;/tr&amp;gt;
&amp;lt;tr&amp;gt;
&amp;lt;td&amp;gt;
192.168.1.32
&amp;lt;/td&amp;gt;
&amp;lt;td&amp;gt;
&amp;lt;a href="http://oeorgan1"&amp;gt;Offshore Educators&amp;lt;/a&amp;gt;
&amp;lt;/td&amp;gt;
&amp;lt;td&amp;gt;
New school site
&amp;lt;/td&amp;gt;
&amp;lt;td&amp;gt;
&amp;lt;?php
if (fsockopen('oeorgan1', 80)){
echo('Online');
} else{
echo('The server is offline');
}
?&amp;gt;
&amp;lt;/td&amp;gt;
&amp;lt;/tr&amp;gt;
&amp;lt;tr&amp;gt;

&amp;lt;tr&amp;gt;
&amp;lt;td&amp;gt;

&amp;lt;/td&amp;gt;
&amp;lt;td&amp;gt;
&amp;lt;a href="http://www.myposgarage.com"&amp;gt;Myposgarage&amp;lt;/a&amp;gt;
&amp;lt;/td&amp;gt;
&amp;lt;td&amp;gt;
The store
&amp;lt;/td&amp;gt;
&amp;lt;td&amp;gt;
&amp;lt;?php
if (fsockopen('www.myposgarage.com', 80)){
echo('Online');
} else{
echo('The server is offline');
}
?&amp;gt;
&amp;lt;/td&amp;gt;
&amp;lt;/tr&amp;gt;
&amp;lt;tr&amp;gt;
&amp;lt;td&amp;gt;

&amp;lt;/td&amp;gt;
&amp;lt;td&amp;gt;
&amp;lt;a href="http://www.softserv.com"&amp;gt;Softserv&amp;lt;/a&amp;gt;
&amp;lt;/td&amp;gt;
&amp;lt;td&amp;gt;
Software development
&amp;lt;/td&amp;gt;
&amp;lt;td&amp;gt;
&amp;lt;?php
if (fsockopen('www.softserv.com', 80)){
echo('Online');
} else{
echo('The server is offline');
}
?&amp;gt;
&amp;lt;/td&amp;gt;
&amp;lt;/tr&amp;gt;
&amp;lt;tr&amp;gt;
&amp;lt;!--
&amp;lt;td&amp;gt;
&amp;lt;a href="http://www.myposgarage.com"&amp;gt;Myposgarage&amp;lt;/a&amp;gt;
&amp;lt;/td&amp;gt;
&amp;lt;td&amp;gt;
The store
&amp;lt;/td&amp;gt;

&amp;lt;td&amp;gt;
&amp;lt;?php
if (fsockopen('www.myposgarage.com', 80)){
echo('Online');
} else{
echo('The server is offline');
}
?&amp;gt;
&amp;lt;/td&amp;gt;
--&amp;gt;
&amp;lt;/tr&amp;gt;
&amp;lt;tr&amp;gt;
&amp;lt;td&amp;gt;

&amp;lt;/td&amp;gt;
&amp;lt;td&amp;gt;
&amp;lt;a href="http://www.www.thefoodhistory.com"&amp;gt;The food history.com&amp;lt;/a&amp;gt;
&amp;lt;/td&amp;gt;
&amp;lt;td&amp;gt;
Food history
&amp;lt;/td&amp;gt;
&amp;lt;td&amp;gt;
&amp;lt;?php
if (fsockopen('www.thefoodhistory.com', 80)){
echo('Online');
} else{
echo('The server is offline');
}
?&amp;gt;
&amp;lt;/td&amp;gt;
&amp;lt;/tr&amp;gt;
&amp;lt;tr&amp;gt;
&amp;lt;td&amp;gt;

&amp;lt;/td&amp;gt;
&amp;lt;td&amp;gt;
&amp;lt;a href="http://www.misslizziesworld.com"&amp;gt;Miss Lizzies world&amp;lt;/a&amp;gt;
&amp;lt;/td&amp;gt;
&amp;lt;td&amp;gt;
Womans world
&amp;lt;/td&amp;gt;
&amp;lt;td&amp;gt;
&amp;lt;?php
if (fsockopen('www.misslizziesworld.com', 80)){
echo('Online');
} else{
echo('The server is offline');
}
?&amp;gt;
&amp;lt;/td&amp;gt;
&amp;lt;/tr&amp;gt;
&amp;lt;tr&amp;gt;
&amp;lt;td&amp;gt;

&amp;lt;/td&amp;gt;
&amp;lt;td&amp;gt;
&amp;lt;a href="http://www.yourdrsmedicalrecords.com"&amp;gt;Dr's office&amp;lt;/a&amp;gt;
&amp;lt;/td&amp;gt;
&amp;lt;td&amp;gt;
Medical office
&amp;lt;/td&amp;gt;
&amp;lt;td&amp;gt;
&amp;lt;?php
if (fsockopen('www.yourdrsmedicalrecords.com', 80)){
echo('Online');
} else{
echo('The server is offline');
}
?&amp;gt;
&amp;lt;/td&amp;gt;
&amp;lt;/tr&amp;gt;
&amp;lt;tr&amp;gt;
&amp;lt;td&amp;gt;
192.168.1.33
&amp;lt;/td&amp;gt;
&amp;lt;td&amp;gt;
&amp;lt;a href="http://oesrvr3"&amp;gt;Offshore Educators&amp;lt;/a&amp;gt;
&amp;lt;/td&amp;gt;
&amp;lt;td&amp;gt;
Nslu2
&amp;lt;/td&amp;gt;
&amp;lt;td&amp;gt;
&amp;lt;?php
if (fsockopen('oesrvr3', 80)){
echo('Online');
} else{
echo('The server is offline');
}
?&amp;gt;
&amp;lt;/td&amp;gt;
&amp;lt;/tr&amp;gt;
&amp;lt;tr&amp;gt;
&amp;lt;td&amp;gt;
192.168.1.34
&amp;lt;/td&amp;gt;
&amp;lt;td&amp;gt;
&amp;lt;a href="http://archie"&amp;gt;Alarm&amp;lt;/a&amp;gt;
&amp;lt;/td&amp;gt;
&amp;lt;td&amp;gt;
Arch pogoplug
&amp;lt;/td&amp;gt;
&amp;lt;td&amp;gt;
&amp;lt;?php
if (fsockopen('alarm', 80)){
echo('Online');
} else{
echo('The server is offline');
}
?&amp;gt;
&amp;lt;/td&amp;gt;
&amp;lt;/tr&amp;gt;

&amp;lt;tr&amp;gt;
&amp;lt;td&amp;gt;
192.168.1.120
&amp;lt;/td&amp;gt;
&amp;lt;td&amp;gt;
&amp;lt;a href="http://typo1"&amp;gt;Typo1&amp;lt;/a&amp;gt;
&amp;lt;/td&amp;gt;
&amp;lt;td&amp;gt;
Pxe server
&amp;lt;/td&amp;gt;
&amp;lt;td&amp;gt;
&amp;lt;?php
if (fsockopen('typo1', 80)){
echo('Online');
} else{
echo('The server is offline');
}
?&amp;gt;
&amp;lt;/td&amp;gt;
&amp;lt;/tr&amp;gt;

&amp;lt;tr&amp;gt;
&amp;lt;td&amp;gt;
Secret
&amp;lt;/td&amp;gt;
&amp;lt;td&amp;gt;
&amp;lt;a href="http://www.google.com"&amp;gt;Google&amp;lt;/a&amp;gt;
&amp;lt;/td&amp;gt;
&amp;lt;td&amp;gt;
Search engine
&amp;lt;/td&amp;gt;
&amp;lt;td&amp;gt;
&amp;lt;?php
if (fsockopen('www.google.com', 80)){
echo('Online');
} else{
echo('The server is offline');
}
?&amp;gt;

&amp;lt;/table&amp;gt;
&amp;lt;/body&amp;gt;
&amp;lt;/html&amp;gt;

———————————————————

What is for dinner”

So busy, I forgot to make it.

Good day!

Out of it

Leave a comment

Chit chat

———–

Been goofing off so there is not much to report.

———————————————————-

No matter what system you use or even if you do everything by hand, you will need a typewriter (editor), Filing cabinet (database), and an financial worksheet (spreadsheet). Everyone knows about vim, nano, and  for using as editor or word processor. If you have ever wanted to set up a filing cabinet or database, you probably have heard of Mysql (or one of the variants), Postgresql, or even Nosql.

What many people have not heard of is a spreadsheet for the command line.One interesting spreadsheet is called simply enough called sc. Some people may lead you to believe it will only support just numbers that is not true.

You can even get a help file with:

$ scqref > sc_commands


A:   This overview
B:   Toggle Options
C:   Set Options
D:   Cursor movement commands
E:   Cell entry and editing commands
F:   Line Editing
G:   File commands
H:   Row and column commands
I:   Range commands
J:   Miscellaneous commands
K:   Variable names/Expressions
L:   Range functions
M:   Numeric functions
N:   String functions
O:   Financial functions
P:   Time and date functions

There is even a tutorial you can use:

$ sc /usr/share/doc/sc/tutorial.sc

Though we like to use out own home grown spreadsheet called lizzyclc. Lizzyclc was created with Freebasic, so it is easy to update for adding new features.

Also the command structure is easier to follow for a new user.

Thats all..

———————————————————-

Server upgrades.

Upgrading the operating system on your home machine is a piece of cake compared to doing it in the server environment, Generally when you care changing a server os, you use a new systems so that if there are issues you can go back to the old system as a failsafe. There are always issues setup up new operating systems especially with hardware drivers, so dealing with that can be fun.

When you set up a new system the storage formats are completely different.   Some applications will balk at that, In some cases it could be just a permissions problem. Also network printers and input devices have to be set up. Remembering once when we went from Novell to NT printing out student invoices did not work or barely worked. The consulting company said it worked when they tested it, but never really did a mass testing. We ended up pooling printers to make things work well enough till a better fix was done.

To add to that scenario, you have to make sure the general permissions of files are correctly setup. For instance, years ago everything was locked down on Novell, Microsoft there was no real security, so you had to go directory, and file by file and change as needed.

There were always server applications that did not want to work with the newer systems OS applications could and will fail, This is especially true with specific permissions access.  You will need to make adjustments to allow your applications work in the new environment. . This was even true between versions of Microsoft servers. You would have to contact vendors for fixes and updates which on many cases the vendors were reluctant to do. In many cases you had to perform miracles on your own to make things work,  That led to issues, because vendors would threaten to sue you if you changed their software for copyright and or other violations.

Once you had that done, you had to go application by application to make sure the clients interacted with the server properly. This meant you had to completely revise your control (batch, shell, etc) files because the same scripts would no longer work anymore. Then you had to go to the clients and correct shortcuts to connect to the new control files. We usually just built a new image to work with.  Then there was the testing and retesting to make sure everything worked, That was just the tip of the iceberg.. Moving on, Of course, all this had to be done without the user ever knowing a change was made.  Being a software administrator is so much fun,

———————————————————-

Not so many years ago when I was a tech, needed to use the internet to solve a vital problem. The internet was allegedly down. Contacted the administrator (who had umpteen MSce certifications) who in charge of that area confirmed that the net was inaccessible because they were having problems. So I asked what I could do and the reply was nothing could be done.

Being independent as I am and not willing to give up so easily, I decided to tinker a bit.  Decided to go into the student CS lab and use one of the desktops as a test machine. Having set up a lot of the cabling and routers, was pretty knowledgeable of the systems, Fortunately also had systems admin rights also in those systems. Now for the tinkering,.

Logged into a system and immediately went to the ip settings. Dns server was down so, I used a public dns server in its place of the local dns server.  Could not get a ip address from that server, so I used a static ip address that would not interfere with the network if the local dhcp came back up. Saved the settings and restarted the system.

When the system came back up, I logged in and fired up the web browser. Guess what  There was now internet. Was able to get my research done that I needed. Then I reset the settings back on the system for normal use. More than one way to skin a cat. Never took the systems administrator very seriously after that. Actually I was a member of that same IT team.

———————————————————-

One of the simplest graphs I have seen can be done in bash. You will need a data file and a one line executable to extract the data from the file and then display it.

data:
Irene     10
Karen     37
Andreas   41
Beatrice  23

Code:
SCALE=1; WIDTHL=10; WIDTHR=60; BAR=”12345678″; BAR=”${BAR//?/==========}”; while read LEFT RIGHT rest ; do RIGHT=$((RIGHT/SCALE)); printf “%${WIDTHL}s: %-${WIDTHR}s\n” “${LEFT:0:$WIDTHL}” “|${BAR:0:$RIGHT}*”; done < data

Result:
Irene: |==========*
Karen: |=====================================*                       Andreas: |=========================================*
Beatrice: |=======================*

Another script:

 bar="=================================================="
  barlength=${#bar}
  i=0
  while ((i < 100)); do
    n=$((i*barlength / 100))       # Number of bar segments to draw $((i/2))
    printf "\r[%-${barlength}s]" "${bar:0:n}"
    ((i += RANDOM%5+2))            # i = percentage done
    sleep 1
  done
  echo

The you could get a bit more fancy with a bit of animation.

&nbsp;# !/bin/sh
#
# Bargraph_Generator.sh
#
# A DEMO 6 bit coloured bargraph animation for a default Bash and Terminal window on OSX 10.7.5...
# A simple Shell script to display an _AT_A_GLANCE_ real time analogue bargraph generator. It
# starts off with GREEN for OK, then YELLOW for warning and finally ending with RED for danger
# with a critical beep for values 61 to 63 inclusive.
# It assumes an 8 bit value being injected into the script which is then divided by 4 to give
# a 6 bit value which is 64 spaces width inside the Terminal. The DEMO uses a random number
# generator to give a representation of an 8 bit value so you can see it working...
#
# A shell derivative of my Python code:-
# http://code.activestate.com/recipes/577612-seven-bit-colored-analogue-bar-graph-generator-dem/?in=user-4177147
#
# To run, ensure the script is executable and change if required, then type from a Terminal:-
#
# xxxxx$ /full/path/to/Bargrapth_Generator.sh&lt;CR&gt;
#
# And away you go...
#
# Written in such a way that kids and newbies can understand what is going on.
#
# Originally written for a Macbook Pro 13 inch, OSX 10.7.5 using the default Terminal.
# It MIGHT work on some Linux variants but WAS intended for MacOS OSX 10.7.x and above only.
#
# The Terminal colours WILL be changed to Black background and Various foreground colours.
# It will NOT be returned back to its original state although it can be easily. If you
# need to rerturn back to default state then there are a couple of easy methods the
# simplest being type:-
#
# xxxxx$ reset&lt;CR&gt;
#
# And all will be corrected...
#
# Issued entirely as Public Domain and you may do with it as you please
#
# $VER Bargraph_Generator.sh_Version_0.00.10_(C)2012_B.Walker_G0LCU.
#
# Enjoy finding simple solutions to often very difficult problems...

# The required _varibales_ for ease of coding, these are the colours...
# White On Black.
WOB="\x1B[1;37;40m"
# Black On Green.
BOG="\x1B[1;30;42m"
# Black On Yellow.
BOY="\x1B[1;30;43m"
# Black On red.
BOR="\x1B[1;30;41m"
# Green On Black.
GOB="\x1B[1;32;40m"
# Yellow On Black.
YOB="\x1B[1;33;40m"
# Red On Black.
ROB="\x1B[1;31;40m"

# Set the pseudo 6 bit value to zero.
SIX_BIT_DEPTH=0

# Do a clear screen to White On Black.
printf $WOB
clear

while true
do
&nbsp;&nbsp; &nbsp;# Set up the screen per scan and prepare for the bargraph.
&nbsp;&nbsp; &nbsp;clear
&nbsp;&nbsp; &nbsp;printf $WOB"\n \$VER: Bargraph_Generator.sh_Version_0.00.10_(C)2012_B.Walker_G0LCU.\n\n"
&nbsp;&nbsp; &nbsp;printf " A horizontal, at a glance, coloured, analogue bargraph display for\n"
&nbsp;&nbsp; &nbsp;printf " a default Terminal inside OSX 10.7.5..\n\n\n\n\n"
&nbsp;&nbsp; &nbsp;printf "&nbsp;&nbsp;&nbsp;&nbsp;&nbsp;&nbsp;&nbsp; 0&nbsp;&nbsp;&nbsp;&nbsp;&nbsp;&nbsp;&nbsp;&nbsp; 10&nbsp;&nbsp;&nbsp;&nbsp;&nbsp;&nbsp;&nbsp; 20&nbsp;&nbsp;&nbsp;&nbsp;&nbsp;&nbsp;&nbsp; 30&nbsp;&nbsp;&nbsp;&nbsp;&nbsp;&nbsp;&nbsp; 40&nbsp;&nbsp;&nbsp;&nbsp;&nbsp;&nbsp;&nbsp; 50&nbsp;&nbsp;&nbsp;&nbsp;&nbsp;&nbsp;&nbsp; 60"
&nbsp;&nbsp; &nbsp;printf $GOB"\n&nbsp;&nbsp;&nbsp;&nbsp;&nbsp;&nbsp;&nbsp; +----+----+----+----+----+----+----+----+----+"$YOB"----+----+"$ROB"----+--\n"
&nbsp;&nbsp; &nbsp;printf $GOB"&nbsp;&nbsp;&nbsp;&nbsp;&nbsp;&nbsp; (|&nbsp;&nbsp;&nbsp;&nbsp;&nbsp;&nbsp;&nbsp;&nbsp;&nbsp;&nbsp;&nbsp;&nbsp;&nbsp;&nbsp;&nbsp;&nbsp;&nbsp;&nbsp;&nbsp;&nbsp;&nbsp;&nbsp;&nbsp;&nbsp;&nbsp;&nbsp;&nbsp;&nbsp;&nbsp;&nbsp;&nbsp;&nbsp;&nbsp;&nbsp;&nbsp;&nbsp;&nbsp;&nbsp;&nbsp;&nbsp;&nbsp;&nbsp;&nbsp;&nbsp;&nbsp;&nbsp;&nbsp;&nbsp;&nbsp;&nbsp;&nbsp;&nbsp;&nbsp;&nbsp;&nbsp;&nbsp;&nbsp;&nbsp;&nbsp;&nbsp;&nbsp; "$ROB")\n"
&nbsp;&nbsp; &nbsp;printf $GOB"&nbsp;&nbsp;&nbsp;&nbsp;&nbsp;&nbsp;&nbsp; +----+----+----+----+----+----+----+----+----+"$YOB"----+----+"$ROB"----+--\n\n\n\n"
&nbsp;&nbsp; &nbsp;# If the 6 bit value is 0, zero, do no more until printing the 6 bit value and generating another 6 bit value...
&nbsp;&nbsp; &nbsp;# Anything greater than or equal to 1 enters this conditional branch.
&nbsp;&nbsp; &nbsp;if [ "$SIX_BIT_DEPTH" -ge "1" ]
&nbsp;&nbsp; &nbsp;then
&nbsp;&nbsp; &nbsp;&nbsp;&nbsp; &nbsp;# If the 6 bit value is less than or equal to 46 then _plot_ the green section only.
&nbsp;&nbsp; &nbsp;&nbsp;&nbsp; &nbsp;# The '\x1B[12;8f' is the ANSI 'Esc' code that forces the print position to 12 lines by 8 columns.
&nbsp;&nbsp; &nbsp;&nbsp;&nbsp; &nbsp;if [ "$SIX_BIT_DEPTH" -le "46" ]
&nbsp;&nbsp; &nbsp;&nbsp;&nbsp; &nbsp;then
&nbsp;&nbsp; &nbsp;&nbsp;&nbsp; &nbsp;&nbsp;&nbsp; &nbsp;BARGRAPH=$GOB"\x1B[12;8f("$BOG
&nbsp;&nbsp; &nbsp;&nbsp;&nbsp; &nbsp;&nbsp;&nbsp; &nbsp;for green in $(seq 1 "$SIX_BIT_DEPTH")
&nbsp;&nbsp; &nbsp;&nbsp;&nbsp; &nbsp;&nbsp;&nbsp; &nbsp;do
&nbsp;&nbsp; &nbsp;&nbsp;&nbsp; &nbsp;&nbsp;&nbsp; &nbsp;&nbsp;&nbsp; &nbsp;BARGRAPH=$BARGRAPH" "
&nbsp;&nbsp; &nbsp;&nbsp;&nbsp; &nbsp;&nbsp;&nbsp; &nbsp;done
&nbsp;&nbsp; &nbsp;&nbsp;&nbsp; &nbsp;fi
&nbsp;&nbsp; &nbsp;&nbsp;&nbsp; &nbsp;# If the 6 bit value is greater than or equal to 47 then print the green section and _plot_ the yellow section.
&nbsp;&nbsp; &nbsp;&nbsp;&nbsp; &nbsp;if [ "$SIX_BIT_DEPTH" -ge "47" ]
&nbsp;&nbsp; &nbsp;&nbsp;&nbsp; &nbsp;then
&nbsp;&nbsp; &nbsp;&nbsp;&nbsp; &nbsp;&nbsp;&nbsp; &nbsp;BARGRAPH=$GOB"\x1B[12;8f("$BOG"&nbsp;&nbsp;&nbsp;&nbsp;&nbsp;&nbsp;&nbsp;&nbsp;&nbsp;&nbsp;&nbsp;&nbsp;&nbsp;&nbsp;&nbsp;&nbsp;&nbsp;&nbsp;&nbsp;&nbsp;&nbsp;&nbsp;&nbsp;&nbsp;&nbsp;&nbsp;&nbsp;&nbsp;&nbsp;&nbsp;&nbsp;&nbsp;&nbsp;&nbsp;&nbsp;&nbsp;&nbsp;&nbsp;&nbsp;&nbsp;&nbsp;&nbsp;&nbsp;&nbsp;&nbsp; "$BOY
&nbsp;&nbsp; &nbsp;&nbsp;&nbsp; &nbsp;&nbsp;&nbsp; &nbsp;for yellow in $(seq 47 "$SIX_BIT_DEPTH")
&nbsp;&nbsp; &nbsp;&nbsp;&nbsp; &nbsp;&nbsp;&nbsp; &nbsp;do
&nbsp;&nbsp; &nbsp;&nbsp;&nbsp; &nbsp;&nbsp;&nbsp; &nbsp;&nbsp;&nbsp; &nbsp;BARGRAPH=$BARGRAPH" "
&nbsp;&nbsp; &nbsp;&nbsp;&nbsp; &nbsp;&nbsp;&nbsp; &nbsp;done
&nbsp;&nbsp; &nbsp;&nbsp;&nbsp; &nbsp;fi
&nbsp;&nbsp; &nbsp;&nbsp;&nbsp; &nbsp;# If the 6 bit value is greater than or equal to 57 then print the green and yellow section and _plot_ the red section.
&nbsp;&nbsp; &nbsp;&nbsp;&nbsp; &nbsp;if [ "$SIX_BIT_DEPTH" -ge "57" ]
&nbsp;&nbsp; &nbsp;&nbsp;&nbsp; &nbsp;then
&nbsp;&nbsp; &nbsp;&nbsp;&nbsp; &nbsp;&nbsp;&nbsp; &nbsp;BARGRAPH=$GOB"\x1B[12;8f("$BOG"&nbsp;&nbsp;&nbsp;&nbsp;&nbsp;&nbsp;&nbsp;&nbsp;&nbsp;&nbsp;&nbsp;&nbsp;&nbsp;&nbsp;&nbsp;&nbsp;&nbsp;&nbsp;&nbsp;&nbsp;&nbsp;&nbsp;&nbsp;&nbsp;&nbsp;&nbsp;&nbsp;&nbsp;&nbsp;&nbsp;&nbsp;&nbsp;&nbsp;&nbsp;&nbsp;&nbsp;&nbsp;&nbsp;&nbsp;&nbsp;&nbsp;&nbsp;&nbsp;&nbsp;&nbsp; "$BOY"&nbsp;&nbsp;&nbsp;&nbsp;&nbsp;&nbsp;&nbsp;&nbsp;&nbsp; "$BOR
&nbsp;&nbsp; &nbsp;&nbsp;&nbsp; &nbsp;&nbsp;&nbsp; &nbsp;for red in $(seq 57 "$SIX_BIT_DEPTH")
&nbsp;&nbsp; &nbsp;&nbsp;&nbsp; &nbsp;&nbsp;&nbsp; &nbsp;do
&nbsp;&nbsp; &nbsp;&nbsp;&nbsp; &nbsp;&nbsp;&nbsp; &nbsp;&nbsp;&nbsp; &nbsp;BARGRAPH=$BARGRAPH" "
&nbsp;&nbsp; &nbsp;&nbsp;&nbsp; &nbsp;&nbsp;&nbsp; &nbsp;done
&nbsp;&nbsp; &nbsp;&nbsp;&nbsp; &nbsp;fi
&nbsp;&nbsp; &nbsp;&nbsp;&nbsp; &nbsp;printf "$BARGRAPH"$GOB"\n\n\n\n\n"
&nbsp;&nbsp; &nbsp;fi
&nbsp;&nbsp; &nbsp;# When the 6 bit value is greater than or equal to 61 sound a system error beep.
&nbsp;&nbsp; &nbsp;if [ "$SIX_BIT_DEPTH" -ge "61" ]
&nbsp;&nbsp; &nbsp;then
&nbsp;&nbsp; &nbsp;&nbsp;&nbsp; &nbsp;printf "\a"
&nbsp;&nbsp; &nbsp;fi
&nbsp;&nbsp; &nbsp;# Print the 6 bit value in White On Black...
&nbsp;&nbsp; &nbsp;printf $WOB" Random number generated "$SIX_BIT_DEPTH"...\n\n"
&nbsp;&nbsp; &nbsp;printf " Press Ctrl-C to stop the program...\n\n"
&nbsp;&nbsp; &nbsp;# Generate another 6 bit value as though from an 8 bit value...
&nbsp;&nbsp; &nbsp;SIX_BIT_DEPTH=$[($RANDOM % (256/4))]
&nbsp;&nbsp; &nbsp;# A practical lower limit for the sleep command is 'sleep 0.05'...
&nbsp;&nbsp; &nbsp;sleep 1
done

# End of Bargraph_Generator.sh DEMO.
# Enjoy finding simple solutions to often very difficult problems... ;o)

One step farther:

Or then you could use a built in program such as gnuplot. It is well documented and there are a zillion examples on the web.

Here is a simple data file:

# sample 2-column data file
# ————————-
1     1
2     4
3     9
4    16
5    25
6    36
7    49
8    64
9    81
10  100

The you want to fire up gnuplot

$ gnuplot

G N U P L O T
Version 4.6 patchlevel 0    last modified 2012-03-04
Build System: Linux i686

Copyright (C) 1986-1993, 1998, 2004, 2007-2012
Thomas Williams, Colin Kelley and many others

gnuplot home:     http://www.gnuplot.info
faq, bugs, etc:   type “help FAQ”
immediate help:   type “help”  (plot window: hit ‘h’)

Terminal type set to ‘unknown’
gnuplot>

Set a simple terminal for now

gnuplot> set term dumb

Now let’s use that data file

gnuplot> plot ‘2col.dat’

Or if you have Imagemagick installed you can get a bit fancier.

gnuplot> set term png
Terminal type set to ‘png’
Options are ‘nocrop font “/usr/share/fonts/truetype/liberation/LiberationSans-Regular.ttf,12” fontscale 1.0 size 640,480 ‘

gnuplot>               set output ‘| display png:-‘

Then run your plot again

gnuplot> plot ‘2col.dat’ with linespoints

Try a different data file

1,    1,   2,   5
2,    4,   4,  10
3,    9,   6,  15
4,   16,   8,  20
5,   25,  10,  25
6,   36,  12,  30
7,   49,  14,  35
8,   64,  16,  40
9,   81,  18,  45
10, 100,  20,  50

gnuplot> plot '4col.csv' using 1:2 with lines, '4col.csv' using 1:3 with lines
gnuplot> plot '4col.csv' using 1:2 with lines, '4col.csv' using 1:3 with lines, '4col.csv' using 1:4 with lines


gnuplot>               set term png
Terminal type set to ‘png’
Options are ‘nocrop font “/usr/share/fonts/truetype/liberation/LiberationSans-Regular.ttf,12” fontscale 1.0 size 640,480 ‘
gnuplot>               set output ‘| display png:-‘
gnuplot> set style line 1 lc rgb “red”
gnuplot> set style line 2 lc rgb “blue”
gnuplot>
gnuplot> set style fill solid
gnuplot> set boxwidth 0.5
gnuplot>
gnuplot> plot “data.dat” every ::0::0 using 1:3:xtic(2) with boxes ls 1, \
>     “data.dat” every ::1::2 using 1:3:xtic(2) with boxes ls 2
gnuplot>


gnuplot>               set term png
Terminal type set to ‘png’
Options are ‘nocrop font “/usr/share/fonts/truetype/liberation/LiberationSans-Regular.ttf,12” fontscale 1.0 size 640,480 ‘
gnuplot>               set output ‘| display png:-‘
gnuplot>
gnuplot> set xrange [-pi/2:pi/2]; set yrange [-pi/2:pi/2]
gnuplot> set contour
gnuplot> set isosamples 100,100; set samples 100,100
gnuplot> splot sin(x)*cos(y) with lines palette linewidth 4
smooth palette in png: using 160 of 160 available color positions
gnuplot> pause -1

The sky is the limit have fun.
——————————————
Update:

Each script takes in a csv file as input and “plots” the values as an ASCII graph in the terminal. It’s questionable how useful this actually is, but it’s a bit of fun at least. The SCALE variable controls the amount of characters used for the width of the plot area (not including the table containing labels and values).
Simple: Plot Values of each item
input file: sales

january,140
february,29
march,26
april,54
may,72
june,86

output: ./vgraph sales


 Relative Value Chart
Name      Value (Max is 140)
____________________0_________._________|_________._________|100% (140)
january      140    |========================================
february     29     |========
march        26     |=======
april        54     |===============
may          72     |====================
june         86     |========================

Percentage graph using value and max for each item

input file: stock-list

apples,20,100
pears,40,50
cherries,100,150
mangoes,45,85
tomatoes,30,30

output: ./pgraph stock-list


 Percentage Chart
____________________0_________._________|_________._________|100%
apples       ( 20%) |========
pears        ( 80%) |================================
cherries     ( 66%) |==========================
mangoes      ( 52%) |=====================
tomatoes     (100%) |========================================

And the scripts…. They are both very similar, just some minor tweaks to make them do what I wanted.

vgraph

Relative Value Chart

Name      Value (Max is 140)
____________________0_________._________|_________._________|100% (140)
january      140    |========================================
february     29     |========
march        26     |=======
april        54     |===============
may          72     |====================
june         86     |========================


#!/bin/bash
#
# Value Graph (vgraph)
# Basic ASCII Graphing Tool
#
# Plot values and scale to max
#
# CSV format: Name, Value
#
# Awk isn't perfect at rounding.. .5 rounds down
#
# v1.1 sol@subnetzero.org

if [ -z $1 ]; then
        printf "Usage: pgraph [datafile]\n"
        exit 1
fi

# Set Vars
# FILLER and ENDDELIM are used for drawing bars.
ENDDELIM="="
FILLER="="
SCALE=40
INPUTFILE=$1
NAME=(`awk -F"," '{print $1}' < "$INPUTFILE"`)
TOTAL=(`awk -F"," '{print $2}' < "$INPUTFILE"`)

# Get Max qty for scaling
MAXQTY=0
for VALUE in ${TOTAL[*]}
do
        if [ "$VALUE" -gt "$MAXQTY" ]; then
                MAXQTY=$VALUE
        fi
done

# Make graph header and markings
printf "\n Relative Value Chart\n"
printf "\nName      Value (Max is $MAXQTY)\n"
printf "____________________0"
QTRSCALE=`echo "$SCALE / 4" | bc -l | awk '{printf("%.0f",$0)}'`
HALFSCALE=`echo "$SCALE / 2" | bc -l | awk '{printf("%.0f",$0)}'`
THRSCALE=`echo "$SCALE * 0.75" | bc -l | awk '{printf("%.0f",$0)}'`
LCNT=1
while [ "$LCNT" -le "$SCALE" ];
do
        case $LCNT in
                $QTRSCALE)      printf ".";;
                $HALFSCALE)     printf "|";;
                $THRSCALE)      printf ".";;
                $SCALE)         printf "|100%% ($MAXQTY)\n";;
                *)              printf "_";;
        esac
        LCNT=$(( $LCNT + 1 ))
done

# Draw graph bars
i=0
for ITEM in ${NAME[*]}
do
        # Print Category name in format along with info and bars
        LENGTH=`echo "scale=2;(( ${TOTAL[$i]} / $MAXQTY ) * $SCALE )" |\
                bc |\
                awk '{printf("%.0f",$0)}'`
        printf "%-12.12s %-6.6s |" "$ITEM" "${TOTAL[$i]}"
        BLOCKS=""
        while [ "$LENGTH" -gt "0" ]; do
                if [ "$LENGTH" -eq "1" ]; then
                        BLOCKS="$BLOCKS$ENDDELIM"
                else
                        BLOCKS="$BLOCKS$FILLER"
                fi
                LENGTH=$(( $LENGTH - 1 ))
        done
        printf "$BLOCKS\n"
        i=$(( $i + 1 ))
done
printf "\n\n"

pgraph


 ./pgraph.sh stock-list
max is 150

 Percentage Chart
____________________0_________._________|_________._________|100%
apples       ( 20%) |========
pears        ( 80%) |================================
cherries     ( 66%) |==========================
mangoes      ( 52%) |=====================
tomatoes     (100%) |========================================

#!/bin/bash
#
# PercentageGraph (pgraph)
# Basic ASCII Graphing Tool
#
# CSV format: Name,Used,Total (or Maximum)
#
# Awk isn't perfect at rounding.. .5 rounds down
#
# v1.1 sol@subnetzero.org

if [ -z $1 ]; then
        printf "Usage: pgraph [datafile]\n"
        exit 1
fi

# Set Vars
# FILLER and ENDDELIM are used for drawing bars.
ENDDELIM="="
FILLER="="
SCALE=40
INPUTFILE=$1
NAME=(`awk -F"," '{print $1}' < "$INPUTFILE"`)
USED=(`awk -F"," '{print $2}' < "$INPUTFILE"`)
TOTAL=(`awk -F"," '{print $3}' < "$INPUTFILE"`)

# Get Max qty for scaling
MAXQTY=0
for VALUE in ${TOTAL[*]}
do
        if [ "$VALUE" -gt "$MAXQTY" ]; then
                MAXQTY=$VALUE
        fi
done

echo "max is $MAXQTY"

# Make graph header and markings
printf "\n Percentage Chart\n"
printf "____________________0"
QTRSCALE=`echo "$SCALE / 4" | bc -l | awk '{printf("%.0f",$0)}'`
HALFSCALE=`echo "$SCALE / 2" | bc -l | awk '{printf("%.0f",$0)}'`
THRSCALE=`echo "$SCALE * 0.75" | bc -l | awk '{printf("%.0f",$0)}'`
LCNT=1
while [ "$LCNT" -le "$SCALE" ];
do
        case $LCNT in
                $QTRSCALE)      printf ".";;
                $HALFSCALE)     printf "|";;
                $THRSCALE)      printf ".";;
                $SCALE)         printf "|100%%\n";;
                *)              printf "_";;
        esac
        LCNT=$(( $LCNT + 1 ))
done

# Draw graph bars
i=0
for ITEM in ${NAME[*]}
do
        # Print Category name in format along with info and bars
        LENGTH=`echo "scale=2;(( ${USED[$i]} / ${TOTAL[$i]} ) * $SCALE )" |\
                bc | \
                awk '{printf("%.0f",$0)}'`
        PCT=`echo "scale=2;(( ${USED[$i]} / ${TOTAL[$i]} ) * 100)" |\
             bc |\
             awk '{printf("%.0f",$0)}'`
        printf "%-12.12s (%3.3s%%) |" "$ITEM" "$PCT"
        BLOCKS=""
        while [ "$LENGTH" -gt "0" ]; do
                if [ "$LENGTH" -eq "1" ]; then
                        BLOCKS="$BLOCKS$ENDDELIM"
                else
                        BLOCKS="$BLOCKS$FILLER"
                fi
                LENGTH=$(( $LENGTH - 1 ))
        done
        printf "$BLOCKS\n"
        i=$(( $i + 1 ))
done
printf "\n\n"

———————————————————-

Your web cams and CCTV may not be  secure.

Use a search engine with the ipaddress of the unit and one of these search terms one at a time to see if the unit is accessible. These are only a few of many.

inurl:/view.shtml
intitle:”Live View / – AXIS” | inurl:view/view.shtml^
inurl:ViewerFrame?Mode=
inurl:ViewerFrame?Mode=Refresh
inurl:axis-cgi/jpg
inurl:view/index.shtml inurl:view/view.shtml
liveapplet
intitle:liveapplet
allintitle:”Network Camera NetworkCamera”
intitle:axis intitle:”video server”
intitle:liveapplet inurl:LvAppl
intitle:”EvoCam” inurl:”webcam.html”
intitle:”Live NetSnap Cam-Server feed”
intitle:”Live View / – AXIS 206M”
intitle:”Live View / – AXIS 206W”
intitle:”Live View / – AXIS 210″

———————————————————-

Picture of Exacto knife to an existing page.
screenshotledresistorca1.png

One nice thing is that if you find a page with an educational tool that you need, under certain circumstances, you can save the page for later use. In some cases, if it is going into an educational environment, the advertisements have to go away. That is what was done with this web page. See pictures. You will also need to save the images and then edit the code to look for them locally.

for example we have a web page that has the script we want to use and the dots represent code that is not needed, we can just remote those unneeded lines lined.

before:

&lt;html&gt;
&lt;body&gt;

&lt;h1&gt;My First Web Page&lt;/h1&gt;
...
...
...
...
....
....
<span class="marked">&lt;script type="text/javascript"&gt;
document.write("&lt;p&gt;" + Date() + "&lt;/p&gt;");
&lt;/script&gt;</span>
...
...
...
...
&lt;/body&gt;
&lt;/html&gt;

after;

&lt;html&gt;
&lt;body&gt;

&lt;h1&gt;My First Web Page&lt;/h1&gt;

<span class="marked">&lt;script type="text/javascript"&gt;
document.write("&lt;p&gt;" + Date() + "&lt;/p&gt;");
&lt;/script&gt;</span>

&lt;/body&gt;
&lt;/html&gt;

———————————————————-

Love Tuxpaint, but it lacks some cut and paste features. Used the
Gimp to get around these short comings. Kind of had to plan out what I wanted to do. First was to use the picture of the video card in the Gimp.

So now I can see the picture, but the canvas is not big enough to hold what else I want. So let us make a new canvas four times bigger. Original picture was 480 x 281.

Import the picture of the card and the picture of the RPi. Actually I cut and pasted the RPi out of one of my other pictures.

Now to do a screen capture of the canvas. Then we will do a tuxpaint-import of that capture into tuxpaint.

Then we need to do a magic shift to put the pictures where we can have more room for pictures and text. Now  the pictures are centered better.

Now all that is left to do is erase some lines that were wires in the original picture and add all the new art work by hand.

Now all we have to do is take a screen shot of the canvas for the blog like we did with this one.

That’s all for now.

———————————————————-

Writing code.

Traditional:

Systems analyst:
What is problem per users.
Develop criteria and test data needed to solve a problem.
Use criteria logically using test data.

Programmer
Develop code based on data defined by criteria.
Test and rewrite code until it works.
Rewrite code for best form.

Users
Test code to see if it solves problem.
Else start over.

Another view.

———————————————————-

if you wanted to convert a decimal number to a hexadecimal number, you can do it several ways. first you could do it the old fashion way by hand.

or you could use a C language program such as:

&nbsp; #include&lt;stdio.h&gt;
int main(){
&nbsp;&nbsp;&nbsp; long int decimalNumber,remainder,quotient;
&nbsp;&nbsp;&nbsp; int i=1,j,temp;
&nbsp;&nbsp;&nbsp; char hexadecimalNumber[100];

&nbsp;&nbsp;&nbsp; printf("Enter any decimal number: ");
&nbsp;&nbsp;&nbsp; scanf("%ld",&amp;decimalNumber);

&nbsp;&nbsp;&nbsp; quotient = decimalNumber;

&nbsp;&nbsp;&nbsp; while(quotient!=0){
&nbsp;&nbsp;&nbsp;&nbsp;&nbsp;&nbsp;&nbsp;&nbsp; temp = quotient % 16;

&nbsp;&nbsp;&nbsp;&nbsp;&nbsp; //To convert integer into character
&nbsp;&nbsp;&nbsp;&nbsp;&nbsp; if( temp &lt; 10)
&nbsp;&nbsp;&nbsp;&nbsp;&nbsp;&nbsp;&nbsp;&nbsp;&nbsp;&nbsp; temp =temp + 48;
&nbsp;&nbsp;&nbsp;&nbsp;&nbsp; else
&nbsp;&nbsp;&nbsp;&nbsp;&nbsp;&nbsp;&nbsp;&nbsp; temp = temp + 55;

&nbsp;&nbsp;&nbsp;&nbsp;&nbsp; hexadecimalNumber[i++]= temp;
&nbsp;&nbsp;&nbsp;&nbsp;&nbsp; quotient = quotient / 16;
&nbsp; }

&nbsp;&nbsp;&nbsp; printf("Equivalent hexadecimal value of decimal number %d: ",decimalNumber);
&nbsp;&nbsp;&nbsp; for(j = i -1 ;j&gt; 0;j--)
&nbsp;&nbsp;&nbsp;&nbsp;&nbsp; printf("%c",hexadecimalNumber[j]);

&nbsp;&nbsp;&nbsp;&nbsp;&nbsp;&nbsp;&nbsp; printf("\n");
&nbsp;&nbsp;&nbsp; return 0;
}

Compile it  and then run it:

$ ./d2h
Enter any decimal number: 708
Equivalent hexadecimal value of decimal number 708: 2C4

or actually you could use either of two command line commands.

$ echo ‘obase=16;ibase=10;708’| bc
2C4

or

$ printf ‘%x\n’ 708
2c4

As you learn bash, you can see you can do things without getting real complicated.

———————————————————-

Try at your own risk!!!! It could brick your arduino!!

1. Minimal Arduino

I recently got really interested in Arduino hardware. For those who don’t know what it is,

 Arduino is an open-source electronics prototyping platform based on flexible, easy-to-use hardware and software. It’s intended for artists, designers, hobbyists, and anyone interested in creating interactive objects or environments.


So I looked for ways to make my own board but as I am not into electronics, I needed something really simple, where I just needed to put in components, abracadabra and it should start working. So after much research (Googling actually) I have now learned how to make a minimal Arduino clone.

PARTS LIST

ATmega168 (or similar e.g. ATmega8) (Rs. 300)
A Breadboard (Rs. 150)
7805 Voltage regulator (Rs.10)
2 LEDs (Rs. 5)
2 10 uF capacitors (Rs.5)
16 MHz clock crystal
2 22 pF capacitors
2 220 Ohm resistors
1 10k Ohm resistor
small momentary normally open (“off”) button, i.e. Omron type B3F

Note: replaced a resonator for the capacitors and the crystal.

BUILD IT

Before building the main circuit, you need to prepare a 5v supply.
Use 7805 voltage regulator, have a look at this picture:


5v voltage regulator

You need to provide 9v-12v to the INPUT and connect ground wire to GROUND. Then use OUTPUT pin for 5v output and do not forget to ground your circuit with the same GROUND pin.

Next step is to add an LED. An LED attached to power like this is a great troubleshooting trick. You’ll always know when your board is being powered as well as quickly know if your board is being shorted.

We will be using Atmega168(or similar) for our Arduino:


ATmega168

Before moving on, this image is a great resource for learning what each of the pins on your Atmega chip do in relation to the Arduino’s functions. This will clarify a lot of confusion behind why we hook up certain pins the way we do.

Start by adding a 10k ohm resistor “up” (to power) on the RESET pin in order to prevent the chip from resetting itself during normal operation. The RESET pin reboots the chip when pulled down to ground. In later steps I will show you how to add a reset switch that takes advantage of this.

  • Pin 7 – Vcc – Digital Supply Voltage
  • Pin 8 – GND
  • Pin 22 – GND
  • Pin 20 – AVcc – Suppply voltage for the ADC converter. Needs to be connected to power if ADC isn’t being used and to power via a low-pass filter if it is (a low pass filter is a circuit that cleans out noise from the power source, we aren’t using one)

After that, add a 16 MHz external clock between pin 9 and 10, and add two 22 pF capacitors running to ground on each of those pins.

This is where we add the small tactile switch so that we can reset the Arduino whenever we’d like and prepare the chip for uploading a new program. A quick momentary press of this switch will reset the chip when needed. Add the switch just above the top of the Atmega chip. Connect one leg to the RESET on the chip. Then, connect the other leg of the button to the ground.

small tactile switch

Success!
Congratulations, You just made an Arduino clone for yourself.
As of now, this arduino is of no use to you. As it is not functional.
We need a Programmer to “program” our Atmega chip.
I opted for Parallel Programmer, which is the cheapest and simplest one.

You need a male DB25 parallel port connector and some wires.


DB25 male connector

Now you need to solder some pins of this connector to your chip.

 Pin of DB25  Pin of ATmega168
 Pin 11  Pin 18
 Pin 1  Pin 19
 Pin 16  Pin 1
 Pin 2  Pin 17
 Pin 18  GROUND

Please be sure to keep the wire between the parallel port and Atmega chip short as possible.

Now we are done with the hardware part.

Connect you Arduino to your PC through Parallel Programmer and execute these commands through avrdude (Download)

Unzip avrdude into a folder and use CMD(MS-DOS) to first navigate to that new folder you just unzipped and execute the following:

avrdude.exe -p m168 -v -U hfuse:w:0xdf:m -U lfuse:w:0xc7:m -U efuse:w:0x08:m

This command will set the Fuse settings of your chip to use the external 16Mhz crystal we connected earlier (by default, the chip will use 1Mhz internal clock which is slow)

Getting started with programming with Arduino:
Download Arduino software from www.arduino.cc
Before you start programming with Arduino software, configure it to use Parallel Programmer.

  • Go to C:\Documents and Settings\YOUR USER NAME\Application Data\Arduino\
  • Open the preferences.txt file in Notepad.
  • Find the line upload.using=bootloader and change it to upload.using=parallel
Now you should be able to program and upload your code through Parallel Programmer.

———————————————————-

Soduku is an interesting game of numbers and logic. You can not lose of you play it right. The board with preset numbers already sporadically spaced on the  board can be divided into nine sections  with each section of nine squares.The numbers one through nine must be strategically placed so that no number is duplicated in any column or row. Here is your typical sections.

Section:

The whole board:

or you could mentally separate it into three columns or rows.


You can have a maximum of one number shown three times in any column or row. For example we already have the number eight three times but the number nine is only shown twice. so we need another nine.

In the upper right hand corner we have three possibilities where another number nine can go.  So we look at the whole board to eliminate the possibilities in our mind.

In this case, it was easy to figure out the where the third nine should go. It will not be that easy with every number. It is a process of elimination with all numbers one through nine both in columns and rows.


Since only one number of each can be in each square, you can also eliminate boxes where a number exists. If most of a row is done, you can also fill in numbers.


Lastly if you have a mini-square almost filled in you can obviously choose the last number to be filled in.

There are other hints you can pick on your own, but just wanted to share a few starter hints. Good luck.

———————————————————-

Screenshot from 2015-08-30 19:13:00

Good day.


Looking for Venus

Leave a comment

Chit chat

========

My old Microsoft mouse was giving me real trouble, so I replaced it. Maybe we can use some part of it for robot parts.

Downloaded another real light weight linux. have not tested it yet, except to see if it would boot in a virtual machine.

Screenshot from 2015-07-18 23:17:52

Sometime you can edit you .bash_history file to get some of the shorts you have used and store them in a separate file for documentation purposes. Actually we use a blog to also do the same thing.

You do not need a gui environment or a 4k monitor to have a multiple windows desktop. (dvtm)

Screenshot from 2015-07-12 05:35:16


Joe’s own editor. A workalike of the old Wordstar


Screenshot from 2015-07-12 04:19:46

Wordstar_Screenshot

——————————————-

Couple of cartoons

Screenshot from 2015-07-16 06:20:58

Screenshot from 2015-07-14 01:28:48

Screenshot from 2015-07-13 00:28:27

——————————————-

Alleged fix when getting a blank screen doing <ctrl><alt>Fn

This is usually caused because the graphical text-mode resolution set at boot up is not compatible with your video card. The solution is to switch to true text-mode by configuring Grub appropriately:

A, Open the terminal with Ctrl+Alt+T

B. Paste the below, and enter your password when asked:

C, sudo sed -i -e ‘s/#GRUB_TERMINAL/GRUB_TERMINAL/g’ /etc/default/grub

D, Then type sudo update-grub
E. Reboot and the virtual terminals should now work.

——————————————

You just bought a new computer and the first thing you want to do is to turn it on and play with it. DON’T. You will want to make a pristine duplicate of your computer’s hard drive first. Why? Because that way you can be sure that you can go back to the beginning if you need to. In fact, I recommend getting two extra drives unless you have a server with plenty of space. Why two drives?  The first drive will be a duplicate of the virgin hard drive. The second drive will be a duplicate of the modified and  setup system you can use as a base in case you have problems.  After setting up thousands of systems in the corporate environment, the words come from experience.


You will also need software to back up your drives without it having to be installed. You will have to do some research as they change all the time. The two I have used most is Clonezilla and Ghost. Clonezilla is free for personal use. Best to read the manual before using the softwre. Even better would be to get a professional to help you out the first time.

Thge procedure is to back up the original hard drive to a second drive. Replace the original drive with the first backup drive. Now you can make any changes you want wighout losing the pristine image if you make a mistake.  One you have the backup drive configured with all the needed software, you will want to make a second backup. so you have a Grandfather, father  and son images. You are backed up twice so to speak,  If you have purchased duplicate machines, you can image them from the backup without having to manually setup each of the extra machines.

If you have a business and a business server, you can send the images to a server without having to get the extra drives. This is actually quicker and more efficient. With the server, you can image multiple machines (known as multicasting) at a time. For example: at the school where I worked, we would image a whole computer lab at a time instead of duplicating them manually.The nice thing was you could automate this to be done late at night when the computers in the labs were not being used.

Did not draw all the cables, but you get the idea. You can also make additional updated images to the server. So if a hard disk dies, you can simply reimage the replacement drive and be up and running again in no time. Actually today larger businesses are going diskless with virtual machines via ltsp, aoe, and iscsi, but that is another discussion.

——————————————

Controlling leds can be a real challenge, unlessyou know ho t use a bit shifter aka the 74hs595. Oversimplified  her, but one you get the gidt of it only the sky is the limit.

From wikipedia:(https://en.wikipedia.org/wiki/Shift_register)

In digital circuits, a shift register is a cascade of flip flops, sharing the same clock, in which the output of each flip-flop is connected to the “data” input of the next flip-flop in the chain, resulting in a circuit that shifts by one position the “bit array” stored in it, shifting in the data present at its input and shifting out the last bit in the array, at each transition of the clock input. More generally, a shift register may be multidimensional, such that its “data in” and stage outputs are themselves bit arrays: this is implemented simply by running several shift registers of the same bit-length in parallel. Shift registers can have both parallel and serial inputs and outputs. These are often configured as ‘serial-in, parallel-out’ (SIPO) or as ‘parallel-in, serial-out’ (PISO). There are also types that have both serial and parallel input and types with serial and parallel output. There are also ‘bidirectional’ shift registers which allow shifting in both directions: L→R or R→L. The serial input and last output of a shift register can also be connected to create a ‘circular shift register’.

74HC595 serial to parallel data converter that accepts one bit at a time, but the buffers can be daisy chained  to almost limitless control of outputs.  When DS pulses from the PC, you see that Output 0 and Output 1 on IC chip#1, goes high. Then IC chip #1 has determined that 8 pulses have past and it is time to pulse it’s Q7′ output which is connected to the next IC #2 chip’s DS input. When the DS input of IC #2 gets a pulse from the Q7′ output of IC #1, outputs 4, 5, 6, and 7 go high on chip #2. When the PC sends a DS pulse to IC #1 again, IC #1 reads the first eight bits from ST_CP and Output 0 on IC #1 turns off but output 1 stays on because it got a pulse and so on………..


int DS_pin = 8;
int STCP_pin = 9;
int SHCP_pin = 10; 

void setup()
{
pinMode(DS_pin,OUTPUT);
pinMode(STCP_pin,OUTPUT);
pinMode(SHCP_pin,OUTPUT);
writereg();
} 

boolean registers[8]; 

void writereg()
{
digitalWrite(STCP_pin, LOW);
for (int i = 7; i>=0; i--)
{
digitalWrite(SHCP_pin, LOW);
digitalWrite(DS_pin, registers[i] );
digitalWrite(SHCP_pin, HIGH);
}
digitalWrite(STCP_pin, HIGH);
} 

void loop()
{
for(int i = 0; i<8; i++)
{
registers[i] = HIGH;
delay(100);
writereg();
} 

for(int i = 7; i>0; i--)
{
registers[i] = LOW;
delay(100);
writereg();
}
}

Screenshot from 2015-07-15 07:14:31

The data entering the buffer might look like this assuming all the previous data bits are zeros.

Screenshot from 2015-07-15 07:29:09

Possible Arduino setup,

multiplexing-shiftregister_Steckplatine

Several can be connected together with just a few control lines.

89-Serialpar1a

The pin-outs for the dip (dual in-line package) version.

images

——————————————

There are now modules that are cheaper than the ethernet add-on boards for the Arduino and with the proper rs232 interfacing could be use with older serial port devices to give access to the internet such as an old 486 laptop’

pl1604865-arduino_spi_interface_enc28j60_network_module_ethernet_network_interface_hr911105

 maxresdefault

IMG_3756

ENC-table

——————————————

Just a little documentation for easy access.

Raspberry Pi GPIO Pinout

Raspberry Pi GPIO Pinout

NOTE1: The Raspberry Pi is a 3.3V device
NOTE2: The GPIO pins are unbuffered and unprotected, so if you short something out, you could fry your whole Pi, so be careful!
As with Revision 2 of the Rasberry Pi, there are some changes to the GPIO connector. Make sure you use the correct diagram for your board

Raspberry Pi Version 1

Raspberry Pi GPIO Pinout

Raspberry Pi Revision 2

Raspberry Pi GPIO Pinout

Raspberry Pi B+

Raspberry Pi GPIO Pinout

For full details see http://elinux.org/Rpi_Low-level_peripherals

——————————————

Many months ago I introduced a batch file called Oracle. The one incentive I had was to separate the data from the code and make the code was flexible and reusable. In this case the author keeps the code and the data in the same file. of course that makes it seemingly more portable.Coding is both a science and an art. How you do it is up to you.

$ ./8ball.sh
Outlook good

8ball.sh

#!/bin/bash
# start data
answers=( "It is certain"
  "It is decidedly so"
  "Without a doubt"
  "Yes – definitely"
  "You may rely on it"
  "As I see it, yes"
  "Most likely"
  "Outlook good"
  "Yes"
  "Signs point to yes"
  "Reply hazy, try again"
  "Ask again later"
  "Better not tell you now"
  "Cannot predict now"
  "Concentrate and ask again"
  "Don't count on it"
  "My reply is no"
  "My sources say no"
  "Outlook not so good"
  "Very doubtful" )
# end data
num=$((RANDOM%20))
echo ${answers[$num]}

——————————————

Saw this pic and thought it was an interesting login. Using ., “, d, Y, and P on the corners was certainly inventive;

To make it easier to duplicate the printout we split the text into two lines into two lines.

    888  888    888         d8888                  888     
    888  888    888        d88888                  888      
 88888888888888 888       d88 888                  888     
    888  888    888      d88  888 8888888 .d8888b  88888b. 
    888  888    888     d88   888 8888"  d88P"     888 "88b
 88888888888888 YOP    d88    888 888    888       888  888b
    888  888          d8888888888 888    Y88b.     888  888b
    888  888    888  d888     888 888     "Y8888P  888  888  

                     888       d8b                   Y88b   d88P
                     888       YOP                    Y88b d88P
                     888                               Y88u88P
                     888       888 88888b.  888  888    Y888P
                     888       888 888 "88b 888  888    d888b
                     888       888 888  888 888  888   d88888b
                     888       888 888  888 Y88b 888  d88P Y88b
                     888888888 888 888  888  "Y88888 d888P  Y88b

If you copy one line at a time you can piece it back together. Here is yet another, but you can type it in.

Then there is snoopycal.sh. Invoke with ./snoopycal.sh

echo "           ,-~~-.___.                                         ---------"
echo "          / ()=(()   \\                                         $1 $2"
echo "         (   (        0                                       ---------"
echo "          \\._\\, ,----'"
echo "     ##XXXxxxxxxx"
echo "            /  ---'~;"
echo "           /    /~|-"
echo "         =(   ~~  |"
echo "   /~~~~~~~~~~~~~~~~~~~~~\\"
echo "  /_______________________\\"
echo " /_________________________\\"
echo "/___________________________\\"
echo "   |____________________|"
echo "   |                    |"
echo ""
cal $1  $2


$ ./snoopycal.sh 03 1982
           ,-~~-.___.                                         ---------
          / ()=(()   \                                         03 1982
         (   (        0                                       ---------
          \._\, ,----'
     ##XXXxxxxxxx
            /  ---'~;
           /    /~|-
         =(   ~~  |
   /~~~~~~~~~~~~~~~~~~~~~\
  /_______________________\
 /_________________________\
/___________________________\
   |____________________| 
   |____________________|
   |____________________|
   |                    |

     March 1982       
Su Mo Tu We Th Fr Sa  
    1  2  3  4  5  6  
 7  8  9 10 11 12 13  
14 15 16 17 18 19 20  
21 22 23 24 25 26 27  
28 29 30 31


Then there is the good old shark.

The programs included with the GNU/Linux system are free 
software. The exact distribution terms for each program are described in the
individual files in /usr/share/doc/*/copyright.

GNU/Linux comes with ABSOLUTELY NO WARRANTY, to the extent
permitted by applicable law.

   ------------------------------------------------------------------------

               /)
          o                 /' )
                           /'   (                          ,.
                        __/'     )                        .' `;
         o      _.-~~~~'          ``---..__             .'   ;
           _.--'  b)                       ``--...____.'   .'
          (     _.      )).      `-._                     <
           `\|\|\|\|)-.....___.-     `-.         __...--'-.'.
            `---......____...---`.___.'----... .'         `.;
                                            `-`             `

   This machine is for the exclusive use of OE.
   Anyone attempting to gain, or gaining access other
   than as specifically authorized will be prosecuted
   under all applicable statutes plus all applicable
   civil rules for damages.

You can find lots of ascii graphics on the net. Note you may have to use \\ for \ symbols for the \ to show up.

You can also convert current files to test with  img2txt -w 80 -f ansi ./caca.png

Original picture:

Then converted with:
$  img2txt -W 60 -f ansi foot.png

$ img2txt -W 60 -f ansi foot.png > foot.txt
$ cat foot.txt

Also look at jp2a.
$ convert foot.png foot.jpg
$ jp2a foot.jpg

You could also pipe this picture to a file.

——————————————

What if Software Arts had patented Visicalc, Visiword, and etc?  Would office365 and Libreoffice never have existed?   Picture is actual VC.com running in the dosbox emulator.

Per www.archive.org

VisiCalc was the first spreadsheet computer program, originally released for the Apple II. It is often considered the application that turned the microcomputer from a hobby for computer enthusiasts into a serious business tool. VisiCalc sold over 700,000 copies in six years.

Conceived by Dan Bricklin, refined by Bob Frankston, developed by their company Software Arts, and distributed by Personal Software in 1979 (later named VisiCorp) for the Apple II computer, it propelled the Apple from being a hobbyist’s toy to a useful tool for business, two years before the introduction of the IBM PC.

VisiCalc was, in part, inspired by earlier “row and column” spreadsheet programs in widespread use on systems of several national timesharing companies. Notable among these products were Business Planning Language (BPL) from International Timesharing Corporation (ITS) and Foresight, from Foresight Systems. Dan Bricklin writes, “[W]ith the years of experience we had at the time we created VisiCalc, we were familiar with many row/column financial programs. In fact, Bob had worked since the 1960s at Interactive Data Corporation, a major timesharing utility that was used for some of them and I was exposed to some at Harvard Business School in one of the classes.” However, these earlier timesharing spreadsheet programs were not completely interactive, nor did they run on personal computers.

According to Bricklin, he was watching a professor at Harvard Business School create a financial model on a blackboard. When the professor found an error or wanted to change a parameter, he had to erase and rewrite a number of sequential entries in the table. Bricklin realized that he could replicate the process on a computer using an “electronic spreadsheet” to view results of underlying formulae. The development of Visicalc took two months of work by Frankston and Bricklin during the winter of 1978–79.

Some references:

http://macgui.com/downloads/?file_id=24477
http://www.benlo.com/visicalc/visicalc2.html
http://www.bricklin.com/history/vcexecutable.htm

Of course many companies have copied it. Some people have developed and programmed their own spreadsheets.  An electronic spreadsheet is sort of a calculator and an accountants worksheet all built into one. Here is the original code that I found for an old cpm operating system (control process for microcomputers) written for the zbasic language interpreter.  Eventually converted it to qbasic and freebasic,

Original command set:

‘ lizzycalc version -1

‘ updated March 1995  for qbasic.
‘ last update: January 1996

‘ commands      : description
‘—————:———————————————–
‘ “/’/^text     : enter text in a current cell (left/right/middle just)
‘ =expression   : enter number or formula in a current cell
‘ \text         : repeat text up to cell width
‘ |fun          : static special functions i. e. time, date, file
‘               : smv, or smh
‘ @func         : real-time special functions of above
‘ c             : change column width
‘ d             : numeric data file of certain cells
‘ f             : do file operations (load/save/new)
‘ h or ?        : show this help screen
‘ i             : insert row or column
‘ j             : toggle form feed after print flag
‘ p             : output results to file or printer without the border
‘ q             : quit
‘ r             : replicate a single cell multiple times
‘ s             : output data to file or printer”
‘ u             : toggle update screen flag
‘ arrow keys    : move cursor in indicated direction
‘ expressions   : numeric constant or cell id in form <col letter><row#>
‘                 above items separated by operators +,-,*,^,|, or /
‘                 evaluation is from left to right without operator
‘                 preference.  expressions are evaluated on enter and
‘                 on the u command.
https://computothought.files.wordpress.com/2009/10/ss.png

Original code I typed and then added a bit.

1000 ‘
1010 ‘ lizzycalc .01
1020 ‘
1030 ‘ for zbasic but could be converted to other basics
1040 ‘ updated march 1993 by computoman
1050 ‘
1060 ‘ commands:
1070 ‘ “text” : enter text in a current cell
1080 ‘ =expression : enter number or formula in a current cell
1090 ‘ cxxx : evaluate expressions and update screen
1100 ‘ arrow keys : move cursor in indicated direction
1110 ‘
1120 ‘ expressions:
1130 ‘ numeric constant or cell id in form <col>
1140 ‘ above items separated by operators +,-,*, or /
1150 ‘ evaluation is from left to right without operator preference
1160 ‘ expressions are evaluated on entery and on the “C” command.
1170 ‘
1180 ‘
1190 DEFINT I,N,W,X,Y : KEY OFF
1200 SCRDEPTH = 20
1210 SCRWIDTH = 80
1220 COLWIDTH = 10
1230 MAXCOL=INT(SCRWIDTH/(COLWIDTH + 1))
1240 MAXROWS = SCRDEPTH
1250 DIM D(MAXCOL,MAXROWS)
1260 DIM D$(MAXCOL,MAXROWS)
1270 NUMOPS = 5
1280 DIM O$(NUMOPS)
1290 O$(1) = “=” : O$(2) = “+” : O$(3) = “-” : O$(4) = “*” : O$(5) = “/”
1300 ‘
1310 ‘************* init ************
1320 FOR X = 1 TO MAXCOL
1330 D$(X,0) = SPACE$(COLWIDTH – 1) + CHR$(X+ASC(“A”)-1)
1340 NEXT X
1350 FOR Y =1 TO MAXROWS
1360 D$(0,Y) = SPACE$(COLWIDTH-2)+RIGHT$(STR$(Y),2)
1370 NEXT Y
1380 GOSUB 1610
1390 CRSX = 1 : CRSY = 1 : GOSUB 1890
1400 COLOR 0,7 : LOCATE YLOC,XLOC : PRINT SPACE$(COLWIDTH); : COLOR 7,0
1410 ‘
1420 ‘ command loop
1430 ‘
1440 WHILE 0&lt;1
1450 LOCATE 23,1 : PRINT SPACE$(79);: IN$=&quot;&quot; : IK = 0
1460 LOCATE 23,1 : PRINT&quot;CMD: &quot;;
1470 WHILE IK 13
1480 I$= INKEY$ : IF I$ = “” THEN 1480
1490 IK = ASC(I$)
1500 IF LEN(I$) = 2 THEN GOSUB 9000: GOSUB 2100:GOSUB 1720 ELSE IF IK = 8 THEN GOSUB 1940 ELSE IF IK 13 THEN PRINT I$;: IN$ = IN$ + I$
1510 WEND
1520 C$ = LEFT$(IN$,1)
1530 LOCATE 24,1 : PRINT SPACE$(79);
1540 LOCATE 24,1 : PRINT IN$;
1550 IF C$ = CHR$(34) THEN GOSUB 1990 ELSE IF C$=”=” THEN GOSUB 2050 ELSE IF C$=”C” THEN GOSUB 2740 ELSE IF C$ = “F” THEN GOSUB 4000 ELSE ER$ = “BAD INPUT: “+IN$: GOSUB 2660
1560 WEND
1570 ‘
1580 ‘
1590 ‘
1600 ‘ sub to print screen
1610 CLS : DD = 0 : TEMPY = CRSY : TEMPX = CRSX
1620 LOCATE 25,31: PRINT “LIZZYCALC .01″ : LOCATE 1,1
1630 FOR CRSY = 0 TO MAXROWS
1640 FOR CRSX = 0 TO MAXCOL
1650 GOSUB 2100 : PRINT V$;
1660 NEXT CRSX
1670 NEXT CRSY
1680 CRSX = TEMPX : CRSY = TEMPY
1690 RETURN
1700 ‘
1710 ‘sub to move cursor
1720 ON IK-71 GOSUB 1850,0,0,1790,0,1810,0,0,1830
1730 LOCATE YLOC,XLOC : PRINT V$;
1740 LOCATE 24,1 : PRINT SPACE$(79);
1750 LOCATE 24,1 : PRINT D$(CRSX,CRSY);
1760 GOSUB 2890
1770 LOCATE 23,LEN(IN$)+5
1780 RETURN
1790 ‘ move left
1800 IF CRSX &gt; 1 THEN CRSX = CRSX – 1 : RETURN ELSE RETURN
1810 ‘move right
1820 IF CRSX &lt; MAXCOL THEN CRSX = CRSX + 1 : RETURN ELSE RETURN
1830 ‘ move down
1840 IF CRSY 1 THEN CRSY = CRSY -1 : RETURN ELSE RETURN
1870 ‘
1880 ‘ sub to compute screen postion
1890 XLOC = (COLWIDTH * CRSX)+1
1900 YLOC = CRSY + 1
1910 RETURN
1920 ‘
1930 ‘ sub to process backspace on command line
1940 NEWLEN = LEN(IN$)-1
1950 IF NEWLEN &gt;=0 THEN PRINT CHR$(8);: IN$ = LEFT$(IN$,NEWLEN)
1960 RETURN
1970 ‘
1980 ‘ sub to formulate input
1990 D(CRSX,CRSY)=0:TEXTLEN=LEN(IN$)-1:IF TEXTLEN&lt;1 THEN TEXTLEN=1
2000 IF RIGHT$(IN$,1)=CHR$(34) THEN TEXTLEN = TEXTLEN-1
2010 D$(CRSX,CRSY) = LEFT$(MID$(IN$,2,TEXTLEN),COLWIDTH)
2015 GOSUB 2890
2020 RETURN
2030 ‘
2040 ‘sub to formula input
2050 V$ = IN$ : GOSUB 2140
2060 IF ERRFLAG = 0 THEN D$(CRSX,CRSY) = IN$
2065 GOSUB 2890
2070 RETURN
2080 ‘
2090 ‘SUB TO PREPARE OUTPUT
2100 IF LEFT$(D$(CRSX,CRSY),1)=&quot;=&quot; THEN V$=RIGHT$(SPACE$(COLWIDTH)+STR$(D(CRSX,CRSY)),COLWIDTH) ELSE V$=LEFT$(D$(CRSX,CRSY)+SPACE$(COLWIDTH),COLWIDTH)
2110 RETURN
2120 ‘
2130 ‘ SUB TO EVALUATE EXPRESSION
2140 ERRFLAG = 0 : VI$ = V$
2150 WHILE V$””
2160 GOSUB 2310
2170 IF ERRFLAG 0 THEN ER$=”BAD OPERATOR IN:”+VI$: GOSUB 2660 : RETURN
2180 GOSUB 2400
2190 IF ERRFLAG 0 THEN ER$=”BAD FORMULA:”+VI$: GOSUB 2660: RETURN
2200 ON OPCODE GOSUB 2240,2250,2260,2270,2280
2210 WEND
2220 D(CRSX,CRSY) = VL
2230 RETURN
2240 VL = V : RETURN
2250 VL = VL + V : RETURN
2260 VL = VL – V : RETURN
2270 VL = VL * V : RETURN
2280 VL = VL / V : RETURN
2290 ‘
2300 ‘ SUB TO DECODE OPERATOR
2310 OP$ = LEFT$(V$,1)
2320 OPCODE = 0
2330 FOR I = 1 TO NUMOPS
2340 IF OP$=O$(I) THEN OPCODE = I : I = NUMOPS:V$=MID$(V$,2)
2350 NEXT I
2360 IF OPCODE = 0 THEN ERRFLAG = 1
2370 RETURN
2380 ‘
2390 ‘SUB TO DECODE OPERAND
2400 V = VAL(V$) : C$=LEFT$(V$,1) : ERRFLAG = 0 : T = 0
2410 IF V = 0 AND C$”0″ THEN GOSUB 2530 ELSE GOSUB 2450
2420 RETURN
2430 ‘
2440 ‘SUB TO PROCESS AS A CONSTANT
2450 IX=1:IF C$=”-” THEN C$=”0″
2460 WHILE (C$&gt;=”0″ AND C$ 32 THEN C = C – 32
2540 IF C MAXCOL THEN ERRFLAG = 1 : RETURN
2550 XC=C : C = 0
2560 WHILE V$”” AND C&gt;=0 AND C&lt;=9
2570 V$=MID$(V$,2)
2580 IF V$”” THEN C=ASC(V$)-ASC(“0″) : IF C&gt;=0 AND C MAXROWS THEN ERRFLAG = 1 : RETURN
2610 YC = T
2620 V = D(XC,YC)
2630 RETURN
2640 ‘
2650 ‘ SUB TO GENERATE GENERAL ERROR REPORT
2660 LOCATE 24,1 : PRINT ER$+” “;
2670 BEEP
2680 WHILE INKEY$=”” : WEND
2690 LOCATE 24,1 : PRINT SPACE$(79);
2700 LOCATE 24,1 : PRINT D$(CRSX,CRSY);
2710 RETURN
2720 ‘
2730 ‘ sub to update formula values
2740 LOCATE 24,1 : PRINT SPACE$(79);
2750 LOCATE 24,1 : PRINT”Caculating!”;
2760 TEMPY=CRSY: TEMPX = CRSX
2770 FOR CRSY = 1 TO MAXROWS
2780 FOR CRSX = 1 TO MAXCOL
2790 IF LEFT$(D$(CRSX,CRSY),1)=”=” THEN V$=D$(CRSX,CRSY): GOSUB 2140 : GOSUB 1890 : LOCATE YLOC,XLOC: GOSUB 2100: PRINT V$;
2800 NEXT CRSX
2810 NEXT CRSY
2820 CRSX = TEMPX : CRSY = TEMPY : GOSUB 1890
2830 GOSUB 2890
2840 LOCATE 24,1 : PRINT STRING$(79,” “);
2850 LOCATE 24,1 : PRINT D$(CRSX,CRSY);
2860 RETURN
2870 ‘
2880 ‘ sub to show current cell value
2890 GOSUB 1890 : GOSUB 2100 : COLOR 0,7
2900 LOCATE YLOC,XLOC: PRINT V$;: COLOR 7,0
2910 RETURN
4000 ‘–
4001 ‘ (F)ile routine
4002 ‘–
4010 LOCATE 23,1 : PRINT SPACE$(79);
4020 LOCATE 23,1 : INPUT”Enter (L)oad or (S)ave data: “,QQ$
4030 LOCATE 24,1 : PRINT SPACE$(79);
4040 LOCATE 24,1 : INPUT”Enter file name: “,DATUM$
4050 WHILE QQ$=”L”
4060 OPEN DATUM$ FOR INPUT AS #1
4070 FOR AY = 1 TO MAXROWS
4080 FOR AX = 1 TO MAXCOL
4090 INPUT#1,D(AX,AY),D$(AX,AY)
4100 NEXT AX
4110 NEXT AY
4120 CLOSE#1
4140 QQ$=””
4150 WEND
5050 WHILE QQ$=”S”
5060 OPEN DATUM$ FOR OUTPUT AS #1
5070 FOR AY = 1 TO MAXROWS
5080 FOR AX = 1 TO MAXCOL
5090 PRINT#1,D(AX,AY),D$(AX,AY)
5100 NEXT AX
5110 NEXT AY
5120 CLOSE#1
5140 QQ$=””
5150 WEND
9000 ‘
9010 ‘ fix i$
9020 IK = ASC(RIGHT$(I$,1))
9030 RETURN

——————————————

This may not work with all calculators. Here is an interesting way to count footsteps and estimate how far you have walked.You need a cheap calculator, some foam or sponge, glue, foil, cellophane tape, and 2 long wires.

Then you will want to make a switch. To do tha, drilll or punch a hole in the sponge for the to the bottom.  Glue the foil to the top and bottom of the sponge.  The two foil pieces should not be touching. Connect the wires separately to each foiled surface.

Open up the calculator and connect each of the other wire ends to the top and bottom contacts of the “equals” aka = button. Put a piece of cellophane tape between the contract so that they do not connect. Close the calculator and make sure everything works normally. you would have to press the switch together for the = sign to work.  Attach the switch to the bottom of the shoe.


Now enter “1 + 1” into the calculator. Start waking and you will see the count begin to rise as you walk. When you are finished walking multiply the steps to the length of your stride and you will have your distanced walked.

——————————————

Try this at your own risk.

From the kodi wiki:

Follow this simple procedure:

  1. Open the receiver’s plastic case using a small screw driver. Carefully pry around the case.
  2. Solder the wire to the receiver using the picture below
  • Note: This might damage the casing of the dongle.

1 Color Coded Pinout

Xbox-dvd-pinout thumb.jpg

  • If you’re using a standard USB cable you should just be able to match the colors and solder away, but to be sure check your cable with a continuity tester according to the USB spec provided here.
  1. Red = Positive Power (+5V DC)
  2. White = Data –
  3. Green = Data +
  4. Yellow = Unused
  5. Black = Ground (0V DC)

Normal usb connections:

Pin Name Cable color Description
1 VCC Red +5 VDC
2 D- White Data –
3 D+ Green Data +
4 GND Black Ground


2 Lirc Config

/etc/lirc/hardware.conf:

#Chosen Remote Control
REMOTE="None"
REMOTE_MODULES="lirc_atiusb lirc_dev"
REMOTE_DRIVER=""
REMOTE_DEVICE="/dev/lirc0"
REMOTE_SOCKET=""
REMOTE_LIRCD_CONF=""
REMOTE_LIRCD_ARGS="-r"

#Chosen IR Transmitter
TRANSMITTER="None"
TRANSMITTER_MODULES=""
TRANSMITTER_DRIVER=""
TRANSMITTER_DEVICE=""
TRANSMITTER_SOCKET=""
TRANSMITTER_LIRCD_CONF=""
TRANSMITTER_LIRCD_ARGS=""

#Enable lircd
START_LIRCD="true"

#Don't start lircmd even if there seems to be a good config file
#START_LIRCMD="false"

#Try to load appropriate kernel modules
LOAD_MODULES="true"

# Default configuration files for your hardware if any
LIRCMD_CONF="lircd.conf"

#Forcing noninteractive reconfiguration
#If lirc is to be reconfigured by an external application
#that doesn't have a debconf frontend available, the noninteractive
#frontend can be invoked and set to parse REMOTE and TRANSMITTER
#It will then populate all other variables without any user input
#If you would like to configure lirc via standard methods, be sure
#to leave this set to "false"
FORCE_NONINTERACTIVE_RECONFIGURATION="true"
START_LIRCMD=""

/etc/lirc/lircd.conf:


# brand: Microsoft Xbox DVD Receiever (also works with generic)
# remote control: Xbox remote or any remote using RCA DVD player codes

begin remote

name XboxDVDDongle
bits 8
eps 30
aeps 100

one 0 0
zero 0 0
gap 163983
toggle_bit_mask 0x0

begin codes
LEFT 0xA9
UP 0xA6
RIGHT 0xA8
DOWN 0xA7
SELECT 0x0B
1 0xCE
2 0xCD
3 0xCC
4 0xCB
5 0xCA
6 0xC9
7 0xC8
8 0xC7
9 0xC6
0 0xCF
MENU 0xF7
DISPLAY 0xD5
REVERSE 0xE2
FORWARD 0xE3
PLAY 0xEA
PAUSE 0xE6
STOP 0xE0
SKIP- 0xDD
SKIP+ 0xDF
TITLE 0xE5
INFO 0xC3
BACK 0xD8
end codes
end remote

If using the Xbox DVD IR dongle, add this line to the bottom of /etc/modprobe.d/blacklist.conf:

blacklist xpad


3 XERC 

 The Sickmods XERC 2 XE works really well with an HTPC and the Xbox DVD dongle. It handles power-off and power-on via your remote. Here are some installation instructions for that.

——————————————

Good old Blue Bell, I hope it is back soon.One of the few prepared foods we devour.

bluebell

Good day.


When does your warranty expire?

Leave a comment

Chit chat

======

Grep:

$ grep -l -e “searchterm” *just get the file names

Use sudo without having to retype the command

updatedsudo

Got a bunch off goodies to play with for the Arduino. wifi, ethernet, and ping sensors.

We recommend not using companies that are removing confederate merchandise from their shelves.

Screenshot from 2015-06-25 17:30:17

Basis for a new project ust a touchpad plus an rpi.

Screenshot from 2015-06-28 15:19:57

—————————————-

Cartoons:

Screenshot from 2015-06-29 00:49:13

Screenshot from 2015-06-29 00:12:01

Screenshot from 2015-06-28 23:38:19

—————————————-

Power supplies either home made or commercial switching. Home made can be made iwht parts around the shop or local electronics store. Tendds to run hot and  not that efficent. Switching power supplies can be ought dirt cheap, use less electricity and are the most efficient.

Screenshot from 2015-06-27 04:04:18

Another circuit.

GI83o

—————————————-

Experimental code fir the 4 prong ping detector (vs the 3 ping from Paralax)

Screenshot from 2015-06-29 16:01:58

/* HC-SR04 Sensor
   https://www.dealextreme.com/p/hc-sr04-ultrasonic-sensor-distance-measuring-module-133696

   This sketch reads a HC-SR04 ultrasonic rangefinder and returns the
   distance to the closest object in range. To do this, it sends a pulse
   to the sensor to initiate a reading, then listens for a pulse
   to return.  The length of the returning pulse is proportional to
   the distance of the object from the sensor.

   The circuit:
	* VCC connection of the sensor attached to +5V
	* GND connection of the sensor attached to ground
	* TRIG connection of the sensor attached to digital pin 2
	* ECHO connection of the sensor attached to digital pin 4

   Original code for Ping))) example was created by David A. Mellis
   Adapted for HC-SR04 by Tautvidas Sipavicius

   This example code is in the public domain.
 */

const int trigPin = 2;
const int echoPin = 4;

void setup() {
  // initialize serial communication:
  Serial.begin(9600);
}

void loop()
{
  // establish variables for duration of the ping,
  // and the distance result in inches and centimeters:
  long duration, inches, cm;

  // The sensor is triggered by a HIGH pulse of 10 or more microseconds.
  // Give a short LOW pulse beforehand to ensure a clean HIGH pulse:
  pinMode(trigPin, OUTPUT);
  digitalWrite(trigPin, LOW);
  delayMicroseconds(2);
  digitalWrite(trigPin, HIGH);
  delayMicroseconds(10);
  digitalWrite(trigPin, LOW);

  // Read the signal from the sensor: a HIGH pulse whose
  // duration is the time (in microseconds) from the sending
  // of the ping to the reception of its echo off of an object.
  pinMode(echoPin, INPUT);
  duration = pulseIn(echoPin, HIGH);

  // convert the time into a distance
  inches = microsecondsToInches(duration);
  cm = microsecondsToCentimeters(duration);

  Serial.print(inches);
  Serial.print("in, ");
  Serial.print(cm);
  Serial.print("cm");
  Serial.println();

  delay(100);
}

long microsecondsToInches(long microseconds)
{
  // According to Parallax's datasheet for the PING))), there are
  // 73.746 microseconds per inch (i.e. sound travels at 1130 feet per
  // second).  This gives the distance travelled by the ping, outbound
  // and return, so we divide by 2 to get the distance of the obstacle.
  // See: http://www.parallax.com/dl/docs/prod/acc/28015-PING-v1.3.pdf
  return microseconds / 74 / 2;
}

long microsecondsToCentimeters(long microseconds)
{
  // The speed of sound is 340 m/s or 29 microseconds per centimeter.
  // The ping travels out and back, so to find the distance of the
  // object we take half of the distance travelled.
  return microseconds / 29 / 2;
}

—————————————-

Simple Arduino emf detector. (bug detector?) Lamp[ seems to blink faster and brighter around magnetic fields. (could not get this to work.)

Screenshot from 2015-06-27 16:05:58


int inPin = 5;             // analog 5
int val = 0;                 // where to store info from analog 5
int pin11 = 11;         // output of red led

void setup() {

Serial.begin(9600);

}

void loop() {

val = analogRead(inPin);                    // reads in the values from analog 5 and
//assigns them to val
if(val >= 1){

val = constrain(val, 1, 100);               // mess with these values
val = map(val, 1, 100, 1, 255);        // to change the response distance of the device
analogWrite(pin11, val);                    // *note also messing with the resistor should change
// the sensitivity
}else{                                                     // analogWrite(pin11, val); just tuns on the led with
// the intensity of the variable val
analogWrite(pin11, 0);                     // the else statement is just telling the microcontroller
// to turn off the light if there is no EMF detected
}

Serial.println(val);                                // use output to aid in calibrating

}

—————————————-

When it comes to home automation, you could use any number of systems such as a off the shelf turnkey solution such as Insteon.Check with your hardware store for more details. You could build it yourself. Unless you are experienced at it, I would let a professional do it, if for no other reason of safety to yourself and others.  If you do do it yourself, you will have to write the software to make it all happen. Though most of it may not be that hard, it can be daunting to the inexperienced. Again get a professional and a mentor. Also any drawings in this article are oversimplified and not to be used in actual systems.  What to do first? You want to make a plan of what you want to do including any budget considerations. (What is it going to cost?)

Home Automation – Requirements ChecklistFunctional Areas:
Controls
Standalone time-based controllers
Remote infrared or wireless (RF) controllers
Local PC only
Local PC w/Internet access enabled
Optional telephone interface for status and control
    Security & Monitoring
Alarm System Integration
Standalone system with outputs
Standalone system with auxiliary inputs/outputs
Custom Alarm System
Motion detectors (people or vehicles)
Security cameras (archive motion triggered video clips)
Zone intrusion detectors (infrared)
Local siren alarm
Alerts (pager or email or dial-out)
Door/Window/Gate open sensor
Barking dog deterrent
Flood lightsActivity Monitoring
Cameras to monitor children or pets
Pet feeders, pet doors, automatic cleaners, pet containment
Electronic door latches
Activity logs
Disaster Recovery
Sensors: water level, extreme temperatures, wind, smoke, rain
Alerts (pager or email or emergency dial-out)Scene Lighting
Everyday after dark lighting scheme
Night time pathway lighting
Event lighting scenes (parties, dining, mood settings)
Dusk/Dawn sensor or calculation from latitude & longitude
Motion triggered lights (i.e. front porch, backyard, interior rooms)
Vacation schedule after dark lighting scheme with auto-variance
    Home Entertainment (A/V) Controls
Room lighting: control drapes, blinds, dimmers
Device power up sequence and configuration
Play selection (CD, DVD, VHS, Cable, Satellite, Media PC)
Channel/volume control
DVD/VCR/DVR control (play, pause, stop rewind, fast forward, eject)
    General control
        Single control –simplified (macro commands)
Remote programming control from the Internet (e.g. TIVO or other DVR)
Home HVAC Controls
Heating and cooling based on single/multiple internal thermostats
Set Heating/Cooling temperature targets via program
Control HVAC mode (Auto, Heating, Cooling, Off)
Ceiling fan controls
Send status on demand or periodic reports
Monitor pool/spa water temperature
Control window shades to lower room temperatureSecurity
        Surveillance Cameras
Stationary cameras with video cable plugs into TV or computer webcam
Pan/Tilt/Zoom (PTZ) cameras (hard-wired or wireless)
Continuous recording of video capture on motion detection
Remote viewing from the Internet (live stream or capture files)
    Miscellaneous
Sprinkler controls (rain detection shut off)
Integrate custom systems (requires computer interface)
Appliance controls (electrical water heater, other)
Integrated Pool/Spa controls
It is apparent, you will need to do some research, not only potential products but, doing some price research. We will go into the above in more detail at a later time.

Now you do not have to implement everything, Maybe even one item is all you need. Now that we have that out of the way, Lets go back to the discussion.  Last time we said that home automation is basically being able to turn something on or off remotely. Let us refine that a little bit. We actually need something to be controlled, a device to do the controlling, and an interface to oversee the controlling.

Something to be controlled can be digital such as on or off like a light switch. That is pretty easy. In some cases though, we need to be able to adjust a device to a certain level and that is analog sort of like measuring with a ruler, light dimmer switch or even with a thermometer.

We need a way to control devices based on a pre-setup instructions which may or many not be dependent on the time of day or feedback from sensor devices,  We can send a signal to turn on an electronic switch as if you just simply turned on light switch or we could use an electronic valve like on a water faucet to adjust those things that are analog.  For example you may want to dim or brighten a lamp. We use a stepper motor that can turn in increments in two directions to adjust a light dimmer switch. This would be as if you were turning the knob on the dimmer. Of course you will want a light sensor to get feedback on how the lamp is doing.


If you build it yourself, you can use everything from a microcontroller such as the Arduino to a full fledged computer. The system will need to be able to output the current status and let you change it if need be. For a computer you will need to have some kind of web server installed. The Arduino has a simple interface to be able to ouput to the web if the ethernet shield is attached.


So now you have remote control via a simple web page. Next time we will spend some time in the big long list at the start of the article.

—————————————-

Have not tested this, so try at your own risk.


From Hackaday (http://hackaday.io/project/6258) Single chip  usb temperature sensor.
Description
I  (the Hackaday author) created this project because I wanted to learn about PIC microcontrollers and the USB protocol. I also wanted to see how simple I could make a USB device. I’ve gotten it down to two components: a PIC16F1455 microcontroller and the USB connector. The microcontroller acts as a USB serial device and will send the temperature as an ASCII string once per second.
Details

The PIC16F1455 is a relatively new microcontroller that can do USB without an external crystal. It also has internal pull-up resistors for the USB data lines. These things mean no extra hardware is necessary for USB communication.
I needed something useful to send over USB and I noticed that the PIC16F1455 has a Temperature Indicator Module. This peripheral will let you read the operating temperature of the silicon die over the ADC. It’s not terribly accurate, but the silicon die temperature will be about equal to the outside temperature.

I carefully soldered a male USB Type A connector to the PIC16F1455’s Vdd, Vss, D+, and D- pins. Then, using the M-Stack USB Stack from Signal 11, I wrote a program to enumerate the PIC16F1455 as a USB CDC serial device and send the temperature in ADC counts as an ASCII string at 1 Hz.
From the computer side, it’s easy to connect to the USB temperature data logger like any other serial device, parse the incoming strings, and save the data to a file with a timestamp.
The last step is to map the ADC counts to a temperature scale. Microchip has an application note AN1333 with some equations. However, for a constant Vdd, the scale is pretty linear so it’s easiest to record the ADC count at two known temperatures and interpolate between them.

Looks pretty straight forward.

Some code links:

 https://github.com/mogenson/USBTempLogger

 https://github.com/signal11/m-stack
—————————————-

Try this at your own risk.

From the kodi wiki:

Follow this simple procedure:

  1. Open the receiver’s plastic case using a small screw driver. Carefully pry around the case.
  2. Solder the wire to the receiver using the picture below
  • Note: This might damage the casing of the dongle.

1 Color Coded Pinout

Xbox-dvd-pinout thumb.jpg

  • If you’re using a standard USB cable you should just be able to match the colors and solder away, but to be sure check your cable with a continuity tester according to the USB spec provided here.
  1. Red = Positive Power (+5V DC)
  2. White = Data –
  3. Green = Data +
  4. Yellow = Unused
  5. Black = Ground (0V DC)

Normal usb connections:

Pin Name Cable color Description
1 VCC Red +5 VDC
2 D- White Data –
3 D+ Green Data +
4 GND Black Ground


2 Lirc Config

/etc/lirc/hardware.conf:

#Chosen Remote Control
REMOTE="None"
REMOTE_MODULES="lirc_atiusb lirc_dev"
REMOTE_DRIVER=""
REMOTE_DEVICE="/dev/lirc0"
REMOTE_SOCKET=""
REMOTE_LIRCD_CONF=""
REMOTE_LIRCD_ARGS="-r"

#Chosen IR Transmitter
TRANSMITTER="None"
TRANSMITTER_MODULES=""
TRANSMITTER_DRIVER=""
TRANSMITTER_DEVICE=""
TRANSMITTER_SOCKET=""
TRANSMITTER_LIRCD_CONF=""
TRANSMITTER_LIRCD_ARGS=""

#Enable lircd
START_LIRCD="true"

#Don't start lircmd even if there seems to be a good config file
#START_LIRCMD="false"

#Try to load appropriate kernel modules
LOAD_MODULES="true"

# Default configuration files for your hardware if any
LIRCMD_CONF="lircd.conf"

#Forcing noninteractive reconfiguration
#If lirc is to be reconfigured by an external application
#that doesn't have a debconf frontend available, the noninteractive
#frontend can be invoked and set to parse REMOTE and TRANSMITTER
#It will then populate all other variables without any user input
#If you would like to configure lirc via standard methods, be sure
#to leave this set to "false"
FORCE_NONINTERACTIVE_RECONFIGURATION="true"
START_LIRCMD=""

/etc/lirc/lircd.conf:


# brand: Microsoft Xbox DVD Receiever (also works with generic)
# remote control: Xbox remote or any remote using RCA DVD player codes

begin remote

name XboxDVDDongle
bits 8
eps 30
aeps 100

one 0 0
zero 0 0
gap 163983
toggle_bit_mask 0x0

begin codes
LEFT 0xA9
UP 0xA6
RIGHT 0xA8
DOWN 0xA7
SELECT 0x0B
1 0xCE
2 0xCD
3 0xCC
4 0xCB
5 0xCA
6 0xC9
7 0xC8
8 0xC7
9 0xC6
0 0xCF
MENU 0xF7
DISPLAY 0xD5
REVERSE 0xE2
FORWARD 0xE3
PLAY 0xEA
PAUSE 0xE6
STOP 0xE0
SKIP- 0xDD
SKIP+ 0xDF
TITLE 0xE5
INFO 0xC3
BACK 0xD8
end codes
end remote

If using the Xbox DVD IR dongle, add this line to the bottom of /etc/modprobe.d/blacklist.conf:

blacklist xpad


3 XERC 

 The Sickmods XERC 2 XE works really well with an HTPC and the Xbox DVD dongle. It handles power-off and power-on via your remote. Here are some installation instructions for that.

—————————————-

This may not work with all calculators. Here is an interesting way to count footsteps and estimate how far you have walked.You need a cheap calculator, some foam or sponge, glue, foil, cellophane tape, and 2 long wires.

Then you will want to make a switch. To do tha, drilll or punch a hole in the sponge for the to the bottom.  Glue the foil to the top and bottom of the sponge.  The two foil pieces should not be touching. Connect the wires separately to each foiled surface.

Open up the calculator and connect each of the other wire ends to the top and bottom contacts of the “equals” aka = button. Put a piece of cellophane tape between the contract so that they do not connect. Close the calculator and make sure everything works normally. you would have to press the switch together for the = sign to work.  Attach the switch to the bottom of the shoe.

Now enter “1 + 1” into the calculator. Start waking and you will see the count begin to rise as you walk. When you are finished walking multiply the steps to the length of your stride and you will have your distanced walked.

—————————————-

Could see servos being used with this.

servohand

—————————————-

Zuupa di trippa. A stomach full of goodness.

SUNP0003

Good day.

Ides of june.

Leave a comment

Chit chat

=======

Thinking of B. B. King as he as sort of a hero to me.

The cable I ordered form china came in a month early.

Time for Mercury to settle down and let things get better.

If If you are coding just to code, consider other opportunities There is a lot more to it than just slinging code unless you are just doing it for your own enjoyment. To be honest, if you go to work for a company you will not be choosing what language you use, My first real job was s a maintenance programmer. They had one programming language I was familiar with, but had to learn a completely new language to do my job. Fortunately, having used several languages, I was able to adapt. Just a grain of salt.

Regretfully downloading mswin 2 in base 1.  Taking forever. Could download and install a linux desktop and or server in a fraction of the time spent.  #MSWindows version 2
Cheap sorter box

 When is the best time to get a free computer? When marriages or couples break apart and when MSWindows users think they need a new machine because the operating system requires beefier hardware. Acquired this old P3 for free from a couple breakup. Wiped the drive and put Linux on it. #mswindows #linux #repurpose #computer

——————————————————

Remember the days of modems and bulletin boards. Nostalgia: an old bbs program. (minus the support files)


COMMON SHARED Car.ret, Car.ret$, Lfeed, Lfeed$, Mod.dem, Console
DECLARE SUB delay (Secs!)
DECLARE SUB Lout (l$, Cr!)
CONST False = 0
CONST True = -1
' ****************************************************************************
' eddiedbbs version 0.00001
' main.loop written by computothought
' some data input routines borrowed from the dumbbs program
' last update 02/06/95
start.program:
GOSUB housekeeping
WHILE NOT done
GOSUB The.main.loop
WEND
GOSUB end.of.job
END
' *****************************************************************************
' Subroutines
' -----------------------------------------------------------------------------
housekeeping:
CLS
CLOSE
done = 0
Cdmask = &H80
Carrier = 0
'Status ports should be Com1 = 3fe and Com2 = 2fe (?f8+6)
Rs232.port = &H3FE: '&H3F8 + 6
Mod.dem = 1
Console = 2
Port$ = "COM1:"
Baud$ = "300,"
Flow$ = "N,8,1": ',DS0"
Minute = 60
Char.wait.time = 4 * Minute
Char.grace.time = 1 * Minute
Lin.length = 40
Q$ = CHR$(34)
Bell$ = CHR$(7)
Car.ret = 13
Car.ret$ = CHR$(Car.ret)
Lfeed = 10
Lfeed$ = CHR$(Lfeed)
' ------------------------------------------------
' select.baud - select the baud rate
Com.spec$ = Port$ + Baud$ + Flow$
' ----------------------------------------------
' open communication lines
OPEN Com.spec$ FOR RANDOM AS #Mod.dem
GOSUB pause
OPEN "scrn:" FOR OUTPUT AS #Console
PRINT
' ---------------------------------------------
' Restart the work log file
OPEN "append", #5, "worklog"
PRINT #5, "Start of job", TIME$, DATE$
CLOSE #5
RETURN
' ------------------------------------------------
' gchar - get a character
Gchar:
Char.timeout = False
Charet = 0
T = TIMER
DO
IF NOT EOF(Mod.dem) THEN
Ceddie$ = INPUT$(1, #Mod.dem)
C = ASC(Ceddie$)
PRINT #Mod.dem, CHR$(C);
IF C <> 8 THEN
PRINT #Console, CHR$(C);
ELSE
PRINT #Console, CHR$(29);
END IF
Charet = 1
END IF
GOSUB Carchek
LOOP UNTIL TIMER > T + Char.wait.time OR Charet = 1 OR Carrier = False
IF TIMER > T + Char.wait.time THEN
a$ = Car.ret$ + Lfeed$ + Bell$ + Bell$
a$ = a$ + "This BBS will hang up if you don't press a key."
CALL Lout(a$, True)
Violation = 2
Char.timeout = True
C = 256
END IF
RETURN
' ----------------------------------------------------
' gline - get a line
Gline:
In.line$ = ""
GOSUB Clear.garbage
DO
GOSUB Gchar
SELECT CASE C
CASE IS > 255, Car.ret
REM
CASE 29, 8
In.line$ = LEFT$(In.line$, LEN(In.line$) - 1)
CASE ELSE
In.line$ = In.line$ + CHR$(C)
END SELECT
LOOP UNTIL LEN(In.line$) > Lin.length OR (C = Car.ret AND LEN(In.line$) > 0) OR C > 255 OR Carrier = False
RETURN
' -------------------------------------------------------------------------
' Dtrlow
Dtrlow:
PRINT #Mod.dem, "ATH0"
GOSUB pause
PRINT #Mod.dem, "ATZ"
GOSUB pause
RETURN
' --------------------------------------------------------------------------
' Dtrhi
Dtrhi:
PRINT #Mod.dem, "ATE0M0S0=1&C1"
GOSUB pause
RETURN
' ----------------------------------------------------------
' file download
file.download:
Dload.item$ = ""
DO WHILE UCASE$(Dload.item$) <> "0"
Usefile$ = "dir.fil"
GOSUB File.display
GOSUB Clear.garbage
GOSUB Gchar
Dload.item$ = UCASE$(CHR$(C))
DO WHILE Dload.item$ <= "Z" AND Dload.item$ >= "A"
CALL Lout("Please open your buffer now, then press any key!", True)
GOSUB File.display
GOSUB Clear.garbage
GOSUB Gchar
Usefile$ = "\ul\dload" + CHR$(C)
GOSUB File.display
CALL Lout("Please close your buffer now, then press any key!", True)
GOSUB Clear.garbage
GOSUB Gchar
LOOP
IF Carrier = False OR Char.timeout THEN EXIT DO
LOOP
RETURN
' ----------------------------------------------------------
' bulletin display
bulletins:
Bullet.item$ = ""
DO WHILE UCASE$(Bullet.item$) <> "Q"
Usefile$ = "poster"
GOSUB File.display
CALL Lout("Enter choice: ", False)
GOSUB Clear.garbage
GOSUB Gchar
Bullet.item$ = UCASE$(CHR$(C))
CALL Lout(" ", True)
DO WHILE C > 48 AND C < 57
Usefile$ = Usefile$ + Bullet.item$
GOSUB File.display
C = 256
LOOP
IF Carrier = False OR Char.timeout THEN EXIT DO
LOOP
RETURN
' ----------------------------------------------------------
' new user routine
New.user:
Usefile$ = "newuser"
GOSUB File.display
CALL Lout("Please enter a unique password: ", False)
GOSUB Gline
CALL Lout("", True)
Pass.in$ = In.line$
CLOSE #4
KILL "userfile.old"
NAME "userfile" AS "userfile.old"
OPEN "O", #6, "userfile"
Status = 4
PRINT #6, Q$; Log.name$; Q$; ","; Q$; Pass.in$; Q$; ","; Status; ","; Q$; Time.in$; Q$
CLOSE #6
OPEN "I", #7, "userfile.old"
OPEN "A", #8, "userfile"
DO WHILE NOT EOF(7)
INPUT #7, a$, B$, C, D$
PRINT #8, Q$; a$; Q$; ","; Q$; B$; Q$; ","; C; ","; Q$; D$; Q$
IF a$ = "END" THEN EXIT DO
LOOP
CLOSE #7
CLOSE #8
RETURN
' ---------------------------------------------------------
' file.display
File.display:
OPEN "I", #3, Usefile$
WHILE NOT EOF(3)
LINE INPUT #3, data.in$
CALL Lout(data.in$, True)
WEND
CLOSE #3
RETURN
' =========================================================
' The main Loop
'
' This is where the 'BBS' actually begins.
'
The.main.loop:
Restart:
VIEW PRINT
GOSUB Dtrlow
GOSUB Dtrhi
CLS
PRINT
LOCATE 2, 30: PRINT "eddied BBS version 0.001"
PRINT
Wait.for.ring:
DO
C = 256
LOCATE 3, 30
PRINT DATE$; " "; TIME$
LOCATE 4, 30
PRINT "Rs232:"; INP(Rs232.port)
GOSUB Carchek
LOOP UNTIL Carrier
' -----------------------------------------------------
' start
Mainloop:
VIEW PRINT 6 TO 25
GOSUB Clear.garbage
PRINT
' -----------------------------------------------------
' header
Usefile$ = "prelog"
GOSUB File.display
' -----------------------------------------------------
' logon
logon:
Time.in$ = TIME$
Legal = False
CALL Lout("Please enter your name: ", False)
GOSUB Gline
Log.name$ = In.line$
CALL Lout("", True)
CLOSE #4
OPEN "I", #4, "userfile"
DO WHILE NOT EOF(4)
INPUT #4, Name.in$, Pass.in$, Status, Start$
IF UCASE$(Name.in$) = UCASE$(Log.name$) OR Name.in$ = "END" THEN EXIT DO
LOOP
IF Name.in$ = "END" THEN
GOSUB New.user
ELSE
FOR xdummy = 1 TO 3
CALL Lout(" password: ", False)
GOSUB Gline
Pass.word$ = ""
Pass.word$ = In.line$
CALL Lout("", True)
IF Pass.word$ = Pass.in$ THEN
EXIT FOR
ELSEIF ((Pass.word$ <> Pass.in$) AND (xdummy > 3)) THEN
violate = 1
GOTO Logoff
END IF
NEXT xdummy
END IF
CLOSE #4
' -----------------------------------------------------
' main
menu.item$ = ""
DO WHILE UCASE$(menu.item$) <> "G"
Usefile$ = "post2"
GOSUB File.display
CALL Lout(" ", True)
CALL Lout("Your choice: ", False)
GOSUB Clear.garbage
GOSUB Gchar
menu.item$ = UCASE$(CHR$(C))
CALL Lout(" ", True)
SELECT CASE menu.item$
CASE "D"
GOSUB file.download
CASE "B"
GOSUB bulletins
CASE "G"
violate = 0
END SELECT
IF Carrier = False OR Char.timeout THEN EXIT DO
LOOP
' -----------------------------------------------------
' footer
Usefile$ = "epilog"
GOSUB File.display
' -----------------------------------------------------
' pause
pause:
FOR x = 1 TO 4000
NEXT x
RETURN
' -----------------------------------------------------
' logoff
Logoff:
OPEN "append", #5, "worklog"
PRINT #5, Name.in$, Pass.word$, Time.in$, TIME$, violate
CLOSE #5
a$ = "Logging off"
CALL Lout(a$, True)
a$ = "+++"
CALL Lout(a$, True)
T = TIMER
DO
LOOP UNTIL TIMER > 4 + T
PRINT "Turning DTR low"
GOSUB Dtrlow
CALL delay(2)
PRINT "Bringing DTR high"
GOSUB Dtrhi
CALL delay(2)
RETURN
' ------------------------------------------------------
Carchek:
CC = (INP(Rs232.port) AND Cdmask)
IF CC = 128 THEN
Carrier = True
ELSE
Carrier = False
END IF
RETURN
' ------------------------------------------------------
Clear.garbage:
IF NOT EOF(1) THEN
DO
Ceddie$ = INPUT$(1, #Mod.dem)
LOOP UNTIL EOF(Mod.dem)
END IF
RETURN
' ------------------------------------------------------
end.of.job:
OPEN "append", #5, "worklog"
PRINT #5, "End of use", TIME$, DATE$
CLOSE #5
CLOSE
RETURN
' ===========================================================================

SUB delay (Secs)
' ------------------------------------------------
' delay - wait so many seconds
delay (Secs):
T1 = TIMER
DO
LOOP UNTIL TIMER > 40 + T1
END SUB

SUB flush (Time)
' ----------------------------------------------------
' flush - flush buffer
T = TIMER
DO
IF NOT EOF(Mod.dem) THEN
Dummy$ = INPUT$(LOF(Mod.dem), #Mod.dem)
END IF
LOOP UNTIL TIMER > T + Time
END SUB

SUB Lout (l$, Cr)
' ---------------------------------------------------
' lout - line out
FOR j = 1 TO LEN(l$)
G = ASC(MID$(l$, j, 1))
PRINT #Mod.dem, CHR$(G);
PRINT #Console, CHR$(G);
NEXT j
IF Cr THEN
PRINT #Mod.dem, Car.ret$; Lfeed$
PRINT #Console, Car.ret$;
END IF
END SUB

——————————————————

From Wikipedia:

Pulse-width modulation (PWM), or pulse-duration modulation (PDM), is a technique used to encode a message into a pulsing signal. It is a type of modulation. Although this modulation technique can be used to encode information for transmission, its main use is to allow the control of the power supplied to electrical devices, especially to inertial loads such as motors. In addition, PWM is one of the two principal algorithms used in photovoltaic solar battery chargers,[1] the other being MPPT.

The average value of voltage (and current) fed to the load is controlled by turning the switch between supply and load on and off at a fast rate. The longer the switch is on compared to the off periods, the higher the total power supplied to the load.

The PWM switching frequency has to be much higher than what would affect the load (the device that uses the power), which is to say that the resultant waveform perceived by the load must be as smooth as possible. Typically switching has to be done several times a minute in an electric stove, 120 Hz in a lamp dimmer, from few kilohertz (kHz) to tens of kHz for a motor drive and well into the tens or hundreds of kHz in audio amplifiers and computer power supplies.

The term duty cycle describes the proportion of ‘on’ time to the regular interval or ‘period’ of time; a low duty cycle corresponds to low power, because the power is off for most of the time. Duty cycle is expressed in percent, 100% being fully on.

The main advantage of PWM is that power loss in the switching devices is very low. When a switch is off there is practically no current, and when it is on and power is being transferred to the load, there is almost no voltage drop across the switch. Power loss, being the product of voltage and current, is thus in both cases close to zero. PWM also works well with digital controls, which, because of their on/off nature, can easily set the needed duty cycle.

PWM has also been used in certain communication systems where its duty cycle has been used to convey information over a communications channel.


Most micro controllers have pwm pins on board, but you can easily generate or simulate pwm in software for systems without pwm pins. First you do not see the “1” and then you see more of it. Code compiled with freebasic fbc -lang qb [filename]


 cls
for x = 1 to 1000
    for y =1 to (1000 - x)
        locate 1,1
        ?" ";
    next y
    for a = 1 to x
        locate 1,1
        ?"1";
    next a
next x
?

end 

Here is another way using an actual led connected to the parallel port. Emu;ates the idea of the lights dimming and getting brighter.

out 888,0  turns all lights off

out 888,255  turns all lights on


cls
for x = 1 to 50

    for y =1 to x
        locate 1,1
        rem ?"1";
        out 888,255
        for z = 1 to 500000
        next z
    next y
    for a = 1 to 50 -x
        locate 1,1
        rem ?" ";
        out 888,0
        for z = 1 to 500000
        next z
    next a
next x
out 888,0

or


cls
for x = 1 to 1000
    for y =1 to (1000 - x)
        locate 1,1
        rem ?" ";
        out 888, 0
    next y
    for a = 1 to x
         locate 1,1
         rem ?"1";
         out 888,255
    next a
next x
out 888,0 

——————————————————

Oldie, but goodie: Batch file to slowly print out a text file. Perfect for a quickie teleprompter.

; then
file="$1"
else
file="-"
fi

cat "$file" | while read c ; do
echo "$c"
sleep .5
done

——————————————————

If this is a duplicate, oopss.


Screenshot from 2013-12-08 15:29:59.png


Screenshot from 2013-12-08 15:33:39.png


Screenshot from 2013-12-08 15:50:30.png

Love MPD. It is both a music player and an internet radio player. You can install this on a really old machine or a new arm based linux device. Just add an amp and  speakers and you have a new age stereo that can be controlled remotely..
Make your directories where you want your music to be and then copy them there if they are not already there. Now to inbstall the basic software. You have the program itself (mpd)and a command line player to test it.(mpc)

$sudo apt-get install mpd mpc.

Sure sure your stero and or speakers are attached to the sound card and they work. Now to test it. We will do it with a radio station if you do not have any music to t4est with.

$ mpc add http://relay3.slayradio.org:8000/
adding: http://relay3.slayradio.org:8000/

$ mpc play
You should hear the radio station out of your speakers now.

Now let’s edit the config file for file location and to allow the server to be accesed from other systems. Warning this is not secure, as your better off sshing into the machine to control it.

$ sudo vim /etc/mpd.con
Change the directory where you files are (uncomment  the line also
# Files and directories #######################################################
#
# This setting controls the top directory which MPD will search to discover the
# available audio files and add them to the daemon’s online database. This
# setting defaults to the XDG directory, otherwise the music directory will be
# be disabled and audio files will only be accepted over ipc socket (using
# file:// protocol) or streaming files over an accepted protocol.
#
# music_directory               “/var/lib/mpd/music”

If you want to access the machine remotely you will need to change the hostname to the nmae of the michine, Warning: people will be albe to telnet into the machine unless you password protect the system.
#
# This setting sets the address for the daemon to listen on. Careful attention
# should be paid if this is assigned to anything other then the default, any.
# This setting can deny access to control of the daemon. Choose any if you want
# to have mpd listen on every address
#
# For network
# bind_to_address               “localhost”

Permissions:

# Permissions #################################################################
#
# If this setting is set, MPD will require password authorization. The password
# can setting can be specified multiple times for different password profiles.
#
#password                        “password@read,add,control,admin”
#
# This setting specifies the permissions a user has who has not yet logged in.
#
#default_permissions             “read,add,control,admin”
#
###############################################################################

There are other settings, but I will let you check that out your selves..

Now to access the system form other machines. There is a client for about every system known to man. You can check them out yourself at:

Screenshot from 2013-12-08 16:25:45.png
http://mpd.wikia.com/wiki/Clients

To add a radio station, you most likely have to have a url.

Have fun

——————————————————

Couple of cartoons:

Screenshot from 2015-06-06 07:36:40

Screenshot from 2015-06-04 02:20:52

Screenshot from 2015-05-29 14:47:37

Screenshot from 2015-06-01 00:47:39

Screenshot from 2015-05-29 15:27:06

Screenshot from 2015-06-01 01:12:30


——-Screenshot from 2015-05-31 17:55:25———————————————–

Put your tax dollars back to work.  Obsolete #computers could be a boon for #school #science departments.There are three kinds of ports usually on microcontrollers. Digital, Serial and pwm. From computers, the digital is the parallel port. you can also use the parallel port for pwm using only a few lines of code say in even qbasic. Lastly the serial port can be adapted to interface all kinds of sensors such as for temperature. That obsolete  computer can be made  into a sous vide machine in a matter of minutes, Control leds, an rc car, or even be used as a part of a home automation project. The i486 make a nice multiple rocket launcher. It’s your tax dollars, so use it wisely. #retrocomputing

FJCVOUYGZUAFO2L.MEDIUM

P000-256-267-481-f1016

P000-256-267-481-f1016

——————————————————

Screenshot from 2015-06-08 12:33:46

Not ours but some nice files for instruction in electronics.
wget https://dl.dropboxusercontent.com/u/103847327/Lab%201.pdf
wget https://dl.dropboxusercontent.com/u/103847327/Lab%202.pdf

wget https://dl.dropboxusercontent.com/u/103847327/Lab%202%20part%202.pdf
wget https://dl.dropboxusercontent.com/u/103847327/Lab%203.pdf
wget https://dl.dropboxusercontent.com/u/103847327/Lab%204.pdf
wget https://dl.dropboxusercontent.com/u/103847327/Lab%205.pdf
wget https://dl.dropboxusercontent.com/u/103847327/Lab%206.pdf
wget https://dl.dropboxusercontent.com/u/103847327/Lab%207.pdf

wget https://dl.dropboxusercontent.com/u/103847327/Lab%208.pdf

wget https://dl.dropboxusercontent.com/u/103847327/Lab%209.pdf
wget https://dl.dropboxusercontent.com/u/103847327/Lab%2010.pdf

wget https://dl.dropboxusercontent.com/u/103847327/Lab%202%20part%202.pdf

——————————————————

PC oscilloscope or how to save yourself hundreds of dollars before you buy an oscilloscope. Pull that old PC out of the closet and make it an oscilloscope: Could of copied everything here like I usually do, but most people know how to use a hyperlink.  http://www.instructables.com/id/Simple-PC-oscilliscope/

——————————————————

Minimal to use the Arduino as a web server and that is already in a sketch
that you can use. You need to edit the code so it will work in your network. 
 
</pre>
<pre><code class="hljs cpp"><span class="hljs-preprocessor">#include <SPI.h>
#include <Ethernet.h>

/******************** ETHERNET SETTINGS ********************/

byte mac[] = { 0x90, 0xA2, 0xDA, 0x0D, 0x85, 0xD9 };  //physical mac address
byte ip[] = { 192, 168, 0, 112 };                   // ip in lan
byte subnet[] = { 255, 255, 255, 0 };              //subnet mask
byte gateway[] = { 192, 168, 0, 1 };              // default gateway
EthernetServer server(80);                       //server port

void setup()
{
Ethernet.begin(mac,ip,gateway,subnet);     // initialize Ethernet device
server.begin();                             // start to listen for clients
pinMode(8, INPUT);                         // input pin for switch
}

void loop()
{
EthernetClient client = server.available();   // look for the client

/* a place for the code*/

delay(1);      // giving time to receive the data

/*
The following line is important because it will stop the client
and look for the new connection in the next iteration i.e
EthernetClient client = server.available();
*/
client.stop();
}</span></code></pre>
<pre></pre>
<pre><code class="hljs cpp"><span class="hljs-preprocessor">


Now for the code to do what you want the Arduino to do. Almost looks like
a type of cgi script. This goes in the middle of the script. Definitely 
some errors in this case.


client.println(<span class="hljs-string">"HTTP/1.1 200 OK"</span>);
client.println(<span class="hljs-string">"Content-Type: text/html"</span>);
client.println(<span class="hljs-string">"Connnection: close"</span>);
client.println();

<span class="hljs-comment">/*
This portion is the webpage which will be
sent to client web browser one can use html , javascript
and another web markup language to make particular layout
*/</span>

client.println(<span class="hljs-string">"<!DOCTYPE html>"</span>);    <span class="hljs-comment">//web page is made using html</span>
client.println(<span class="hljs-string">"<html>"</span>);
client.println(<span class="hljs-string">"<head>"</span>);
client.println(<span class="hljs-string">"<title>Ethernet Tutorial</title>"</span>);
client.println(<span class="hljs-string">"<meta http-equiv=\"refresh\" content=\"1\">"</span>);

<span class="hljs-comment">/*
The above line is used to refresh the page in every 1 second
This will be sent to the browser as the following HTML code:
<meta http-equiv="refresh" content="1">
content = 1 sec i.e assign time for refresh
*/</span>

client.println(<span class="hljs-string">"</head>"</span>);
client.println(<span class="hljs-string">"<body>"</span>);
client.println(<span class="hljs-string">"<h1>A Webserver Tutorial </h1>"</span>);
client.println(<span class="hljs-string">"<h2>Observing State Of Switch</h2>"</span>);

client.print(<span class="hljs-string">"<h2>Switch is:  </2>"</span>);

<span class="hljs-keyword">if</span> (digitalRead(<span class="hljs-number">8</span>))
{
client.println(<span class="hljs-string">"<h3>ON</h3>"</span>);
}
<span class="hljs-keyword">else</span>
{
client.println(<span class="hljs-string">"<h3>OFF</h3>"</span>);
}

client.println(<span class="hljs-string">"</body>"</span>);
client.println(<span class="hljs-string">"</html>"</span>);</pre>
<pre><code class="hljs cpp">


This what the code might look like all put back together and have made 
a few changes.


</pre>
<pre><code class="hljs cpp">#include <SPI.h>
#include <Ethernet.h>
/******************** ETHERNET SETTINGS ********************/

byte mac[] = { 0x90, 0xA2, 0xDA, 0x0D, 0x85, 0xD9 };  //physical mac address
byte ip[] = { 192, 168, 1, 112 };                   // ip in lan
byte subnet[] = { 255, 255, 255, 0 };              //subnet mask
byte gateway[] = { 192, 168, 1, 1 };              // default gateway
EthernetServer server(80);                       //server port

void setup()
{
Ethernet.begin(mac,ip,gateway,subnet);     // initialize Ethernet device
server.begin();                             // start to listen for clients
pinMode(8, INPUT);                         // input pin for switch
}

void loop()
{
EthernetClient client = server.available();   // look for the client

// send a standard http response header

client.println("HTTP/1.1 200 OK");
client.println("Content-Type: text/html");
client.println("Connnection: close");
client.println();

/*
This portion is the webpage which will be
sent to client web browser one can use html , javascript
and another web markup language to make particular layout
*/

client.println("<!DOCTYPE html>");    //web page is made using html
client.println("<html>");
client.println("<head>");
client.println("<title>Ethernet Tutorial</title>");
client.println("<meta http-equiv=\"refresh\" content=\"1\">");

/*
The above line is used to refresh the page in every 1 second
This will be sent to the browser as the following HTML code:
<meta http-equiv="refresh" content="1">
content = 1 sec i.e assign time for refresh
*/

client.println("</head>");
client.println("<body>");
client.println("<h1>A Webserver Tutorial </h1>");
client.println("<hr>");

client.println("<h2>Observing State Of Switch</h2>");
client.println("<center>");
client.println("<table border='1'>");
client.println("<td>");
client.println("<tr>");
client.println("<td>");
client.print("<h2>Switch is:  </h2>");
client.println("</td>");
client.println("<td>");
if (digitalRead(8))
{
client.println("<h3>ON</h3>");
}
e</code><code class="hljs cpp"><code class="hljs cpp"> </code><code class="hljs cpp"> </code><code class="hljs cpp">---</code>lse
{
client.println("<h3>OFF</h3>");
}
client.println("</td>");
client.println("</tr>");
client.println("</table>");
client.println("</center>");
client.println("</body>");
client.println("</html>");

delay(1);      // giving time to receive the data

/*
The following line is important because it will stop the client
and look for the new connection in the next iteration i.e
EthernetClient client = server.available();
*/
client.stop();

}</code></pre>
<pre><code class="hljs cpp">

——————————————————

Ideas on holding several Raspberry Pi’s together,


or put them into individually stackable cases

——————————————————

Compatible to computer networks.

What is the ESP8266?

The ESP8266, is a cheap WiFi module which you can address using the UART protocol. It’s been featured on Hackaday and other DIY electronics blogs very recently, and lots of DIY electronics tinkers are very excited at the doors this module opens for their projects. The module is:
Small Footprint
Easy to integrate with (using UART)
Takes care of all other overheads for getting WiFi up-and-running (TCP/IP Stack etc…)
. . . and, perhaps more importantly than all the other factors, very cheap – it can be purchased from China in a quantity of one for less than £4 !

There are no market equivalents for the DIY community – the XBee has been a popular choice for adding WiFi to DIY projects up until now, but the ESP8266 module is close to one tenth the price making it easily accessible for all types of low cost applications.

The ESP8266 is the name of the chip it’s self manufactured by a company called Espressif, but it is sold in modules manufactured in China which look as seen below,

The module can be addressed using a series of AT commands. These are simple commands sent UART at 115200 baud. For example, once the module is wired up, you can send the command

AT+RST will perform a software reset on the device. AT+CWLAPwill displat all of the currently available WiFi networks etc. – simple enough!
How do I set up the ESP8266 Module?

Here is a simple pin-out for the module (the pin numbers are defined in the table
and relate to the image):

Pin Number Pin Function Pin Number Pin Function
1 RX 5 GPIO2
2 VCC 6 CH_PD
3 GPIO0 7 GND
4 RST 8 TX

Note: Under normal operation Pin 6 (CH_PD) should be tied high (3V3) to ensure correct operation

As such, you can easily wire up the module to an Arduino or just a simple USB to serial converter and start sending AT commands (Remember: RX on the module joins to TX on the connection device and vice versa!).
What are the drawbacks of using this module?

As we’ve seen above, this is shaping up to be a very good value-for-money solution for adding WiFi capabilities to DIY projects, so what are the limitations.
The module is rather ‘power thirsty’. The current supplied via USB to an Arduino is barely enough to power this module. Other websites have recommended that you should have easily 1A available, but I have not measured this myself. This makes integrating the module slightly more tricky as a second, separate voltage regulator is required and it also rules out any battery powered projects.
It is temperamental – I’ve had a chance to play with this module, and although it works most of the time, all of the sample code I have found provides far from a solid solution – there are plenty of quirks to using it.

Code examples:  https://github.com/esp8266/Arduino/archive/esp8266-sdk-1.0.zip

Adding support for the esp8266 in the arduino ide 1.6.4 Depending on the speed of your internet connection how long it will take

Installing with Boards Manager

Starting with 1.6.4, Arduino allows installation of third-party platform packages using Boards Manager. We have packages available for Windows, Mac OS, and Linux (32 and 64 bit). The 1.7.3 version did not have this option.

  • Install Arduino 1.6.4 from the Arduino website.
  • Start Arduino and open Perferences window.
  • Enter http://arduino.esp8266.com/package_esp8266com_index.json into Additional Board Manager URLs field. You can add multiple URLs, separating them with commas.
  • Open Boards Manager from Tools > Board menu and install esp8266 platform (and don’t forget to select your ESP8266 board from Tools > Board menu after installation).


——————————————————

Something cool. (Salt helps it cool faster),

Good day

2b | !2b Shakesperean math?

Leave a comment

Chit chat

======

Screenshot - 06172014 - 10:01:35 AM


Just finished running the slackeware 14.1 update on my old Pentium 1 586. The wordpress update is taking a bit longer. Have tried to install all the old CL favorites like sc, but my favorite install is Freebasic. Have been able to port so much of my old software. Need to copy all my new batch files especially the page scrapers. Also installed is the web server for use as a doc server. When I did the install I did it with a pxeboot to a directory on the web server and the internet did the rest. Might be interesting if I could get iscsi or aoe to work and make the local hd unneeded. That is for another day. Using a compact flash for the drive now. So quiet. Also made an atx to at power cable so I could run the system on battery if needed. What does ‘obsolete’ mean? have dnsmasq working on it.
 If you are coding just to code, consider other opportunities There is a lot more to it than just slinging code unless you are just doing it for your own enjoyment. To be honest, if you go to work for a company you will not be choosing what language you use, My first real job was s a maintenance programmer. They had one programming language I was familiar with, but had to learn a completely new language to do my job. Fortunately, having used several languages, I was able to adapt. Just a grain of salt. .
Remember #caldera , #SCO and etc. Guess they forgot they gave out their source code. #linux
#IBM
You heard of B.C. This is B. A.  Before #Arduino. #hardware
Sous vide #arduino prototype
Normally we avoid posting anything Microsoft, but today we are going to make an exception.
When is the best time to get a free computer? When marriages or couples break apart and when MSWindows users think they need a new machine because the operating system requires beefier hardware. Acquired this old P3 for free from a couple breakup. Wiped the drive and put Linux on it.

Developed this simple wedding registry using Visual Basic on a i386 in the early days of gui for my then employer. Got me and interview to work with IT but accepted another companies offer.. Need to go back and code again.

Early dual cpu (aka dual core) system that was set up as a router. A collectors item.

—————————————-

Ever go somewhere and you need to have several systems be able to access their network, but they say all you cn have is one Ipaddress. An Ipaddress is like a phone number for a computer.  You can only have one per system under normal circumstances. Here with an extra system, we will show you how to do this.

A multitude of reasons exist as to why one would want to build a custom router vs. suffer with the performance, reliability issues, and limitations of an off-the-shelf solution. In the spirit of keeping this post short, I won’t launch into a long diatribe on the pros and cons of each here, but I have plenty of thoughts on this, so if you are interested, just ask.

What we are about to do is configure an incredibly fast and stable router/gateway solution for your home/office in about 15 minutes. (Note: This post assumes you already have your machine loaded up with a fresh copy of Ubuntu 14.04 or an equivalent and you have the two needed NICs installed.) This is not a firewall.

First, let’s make three initial assumptions:

eth0 is the public interface (the Cable/DSL modem is attached to this NIC)
eth1 is the private interface (your switch is connected to this NIC)
All of the client computers, servers, WAPs, etc. are connected to the switch

Let’s get started with the configuration. Set your timer and type quickly! 🙂

1.) Configure the network interfaces
You may need to make sure for older systems that plug and play os is enabled. Change the “address”, “netmask”, and “broadcast” values to match your internal network preferences. They must be different from the host aka wan network.

sudo nano -w /etc/network/interfaces
# The external WAN interface (eth0) public
allow-hotplug eth0
iface eth0 inet dhcp

# The internal LAN interface (eth1) private
allow-hotplug eth1
iface eth1 inet static
address 10.1.10.1
netmask 255.255.255.0
network 10.1.10.0
broadcast 10.1.10.255

2. Install and configure DNSmasq
DNSmasq is DNS forwarder and DHCP server. Change “domain” to the FQDN of your network and “dhcp-range” to the desired range of DHCP addresses you would like your router to serve out to clients.

sudo apt-get install dnsmasq

nano -w /etc/dnsmasq.conf
interface=eth1
listen-address=127.0.0.1
domain=home.andreimatei.com
0dhcp-range=10.1.10.100,10.1.10.110,12h

3.) Enable IP Forwarding
Uncomment the following line:

sudo nano -w /etc/sysctl.conf
net.ipv4.ip_forward=1

4.) Configure iptables
We create a file called /etc/iptables.rules and put this rule set inside of it.  As an example, this set includes allowing tcp traffic in from the outside world on port 222 (I run SSH on this alternate port) and also port-forwards tcp port 50,000 to an internal machine with the ip of 10,1,10.3 Use this as a guide for your own rules.

Note that when you do this access to the system will be locked down amd ssh not work. Infact a ping to the system will be ignored.

sudo nano -w /etc/iptables.rules

*nat
-A PREROUTING -i eth0 -p tcp -m tcp –dport 50000 -j DNAT –to-destination 192.168.0.3:50000
-A POSTROUTING -o eth0 -j MASQUERADE
COMMIT

*filter
-A INPUT -i lo -j ACCEPT
-A INPUT -m state –state RELATED,ESTABLISHED -j ACCEPT
-A INPUT -i eth0 -p tcp -m tcp –dport 222 -j ACCEPT
-A INPUT -i eth0 -j DROP
-A FORWARD -i eth0 -p tcp -m tcp –dport 50000 -m state –state NEW -j ACCEPT
COMMIT

5.) Activate your iptables rules

iptables-restore < /etc/iptables.rules

6.) Ensure iptables rules start on boot
Insert the following line into your /etc/network/interfaces file right underneath “iface lo inet loopback”

nano -w /etc/network/interfaces
pre-up iptables-restore < /etc/iptables.rules

7.) Reboot and Verify
That’s it! After a reboot, you should now have a very basic Linux Router/Gateway for your network.

router:~$ sudo nano -w /etc/iptables.rules
[sudo] password for eddie:

router:~$ sudo iptables-restore < /etc/iptables.rules

router:~$ sudo nano -w /etc/network/interfaces

router:~$ sudo reboot

router:~$
Broadcast message from router
(/dev/pts/0) at 8:44 …

The system is going down for reboot NOW!
Connection to 192.168.1.102 closed by remote host.

Connection to 192.168.1.102 closed.

You should be able to use your router now.

NOte: you should be able to do this with most any distro, but using different commands. Wnat to try this with a pentium 1 and Slackware. Did not have time to trying before putting this article out.

oedt01:~$ ssh 192.168.1.102
192.168.1.102’s password:
Welcome to Ubuntu 14.04.2 LTS (GNU/Linux 3.13.0-53-generic i686)

* Documentation:  https://help.ubuntu.com/
Last login: Fri May 29 07:39:02 2015

router:~$ cd /etc

router:/etc$ sudo vim  dnsmasq.conf
[sudo] password for eddie:

router:/etc$ sudo vim /etc/network/interfaces

router:/etc$ sudo vim  dnsmasq.conf

router:/etc$ sudo service dnsmasq restart

* Restarting DNS forwarder and DHCP server dnsmasq                      [ OK ]
router:/etc$ sudo service dnsmasq sttus
Usage: /etc/init.d/dnsmasq {start|stop|restart|force-reload|dump-stats|status}
router:/etc$ sudo service dnsmasq status
* Checking DNS forwarder and DHCP server dnsmasq                                * (running)

Connect to the client side. We used a tablet and crossover adapter to check dnsmasq. You could use a network switch also.

Note: if you get a usb to ethernet adapter, you can make a mice little Raspberry Pi router. You could also use a wireless card for the lan, but that requires a bit more security,

You may also want to setup webmin to make managing the router easier.

—————————————-

It is not required, but installing webmin can make managing the router easier.

router:/etc$ cd

router:~$ wget http://prdownloads.sourceforge.net/webadmin/webmin_1.750_all.deb
–2015-05-29 08:15:22–  http://prdownloads.sourceforge.net/webadmin/webmin_1.750_all.deb
Resolving prdownloads.sourceforge.net (prdownloads.sourceforge.net)… 216.34.181.59
Connecting to prdownloads.sourceforge.net (prdownloads.sourceforge.net)|216.34.181.59|:80… connected.
HTTP request sent, awaiting response… 301 Moved Permanently
Location: http://downloads.sourceforge.net/project/webadmin/webmin/1.750/webmin_1.750_all.deb [following]
–2015-05-29 08:15:22–  http://downloads.sourceforge.net/project/webadmin/webmin/1.750/webmin_1.750_all.deb
Resolving downloads.sourceforge.net (downloads.sourceforge.net)… 216.34.181.59
Connecting to downloads.sourceforge.net (downloads.sourceforge.net)|216.34.181.59|:80… connected.
HTTP request sent, awaiting response… 302 Found
Location: http://hivelocity.dl.sourceforge.net/project/webadmin/webmin/1.750/webmin_1.750_all.deb [following]
–2015-05-29 08:15:22–  http://hivelocity.dl.sourceforge.net/project/webadmin/webmin/1.750/webmin_1.750_all.deb
Resolving hivelocity.dl.sourceforge.net (hivelocity.dl.sourceforge.net)… 74.50.101.106
Connecting to hivelocity.dl.sourceforge.net (hivelocity.dl.sourceforge.net)|74.50.101.106|:80… connected.
HTTP request sent, awaiting response… 200 OK
Length: 26195366 (25M) [application/octet-stream]
Saving to: ‘webmin_1.750_all.deb’

100%[======================================>] 26,195,366   586KB/s   in 42s

2015-05-29 08:16:04 (614 KB/s) – ‘webmin_1.750_all.deb’ saved [26195366/26195366]

router:~$ sudo dpkg -i webmin_1.750_all.debSelecting previously unselected package webmin.
(Reading database … 57184 files and directories currently installed.)
Preparing to unpack webmin_1.750_all.deb …
Unpacking webmin (1.750) …
dpkg: dependency problems prevent configuration of webmin:
webmin depends on libnet-ssleay-perl; however:
Package libnet-ssleay-perl is not installed.
webmin depends on libauthen-pam-perl; however:
Package libauthen-pam-perl is not installed.
webmin depends on libio-pty-perl; however:
Package libio-pty-perl is not installed.
webmin depends on apt-show-versions; however:
Package apt-show-versions is not installed.

dpkg: error processing package webmin (–install):
dependency problems – leaving unconfigured
Processing triggers for ureadahead (0.100.0-16) …
Errors were encountered while processing:
webmin

There will probably be an error. There is an easy fix.

router:~$ sudo apt-get upgrade -f
Reading package lists… Done
Building dependency tree
Reading state information… Done
Correcting dependencies… Done
Calculating upgrade… Done
The following NEW packages will be installed:
apt-show-versions libapt-pkg-perl libauthen-pam-perl libio-pty-perl
libnet-ssleay-perl
0 upgraded, 5 newly installed, 0 to remove and 0 not upgraded.
1 not fully installed or removed.
Need to get 425 kB of archives.
After this operation, 1,752 kB of additional disk space will be used.
Do you want to continue? [Y/n]
Get:1 http://us.archive.ubuntu.com/ubuntu/ trusty/main libnet-ssleay-perl i386 1.58-1 [242 kB]
Get:2 http://us.archive.ubuntu.com/ubuntu/ trusty/universe libauthen-pam-perl i386 0.16-2build3 [27.8 kB]
Get:3 http://us.archive.ubuntu.com/ubuntu/ trusty/main libio-pty-perl i386 1:1.08-1build4 [36.7 kB]
Get:4 http://us.archive.ubuntu.com/ubuntu/ trusty/main libapt-pkg-perl i386 0.1.29build1 [84.5 kB]
Get:5 http://us.archive.ubuntu.com/ubuntu/ trusty/universe apt-show-versions all 0.22.3 [33.9 kB]
Fetched 425 kB in 1s (226 kB/s)
Selecting previously unselected package libnet-ssleay-perl.
(Reading database … 82053 files and directories currently installed.)
Preparing to unpack …/libnet-ssleay-perl_1.58-1_i386.deb …
Unpacking libnet-ssleay-perl (1.58-1) …
Selecting previously unselected package libauthen-pam-perl.
Preparing to unpack …/libauthen-pam-perl_0.16-2build3_i386.deb …
Unpacking libauthen-pam-perl (0.16-2build3) …
Selecting previously unselected package libio-pty-perl.
Preparing to unpack …/libio-pty-perl_1%3a1.08-1build4_i386.deb …
Unpacking libio-pty-perl (1:1.08-1build4) …
Selecting previously unselected package libapt-pkg-perl.
Preparing to unpack …/libapt-pkg-perl_0.1.29build1_i386.deb …
Unpacking libapt-pkg-perl (0.1.29build1) …
Selecting previously unselected package apt-show-versions.
Preparing to unpack …/apt-show-versions_0.22.3_all.deb …
Unpacking apt-show-versions (0.22.3) …
Processing triggers for man-db (2.6.7.1-1ubuntu1) …
Setting up libnet-ssleay-perl (1.58-1) …
Setting up libauthen-pam-perl (0.16-2build3) …
Setting up libio-pty-perl (1:1.08-1build4) …
Setting up libapt-pkg-perl (0.1.29build1) …
Setting up apt-show-versions (0.22.3) …
** initializing cache. This may take a while **
Setting up webmin (1.750) …
Webmin install complete. You can now login to https://router:10000/
as root with your root password, or as any user who can use sudo
to run commands as root.
Processing triggers for ureadahead (0.100.0-16) …

—————————————-

How can I compile a simple C or C++ program on Linux operating systems using bash Terminal application?

Tutorial details

Difficulty: easy
Root privileges No
Requirements GNU C/C++ compiler
Estimated completion time 10m

GNU C and C++ compiler collection
Development tools
Development libraries
IDE or text editor to write programs

Part 1: Install C/C++ compiler and related tools

To compile a C or C++ program on any Linux distro such as Ubuntu, Red Hat, Fedora, Debian and other Linux distro you need to install:

>Fedora, Redhat, Centos, Or Scientific linux:

# yum groupinstall ‘Development Tools’

>Debian, Ubuntu, or Mint

$ sudo apt-get update
$ sudo apt-get install build-essential manpages-dev

To verify the install, type the following commands to display the version number and location of the compiler on Linux:

$ whereis gcc
$ which gcc
$ gcc –version

Sample outputs:

$ whereis gcc
gcc: /usr/bin/gcc /usr/lib/gcc /usr/bin/X11/gcc

$ whereis g++
g++: /usr/bin/g++ /usr/bin/X11/g++

$ gcc –version
gcc (Debian 4.7.2-5) 4.7.2
Copyright (C) 2012 Free Software Foundation, Inc.
This is free software; see the source for copying conditions.  There is NO
warranty; not even for MERCHANTABILITY or FITNESS FOR A PARTICULAR PURPOSE.

$ gcc
gcc: fatal error: no input files
compilation terminated.
$

Part 2:  GNU C compiler on Linux. Create a file called demo.c using a text editor such as vim or nano

#include<stdio.h>
/* demo.c: My first C program on a Linux
*/
int main(void) {
printf(“Hello! This is a test program.\n”);
return 0;
}

Save as demo.c

How do I compile the program on Linux?

Use any one of the following syntax to compile the program called demo.c:

$ cc program-source-code.c -o executable-file-name

OR

$ gcc program-source-code.c -o executable-file-name

In this example, compile demo.c, enter:
$ cc demo.c -o demo

If there is no error in your code or C program then the compiler will successfully create an executable file called demo in the current directory, otherwise you need fix the code. To verify this, type:

$ ls -al demo*
-rwxr-xr-x 1 eddie eddie 4884 May 31 20:35 demo
-rw-r–r– 1 eddie eddie  149 May 31 20:35 demo.c

How do I run or execute the program called demo on Linux? Just simply type the the program name

$ ./demo

OR

$ /path/to/demo

$ ./demo
Hello! This is a test program.

Part 3: GNU C++ compiler on Linux

Create a program called demo.cpp as follows:

#include “iostream”
// demo2.C – Sample C++ program
int main(void) {
std::cout << “Hello! This is a C++ program.\n”;
return 0;
}

To compile this program, enter:

$ g++ demo.cpp -o demo

To run this program, type: ./demo

$ ./demo
Hello! This is a C++ program.

Part 4: More information.
How do I generate optimized code on a Linux machine?

The syntax is as follows C compiler:
cc -O input.c -o executable
The syntax is as follows C++ compiler:
g++ -O -Wall input.C -o executable
How do I compile a C program that uses math functions?

The syntax is as follows when need pass the -lm option with gcc to link with the math libraries:
cc myth1.c -o executable -lm
How do I compile a C++ program that uses Xlib graphics functions?

The syntax is as follows when need pass the -lX11 option with gcc to link with the Xlib libraries:
g++ fireworks.C -o executable -lX11
How do I compile a program with multiple source files?

The syntax is as follows if the source code is in several files (such as light.c, sky.c, fireworks.c):
cc light.c sky.c fireworks.c -o executable
C++ syntax is as follows if the source code is in several files:
g++ ac.C bc.C file3.C -o my-program-name

See gcc(1) : Linux and Unix man page for more information.

$ man gcc

—————————————-

Yet another weather picture grabber and the the picture is converted to ascii.

#!/bin/bash

#Set variables
DOWNLOAD_DIR=/tmp/weather/
WEATHER_GIF=http://archive.wfaa.com/weather/images/core/animated-loops/comp/880×495/new_tarrant.gif

COUNTER=0

#check for  download directory
if [ ! -d “$DOWNLOAD_DIR” ]; then
mkdir -p $DOWNLOAD_DIR
fi

#remove old files
rm  $DOWNLOAD_DIR/*gif
rm  $DOWNLOAD_DIR/*.png
rm  $DOWNLOAD_DIR/*.txt

#get weather gif
wget $WEATHER_GIF -O “${DOWNLOAD_DIR}map.gif”

#extract gif to png
convert -coalesce “${DOWNLOAD_DIR}/map.gif” “${DOWNLOAD_DIR}/map.png”

#convert images to text
for i in $DOWNLOAD_DIR/map-*; do
img2txt -f utf8 -W 100 -H 30 $i > $i.txt
done

#display images
while [ $COUNTER -lt 5 ] ; do
for i in $DOWNLOAD_DIR/map-*.txt; do
printf ’33[1;1H’
cat $i
sleep 0.5
done
let COUNTER=COUNTER+1
done

—————————————-


There are many parts to home automation but the main need is to be able to turn something on or off. Without that the rest is meaningless. Let us start with a simple light switch that you can control manually. The off position we will call zero and the on position we will call the one state.


Of course the purpose of home automation is for you not to have to manually turn off or on a switch. So we can get an electronic part known as a switching transistor to do the job for us with the help of a computing device that we can program. These diagrams are way over simplified to make things simpler. We could ask the computer to turn off all the leds with a command like out 888,0 and if any leds were on, they would immediately turn off.


The again, we could issue a command to turn them all on with out 888,255


Then you would want to turn them off and on individually also. Then you would either write some code or have a per-written program to do it for you and have appliances turn on or off at your will. Of course once you have your programming arranged, you can control the leds or any kind of home appliance or anything else at will. That is when interesting things can start happening if you want them to.

That ends part one.  Next time we will dig a little deeper using sensors such as a computer based thermometer as part of the mix.

—————————————-

In the real world. you probably would not be building any electronics. You could purchase network based control boxes. Most of the devices would be controlled by the time of day or manually controlled like a remote stereo system.


Many single sensors are cause and affect such as a garage door opener where the system waits for the detection of the controller and the proper security sequence. or you could have multiple sensors that workindependently but cuase the same affect such as a fire alarm or a security system

Screenshot from 2015-06-02 05:39:29

But let use get a bit more sophisticated. you could add a variety of sensors, but the most common might be the temperature sensor for control of your heating cooling system. The same idea could probably be adapted to a sous vide cooking system.

Now things have become a bit more complicated with additional sensors and control devices required. Also requires more complicated programming. You can see where systems can become very expensive.

We have only scratched the surface when it comes to sensors. That is part 2 for now,

—————————————-

Lovescope and monthly (use at your own risk)

####################################
# Horoscope Grabber
#
#===============================
# Assignments
# ——————————–
datafile=”rawcnn.txt”
let “flag = 0”
# end assignments
#=================================
#
# Get data file
#———————————
end=$(echo $1 | tr ‘[:lower:]’ ‘[:upper:]’)
elinks -dump “http://www.horoscopes.co.uk/$1/Love-Horoscope.php&#8221; > $datafile
#=================================
#
# Extract and display data
#———————————
while read line
do fdata[$a]=$line
echo $line | grep -q “Love Horoscope”
if [ $? -eq 0 ]; then
# header
clear
let “flag = 1”
fi
if [ $flag -eq 1 ]; then
echo $line | grep -q $end
if [ $? -eq 0 ]; then
let “flag = 0”
else
echo $line | grep -q “IMG”
if [ $? -eq 0 ]; then
let “response = donothing”
else
echo $line | sed ‘s/\[.*\]//’
fi
fi
fi
let “a += 1″
done < $datafile
# footer
echo ———————————————
echo $1
#===================================
# End.
####################################

####################################
# Horoscope Grabber
#
#===============================
# Assignments
# ——————————–
datafile=”rawcnn.txt”
let “flag = 0”
# end assignments
#=================================
#
# Get data file
#———————————
elinks -dump “http://www.horoscopes.co.uk/$1/Monthly-Horoscope.php&#8221; > $datafile
#=================================
#
# Extract and display data
#———————————
while read line
do fdata[$a]=$line
echo $line | grep -q “Monthly Horoscope”
if [ $? -eq 0 ]; then
# header
clear
let “flag = 1”
fi
if [ $flag -eq 1 ]; then
echo $line | grep -q “Horoscopes”
if [ $? -eq 0 ]; then
let “flag = 0”
else
echo $line | grep -q “IMG”
if [ $? -eq 0 ]; then
let “response = donothing”
else
echo $line | sed ‘s/\[.*\]//’
fi
fi
fi
let “a += 1”
done < $datafile
# footer
echo ———————————————
echo
#===================================
# End.
####################################

—————————————-

Sweet potato pie before topping.

yampie

Good day.

Ides of May.

Leave a comment

Chit chat

=======

Having led’s hooked to the parallel port can can a server as well as any machine the chance to send signals whether by predefined code or Morse code to a potential user.

Always looking for software to be able to reach remotely such as ERP. Just a fancy hamve for doing accounting via a web server.

Screenshot from 2015-05-15 19:01:16

Downloaded Debian binaries and the Debian sources. thereby reducing the reliance on the Internet.

Pulled out the old parallax propeller to play with.

Probably play with the new rpi’s first since I finally have the a/v cables/

——————————————————-

nternet.

All of which makes right now the perfect time to hit up your cable, Internet and phone providers for a far better monthly deal, according to Mathew Ong, senior retail specialist at nerdwallet.com in San Francisco.

“Right now is the best time in 10 years to negotiate with your cable company,” Ong said.

Now, working with the experts at nerdwallet.com, here are five simple steps to lowering those bills every month.

Step One: Tell the company you want to cancel your service.

“When you call your provider and threaten to cancel your subscription, you’ll be transferred to a customer retention specialist — a person whose whole job is dependent on keeping you on board as a customer, to keep you paying for whatever they can get you for,” said Ong.

Step Two: Tell the company you want the very same pricing they are offering new customers, which is the same as asking for their best deal.

Step Three: If step two fails, tell the company exactly what their competitors are offering and tell them you want that deal.

To make sure you know what you are talking about, have the competitors’ deal printed out in front of you.
“I would be very upfront and say, this is exactly what I want, this is what I can get from your competition if I switch to them,” Ong said.

Step Four: Be professional and polite. Whatever you do, don’t ever get angry and rude.

“Be firm, very firm, but polite. Be positive and persistent and personal with the person you are negotiating with,” Ong said.

Step Five: If you fail, don’t give up. Try again.

“If you fail at negotiating, call a second time a few days later, you will get someone else, and if that does not work, call back a third time a week after that. The trick is finding someone who wants to make the deal bad enough to deal with you and give you what you want,” said Ong.

——————————————————-

OpenBSD is a Unix-like computer operating system descended from Berkeley Software Distribution (BSD), a Research Unix derivative developed at the University of California, Berkeley. It was forked from NetBSD by project leader Theo de Raadt in late 1995. As well as the operating system, the OpenBSD Project has produced portable versions of numerous subsystems, most notably PF, OpenSSH and OpenNTPD, which are very widely available as packages in other operating systems.

The one thing I like about Openbsd is that you can use it with a variety of hardware. Normally you want to standardize the hardware you use, but on a pinch, you can use alternative hardware. This is also fortunate for people with a limited budget can use older systems to be able to compute. Now Openbsd is being made available for the new microcontrollers. which brings about other exciting opportunities. Shown above is possibly Openbsd 5.2. Notice you can have a graphical user interface aka (gui) so you are not forced to use the traditional text only interface that most people think is cryptic and hard to use.  Though you can can use that type of interface if you prefer.

Actually I prefer to use the textual interface for a lot of tasks as it s easier to automate a lot of duties. The above picture is of a fresh install onto a virtual machine. Sort of a computer within a computer. Openbsd like most computer operating systems has regular upgrades in addition to the usual updates. Version 5.7 I think is the latest version. Openbsd is free as in speech. You can download it and install without paying a price at the door so to speak.

www.openbsd.org is the main site. To install Openbsd, you really need a live internet connection. Generally you will start with some minimal software to load and go from there. This last install was actually started with just a floppy disk so speak. No licensing codes or a set of a zillion disks  to deal with. You will need a system with a free disk drive for installation and a working network card.

If you wanted to try out Openbsd without devoting a system to it you could set up a virtual machine.

Set up the virtual hard drive of 5 gigabytes

$  qemu-img create openbsd.qcow 5G

You will need to download a boot image. you can get it in several formats including a cdrom, I decide to use a floppy disk image as it is only a could of megabytes and not gigabytes. Start the install.

$ qemu -fda  ~/Downloads/floppy57.fs -hda openbsd .qcow -boot d -net nic -net user -m 196 -localtime

More details about the installation can be found at http://www.openbsd.org/faq/faq4.html.  For the most part I just used the defaults.

Once you have finished the install the floppy is not needed anymore so you can eliminate it from the setup.

$ qemu  -hda openbsd.qcow -boot d -net nic -net user -m 196 -localtime
exit

Once you have done the installation, you can add lots of productivity software depending on the amount of free disk space you have. By the way a web server is built in traditionally.  We plan to outfit some old existing Pentium I computers for use in a school saving the school many dollars in computer hardware costs.

Once you have done the installation, you can add lots of productivity software depending on the amount of free disk space you have. By the way a web server is built in traditionally.  We plan to outfit some old existing Pentium I computers for use in a school saving the school many dollars in computer hardware costs.

Let’s update it. I linux you have a sources.list file. with bsd perse you have to set a parth to the packages the first time

#  export PKG_PATH=”http://mirror.esc7.net/pub/OpenBSD/$(uname -r)/packages/$(arch -s)/”

Will take into account the version of bsd and the hardware platform you using.

# Now the upgrade:

# pkg_add -uvi

There should not be any updates if you have just done a fresh install.

Now for packages. Screen is a very useful program especially if you use the command line a lot.

#pkg_add -i screen

Will allow you to install screen interactively.

For more information see:  http://www.openbsd.org/faq/faq15.html#PkgInstall

——————————————————-

Picture of Crossword or Scrabble helper.


Doing a crossword and no one around to ask about a word, then this instructable is for you. Have not played scrabble since I was a kid. Also like to do crossword puzzles. If everyone uses the same tools, then it really is playing fair.There is an easy way to make the game more interesting and you increase your vocabulary as well as your typing skills at the same time.Recommended that you have at least some time at the linux command line. These tricks can also be done on the Mac and BSD with minor modifications.Note: a quick grep trick for finding a file wth certain text is:locate filename | grep search text$ locate.pdf | grep arduino

Step 1: Whats required?

Hardware:
Linux based computer where you can access the command line.Software:
A word file which should be already available in linux.
Access to the “grep” command.Knowledge:
Assuming you know how to do a crossword puzzle and or know how to play scrabble.
You know how to use the linux command line.

Step 2: Getting the words.

Picture of Getting the words.


What would one need? Maybe a list of words and a way to search the list of words. Let’s see there is a list of words on a linux system. That file could be easily copied to the home directory. You definitely want to copy it so if you edit it and there is an issue, there will be no problems with your system. $ cp /usr/share/dict/words .

Step 3: Using grep.

Picture of Using grep.
To get to know a command called grep a little better, tried to explore how it could be used to an advantage.  For now, how can I search through the file. The grep command will work perfectly. Well how do you use it. Lets say we want to add some letters where there is ed at the end. We use the “$” sign to show that we want something at the end of the word. $ grep “ed$” words

Alfred
Americanized
Anglicized
Appleseed
Brailled
Englished
Ethelred
Fed
Fred
Frenched

This generates a rather long list. so we might want to paginate the output.
$ grep “ed$” words | less
or we might want to save the list to a file we can edit and peruse for later use.
$ grep “ed$” words > wordfile
That is nice, now lets do letters at the beggining of the file. We use the “^” sign to show that we want something at the beggining of the word.
$ grep “^th” words

thank
thanked
thankful
thankfuller
thankfullest
thankfully
thankfulness
thankfulness’s

You can combine the two commands so that you can find a word that has the beginning and the ending we want. We want to use an “*” to say any letters can go in between. In this case thought we want one of the letters to be “m”. We use “[]” to show which possible letter or letters we want in between.
$ grep “^zo*[m]*ed$” words
zed
zoomed
There you can use the “[]” to say I want to have any words that start with these two letters.
$ grep “^[xz]“

xylem’s
xylophone
xylophone’s
xylophones
xylophonist
xylophonists
z
zanied
zanier
zanies
zaniest
…grep “^m..t..s$” words
mantels
mantles
martyrs
masters
matters
mentors
misters
mittens
mortals
mortars
mottoes
mouthes
mutters
mysticsBlow by blow:* ^ – The carat (shift-6) says “this is the beginning of the line”. Without it, it would find all words like “fundamentals”.
* $ – The dollar sign is the same thing, only for the end of the line. Without it, you’d also get words like “mattresses”.
* . – The period means “any character here”. One, and one only, character will match here.But suppose you’re dealing with a game besides a crossword puzzle, like Scrabble for instance, and you’re limited by more constraints than in a crossword. You might want to ‘hook’ (Scrabble lingo for ‘add letters to the beginning or end of a word to form more words’). So, let’s see how many words end in “are”.ß grep “are$” words | wc -l
43Well, those are good odds. But we hit the edge of the board with some of them (I peeked). So, we need words that are seven letters or less which end in “are”. “^….are$” would get all of the seven letter words, but not the shorter ones. The solution is rather cryptic this time:ß grep “^.\{1,4\}are$” words
airfare
aware
bare
beware
blare
care
compare
dare
declare
ensnare
fanfare
fare
flare
glare
hare
mare
pare
prepare
rare
scare
share
snare
spare
square
stare
unaware
ware
warfare
welfare…but we’ve met the caret, dollar sign, and period before, so really the new part is the \{1,4\}. This says “match as few as one, and as many as four, repetitions of the previous character”. The activator for the number range is the curly braces, which then have to be escaped with slashes (does anybody know why, class?). And since the previous character is a period, which matches any letter, we’ve found all the words shorter than eight letters which end in “are”.This is all well and good, but we only have so many letters to work with in Scrabble at one time. Say that our current rack has the letters “C F T W A B M”. Can we limit it to only words which use those letters?ß grep “^[cftwabm]\{1,4\}are$” words
aware
bare
care
fare
mare
wareAh, now we’re getting somewhere! The [] square brackets give the set of acceptable characters. Another way to use them is to express a range (e. g. [0-9]), but that’s hardly the usual case in word games.The only limitation is the imagination. If you are playing scrabble, let your partners know what you doing to prevent any hurt feelings. I like to use this same idea for crossword puzzles also.

Step 4: Last thoughts.

Picture of Last thoughts.


If you want to combine two or more word lists to have a greater vocabulary to work from is fine also: (words.new must be an ascii or text file.)$ mv words words.old
$ cat words.old words.new > words.temp
$ sort words.temp | uniq -u > wordsList amount of words$ wc -l wordsYou should now have a larger word file!One other hint:
One zip file I downloaded of words had the words in files separated by the first letter. I needed them in one list. No problem.$ cat {A..Z}.DIC > words.newThere are plenty of on-line web pages to do all this stuff, but for me it is nice not to have to depend on the internet all the time for one’s needs. Have fun!

Step 5: Bonus: What words can you make.

Picture of Bonus: What words can you make.


Like anagrams or wonder what words you can make then try the “an” command.
$ sudo apt-get update
$ sudo apt-get install an
$ an “instructables”
inscrutable st
inscrutable t’s
inscrutable ts
inscrutable t s
inscrutable t s
….
….
….

Want a limited list of only 10 options try:
$ an -n 10 “instructables”
inscrutable st
inscrutable t’s
inscrutable ts
inscrutable t s
inscrutable t s
inscrutable t s
inscrutable t s
incurables st t
incurables t’s t
incurables ts t

Step 6: Use grep to extract from a stream

Picture of Use grep to extract from a stream


Simple batch file to get weather information: (head command limits results).
#! /bin/bash
zip=$1
tmon=$(date +”%b”)
tday=$(date +”%d”)
echo “The weather for $zip on $tmon $tday:”
lynx -width 1000 -dump “http://m.wund.com/cgi-bin/findweather/getForecast?brand=mobile&query=$zip&#8221; > weather
cat weather | grep “Updated”
cat weather | grep “Observed”
cat weather | grep “Temperature”
cat weather | grep “Humidity”
cat weather | grep ” Dew Point”
cat weather | grep “Wind” | head -1
cat weather | grep “Wind Gust” | head -1
cat weather | grep “Pressure”
cat weather | grep “Conditions” | head -1
cat weather | grep “Visibility”
cat weather | grep “UV”
cat weather | grep “Clouds”
cat weather | grep “Yesterday’s Maximum”
cat weather | grep ” Yesterday’s Minimum”
cat weather | grep “Sunrise”
cat weather | grep “Sunset”
cat weather | grep “Moon Rise”
cat weather | grep “Moon Set”
cat weather | grep -A1 “Moon Phase”
cat weather | grep “Raw METAR”

——————————————————-

Look at astrology as an intellectual cartoon and an insight into human thinking. So I will peek at it once in a while. Also gave a chance to play with page scraping again.

$ ./horoscope.sh Virgo

Daily Horoscope for Tuesday 19th May 2015

Share :

Through friends of someone close, you could learn more about their
background. This extra information, particularly if it’s related to how
they acquired their qualifications, and the friendships they made en
route, may not be something you wish to discuss with others, but might go
some way towards explaining why they are pulled towards certain
geographical locations. This might even impact on decisions being taken
now for travel in a couple of months time.

VIRGO


Wrote a script to pull the daily horoscope for a particular sign. The site we are getting the data from has changed. So that led me to go to another site for the time being. Actually it seems a blessing in disguise because now we can get more than the daily listing. Here is the original script.

Original script

 #===================================
# Get today's horoscope
# get sign
hsign=""
read -p "Enter your horscope sign: " hsign
if [ -z $hsign  ]
then hsign="virgo"
fi
# hsign=$(zenity --entry \
#        --title="Daily Horoscope" \
#        --text="Enter your _sign:" \
#        --entry-text "$hsign")
#-------------------------------------------
# output data
# character width required for information box
cw=38
#create data file (datadir and file name can be changed to your needs.
datadir="/home/eddie/bin/signs"
filename="$datadir/th"
# make sure hsign is uppercase
hsign="`echo $hsign|tr '[a-z]' '[A-Z]'`"
cat $datadir/$hsign > $filename
echo -n "Today's date: " >> $filename
date +%D >> $filename
echo "Today's horoscope for:" >> $filename
lynx -width 1000 -dump
"http://www.creators.com/lifestylefeatures/horoscopes/horoscopes-by-holiday.html"
 | grep $hsign | fold -sw $cw >> $filename
#output
# zenity --text-info --filename=$filename
cat $filename
#remove  unneeded file
rm $filename

Was not sure how to do the script, but the I remembered the old CNN script we used. Minor changes and so we are back with the scopes again. To invoke the script you would use

./horoscope.sh signname

$ ./horoscope.sh Virgo

First letter must be capitalized and the rest lower case.
New script

 ####################################
# Horoscope  Grabber
#
#===============================
# Assignments
# ——————————–
datafile="horoscope.txt"
let "flag = 0"
# end assignments
#=================================
#
# Get data file
#———————————
elinks -dump "http://www.horoscopes.co.uk/$1/Daily-Horoscope.php"  > $datafile
#=================================
#
# Extract and display data
#———————————
while read line
do fdata[$a]=$line
    echo $line | grep -q "Daily Horoscope"
    if  [ $? -eq 0 ]; then
        # header
        clear
        let "flag = 1"
    fi
    if [ $flag -eq 1 ]; then
        echo $line | grep -q "$1"
            if [ $? -eq 0 ]; then
            let "flag = 0"
        else
            echo $line | grep -q "IMG"       
            if [ $? -eq 0 ]; then
                let "response = donothing"
            else
                echo $line | sed ‘s/\[.*\]//’
            fi
        fi
    fi
let "a += 1"
done < $datafile
# footer
echo ———————————————
echo
#===================================
# End.
####################################

——————————————————-

Get your google data such as pictures. email and etc. Just go to https://www.google.com/settings/takeout and then you can choose what to get. an archive will be created for you to download when the archive is finished, or you can wait and use the email they send you when the archive is done to go back and download the data.


——————————————————-

Just a bit of news again. According to the Linux Link Tech Show aka #tllts eyeOS  a gui desktop web based application  that can run from a gui-less server has been forked to Oneos.  Actually I have seen several similar sort of micro googledocs projects on Sourceforge. http://www.instructables.com/id/eyeOS/   http://oneye-project.org/
 FTGCF1PGYN8W7G4.LARGE
——————————————————-
 Early dual cpu (aka dual core) system that was set up as a router. A collectors item. #retrocomputing.
SUNP0032

——————————————————-

To determine how many files there are in the current directory, put in ls -1 | wc -l. This uses wc to do a count of the number of lines (-l) in the output of ls -1. It doesn’t count dotfiles. Please note that ls -l (that’s an “L” rather than a “1” as in the previous examples) which I used in previous versions of this HOWTO will actually give you a file count one greater than the actual count. Thanks to Kam Nejad for this point.  If you want to count only files and NOT include symbolic links (just an example of what else you could do), you could use ls -l | grep -v ^l | wc -l (that’s an “L” not a “1” this time, we want a “long” listing here). grep checks for any line beginning with “l” (indicating a link), and discards that line (-v).  Relative speed: “ls -1 /usr/bin/ | wc -l” takes about 1.03 seconds on an unloaded 486SX25 (/usr/bin/ on this machine has 355 files). “ls -l /usr/bin/ | grep -v ^l | wc -l” takes about 1.19 seconds.

——————————————————-

CNC is a big thing. You might think of it as the 2d version of a 3d machine. Always have wanted to build one myself. Have the stepper motors, just have to make the rack.

Numerical control (NC) is the automation of machine tools that are operated by precisely programmed commands encoded on a storage medium, as opposed to controlled manually via hand wheels or levers, or mechanically automated via cams alone. Most NC today is computer (or computerized) numerical control (CNC) in which computers play an integral part of the control.

Nowadays You can get a computerand almost do all of it yourself.First you have to have a drawing prepared. There are lots of existing artwork you can use or you can create your own .svg files with Inkscape. Scalable Vector Graphics (SVG) is an XML-based vector image format for two-dimensional graphics with support for interactivity and animation. The SVG specification is an open standard developed by the World Wide Web Consortium (W3C) since 1999. SVG images and their behaviors are defined in XML text files. See also  https://www.google.com/?gws_rd=ssl#q=inkscape+tutorial

Once you have created your graphic or use and existing one, you can  use a specialized version of linux know as linuxcnc.

You can also use a program called Jscut that can run from a web server or a local machine. The advantage is that you can install it once and use it many times where ever you are at.  Most systems generate gcode.

G-code (also RS-274), which has many variants, is the common name for the most widely used numerical control (NC) programming language. It is used mainly in computer-aided manufacturing for controlling automated machine tools. G-code is sometimes called G programming language.

In fundamental terms, G-code is a language in which people tell computerized machine tools how to make something. The how is defined by instructions on where to move, how fast to move, and through what path to move. The most common situation is that, within a machine tool, a cutting tool is moved according to these instructions through a toolpath, cutting away excess material to leave only the finished workpiece. The same concept also extends to noncutting tools such as forming or burnishing tools, photoplotting, additive methods such as 3D printing, and measuring instruments.

Jscut is certainly easier generating Gcode by hand then feeding a papertape  into a cnc machine.  You do need to know what cnc is about to really use the Jscut. See also: https://www.youtube.com/watch?v=dVgf0Hf91vA

What will you make?


——————————————————-

Have some of the nrf24l0 wifi units to play with. will test them with the Arduino first. One person suggest that a 100 nf capacitor be placed between plus five and ground for more power stability/

nrf24l01

NRF24L01-Receiver

More information at: http://playground.arduino.cc/InterfacingWithHardware/Nrf24L01

Experimental code:

https://github.com/TMRh20/RF24/archive/master.zip

——————————————————-

When is the best time to get a free computer? When marriages or couples break apart and when MSWindows users think they need a new machine because the operating system requires beefier hardware. Acquired this old P3 for free from a couple breakup. Wiped the drive and put Linux on it.

SUNP0043

——————————————————-

Home made pizza peel.

Good day.

Marching onward.

Leave a comment

Chit chat

======

Alas poor Nslu2, I knew you well.

Basic commonly known as Basic all-purpose instruction code is also known as BASIC – “Briskly Achieve Solutions Impossible in C”.

Cunningham’s Law states “the best way to get the right answer on the Internet is not to ask a question, it’s to post the wrong answer.”

may-the-fourth-4th-be-with-you-memes-gifs-star-wars-day-18

——————————————————

Just some notes to myself.

Add to Path

export PATH=/usr/local/bin:/usr/bin:/bin:/usr/local/games:/usr/games:/home/$USER/bc:/home/$USER/bin

Alternative ping command

fping -q -a -c 1 -g 192.168.1.0/24

List files in latest files last in in single lines

ls -rtl

Edit the score of Gnome mines,

cd /var/games
sudo vim gnomine.Small.scores

Moving like files to same directory. i,e, html and support folder.

mkdir html/js ; mv JavaScr* html/js/

Count files in a directory

ls -1 | wc -l

This did not work at all

wget -r -e robot.txt=off username.wordpress.com

——————————————————

Downloaded all the pdf files from my instructables site for use on a local server. Found a manual method that was not too cumbersome. The I used the following batch file to automatically create the html for the file listing.

ls *.pdf > pdflist
cut -d "." -f1 pdflist > descripts
sed -i -e 's/^/<a href=\"/' pdflist
sed -i 's/$/\"\>/' pdflist
paste -d "" pdflist descripts > pdflist.html
sed -i 's/$/\<\/a\>\<br \/\>/' pdflist.html
echo "<html>" > index.html
echo "<body>" >> index.html
echo "<h2><center>PDF list</center></h2>" >> index.html
echo "<hr>" >> index.html
cat pdflist.html >> index.html
echo "</body>" >> index.html
echo "</html>" >> index.html

Screenshot from 2015-05-01 07:52:14


Decided to add some alphabetic tags:

<pre>
<a href="#a">A</a>
<p><a name="a">A</a></p>
</pre>

Screenshot from 2015-05-02 17:56:56
------------------------------------------------------

Update to radio.sh script

Update:  Shoutcast stations work also.

Go to http://www.xatworld.com/radio-search/

One example:

mplayer http://108.61.73.120:8118

Screenshot from 2015-05-02 17:14:13

Screenshot from 2015-05-02 17:09:13

——————————————————

For almost two years, or since Ubuntu 12.04 was released, there has been a steady stream of posts about PAE and related problems. 12.04 was the first Ubuntu for which a special non-PAE version wasn’t available. X/Lubuntu carried on supporting non-PAE processors for one release more, making 12.10 their first PAE-only release.Several workarounds have been published which enabled the affected hardware (the Banias part of the Pentium M family) to run the latest Buntus.From 14.04 the boot option forcepae has been added, which eliminates the need for these workarounds. More here.I suggest that when people encounter a PAE related question they spread the word and point to Lubuntu 14.04 and the boot option, provided that the person asking is willing to run a beta version, of course. We will try this option with a P I.

——————————————————

Use any of this information at you own risk.

Basics

The essence of security is simplicity, and when it comes to workstation or small-office Linux firewalls I have always been a fan of direct iptables use over some of the more popular alternatives ([g]ufw, fwbuilder). While they may be easier to use, they also hide a lot of the details. Especially when you are starting to learn about firewalls and network security, I believe you are better served using customizable firewall scripts like the two I detail below. When you get comfortable with iptables and networking concepts, then you can look to some of the other solutions. At that point, you’ll fully understand what they are doing under the hood.
Iptables Scripts

The first aptly-named shell script, ‘firewall.sh’, is meant to protect a SOHO (Small Office / Home Office) or home office network behind a dual-homed (two interface) firewall. It doesn’t support DMZ hosts, but does support the most common scenario of SOHO or home firewalls doing double-duty as SSH or web servers. It features forwarding, NAT (network address translation), syn-flood protection and rate-limiting for log entries.

The next script, ‘bastion-host.sh’, is much simpler, and is meant to be used on any host directly connected to the Internet, like a home workstation or laptop. It drops all inbound connections by default. Both scripts are well-commented, with any variables and each section explained. You can download the scripts here:

Dual-homed Linux firewall script
Singly-homed Linux firewall script (bastion host)  

Startup Options The way I like to use these scripts on a Debian or Ubuntu system (see below for an alternative if you use network manager) is very simple and is as follows:

First, put your chosen script in /usr/local/sbin, and make it owned by root with permissions 0700.


$ sudo cp ./firewall.sh /usr/local/sbin; chown root.root /usr/local/sbin/firewall.sh; chmod 0700 /usr/local/sbin/firewall.sh

Edit /etc/network/interfaces, and add the following line to the interface stanza of your external interface (usually eth0):


pre-up /usr/local/sbin/firewall.sh

So the stanza for your external interface will probably look something like this when you are done:


interface eth0 inet dhcp 

pre-up /usr/local/sbin/bastion-host.sh 

or


interface eth0 inet static 

address 10.1.1.254 

netmask 255.255.255.0 

gateway 10.1.1.1 

pre-up /usr/local/sbin/firewall.sh

On desktop systems where you are using the network manager application, or on Red Hat, CentOS or Fedora systems, you can put scripts like this in /etc/rc.local (On Red Hat systems the comments and touch command are there already by default): #!/bin/sh # # This script will be executed *after* all the other init scripts. # You can put your own initialization stuff in here if you don’t # want to do the full Sys V style init stuff.


# touch /var/lock/subsys/local /usr/local/sbin/firewall.sh

Just make sure that if you use this method on Red Hat based systems, you stop the default iptables firewall:


# /etc/init.d/iptables stop chkconfig –level 2345 iptables off

If you would rather integrate your firewall into the Red Hat startup scripts, run the firewall script of your choice directly. Then save the rules so they will be read by the


# iptables init script: /usr/local/sbin/firewall.sh iptables-save > /etc/sysconfig/iptables service iptables restart

You would then need to do this every time you made a firewall script change.

Testing

When you make changes to the script, just run it again directly and check the firewall status (see below). There are times when an erroneous change will lock you or a network client out of your server. If you have direct access to the host, you can correct any errors that occur immediately from the console. If you are making firewall changes over an SSH session, rename the firewall script first, and make changes on the copy, so that you can just reboot the box as a last resort to get a known-good configuration. Some hosting providers also provide a remote console that is ideal for fixing mistakes.

Monitoring Firewall Status

You can view the currently loaded ruleset as follows:


# iptables -L -nvx iptables -t nat -L -nvx

The -nvx options give you the most detail possible – showing IP addresses instead of hostnames and full packet counts. This comes in handy if you want to see how often a rule is being hit, or if some rules never get hit. The option -t nat shows just the rules in the NAT table.

One final note, there is an ip6tables command that is the analogue of iptables for IPv6, and can be used independently of and alongside it.

Webmin

Use webmin to set up and administer  your firewall rules remotely.

Older script:

# Red Hat Linux firewall using iptables
#
# Created: October 2002
# Last Revised: August 2006
#
# Authors: Dennis G. Allard (allard@oceanpark.com) and Don Cohen (don@isis.cs3-inc.com)
#
# This script works on on servers running Red Hat 7.3, 8.0, 9.0, and
# RHEL ES 3 and 4.  Variants of this script are in active use on
# many servers.
#
# No warranty is implied.  Use at your own risk!!

# Using this script
# —————–
#
# I save this file as /etc/sysconfig/iptables-precursor
# and then source it and run iptables-save to create
# /etc/sysconfig/iptables, which is an input file
# consumed by the script /etc/rc.d/init.d/iptables,
# which in turn makes use of the script /sbin/iptables-restore.
#
# Before mucking with setting up iptables, you should
# disconnect the machine from the internet.  Examine
# and understand the current set of iptables rules
# before you reconnect to the internet.
#
# To configure the set of iptables rules:
#
#   /etc/rc.d/init.d/iptables stop
#   source /etc/sysconfig/iptables-precursor
#
# To save the current set of iptables rules for use at next reboot:
#
#   iptables-save > /etc/sysconfig/iptables
#
# To dynamically restart iptables after modifying /etc/sysconfig/iptables:
#
#   /etc/rc.d/init.d/iptables restart
#
# Note that /etc/rc.d/init.d/iptables is a script.  You can read it to
# gain understanding of how iptables uses iptables-restore to restore
# iptables firewall rules at reboot.
#
# To examine the current set of rules in effect:
#
#   /etc/rc.d/init.d/iptables status
#
# However, I prefer to show the current set of rules via:
#
#   iptables -nvL -t filter
#   iptables -nvL -t nat
#
# or
#
#   iptables -vL -t filter
#   iptables -vL -t nat
#
#
# To configure iptables to be used at next system reboot:
#
#   chkconfig –add iptables
#
# To see if iptables is currently configured to start at boot, do:
#
#   chkconfig –list iptables
#
# (You might have to do chkconfig –del ipchains to remove ipchains)
#
# The rest of this file is derived from my old ipchains script.
#

# A word about routing
# ——————–
#
# Note that this web page does not discuss routing decisions.  Routing
# (see the ‘ifconfig’ and ‘route’ commands) decides which interface an
# incoming packet will be delivered to, i.e. if a given packet will be
# ‘input’ to this machine or be ‘forwarded’ to some interface for
# delivery to another machine, say on an internal network.  You should
# have your routing configured before you attempt to configure your
# firewall.
#
# Caveat.  DNAT and SNAT provide a way for the IPTABLES firewall to modify the
# Destination or Source IP addresses of a packet and, in this way, interact
# with routing decisions.  See section below: ‘More about NAT and routing’.
#

# The network
# ———–
#
# This firewall is running on a gateway machine having multiple ethernet
# interfaces, a public one, eth0, which is a DSL connection to an ISP,
# and one or more internal ones, including eth1, which is assigned to
# 192.168.0.1, an IP number on my internal private network.  My public
# network has static IP numbers depicted below as x.y.z….  Actual
# IP numbers would, of course, be a sequence of four octets.  For this
# script, I assume that the firewall is running on the same machine
# having the interfaces configued with my public IPs.  For this reason,
# most of the rules below are INPUT rules.  Were I to route some of my public
# static IP numbers to interfaces on one or more machines inside the
# firewall on the internal network, I would modify certain rules to be
# FORWARD rules instead of INPUT rules.  I show some examples below of
# FORWARD rules.  Finally, the script is just for a single server IP,
# hence all of the “/32” network masks below.  A more realistic situation
# would involve using IP ranges and their corresponding network masks.
#
# The gateway at my ISP is x.y.z.1.  I run a few web servers on
# x.y.z.w, a DNS server on x.y.z.n, and qmail on x.y.z.m.
#
# Using this file in a more complex network would require some
# modifications. Particular attention would need to be given to using
# the right the IP numbers and interfaces, among other things. 🙂
#

# Preliminaries
# ————-
#
# To permit machines internal to the network to be able to
# send IP packets to the outside world, enable IP Forwarding:
#
#   echo 1 > /proc/sys/net/ipv4/ip_forward
#
# Prevent SYN floods from consuming memory resources:
#
#   echo 1 > /proc/sys/net/ipv4/tcp_syncookies
#
# I place the above echo commands into /etc/rc.d/rc.local
# so that they will be executed at boot time.
#

# The basic idea of this firewall
# ——————————-
#
# Provide rules that are applied in the following order:
#
# ACCEPT all UDP packets for certain UDP services
#
# Currently the only UDP connections I accept are to my secure DNS
# server, tinydns. For an explanation of why tinydns is secure, see:
# http://www.faqts.com/knowledge_base/view.phtml/aid/8739/fid/699.
#
# DENY all other UDP packets.
#
# ACCEPT SYN packets just for certain TCP services
#
# SYN packets are specified via the -syn flag in the input
# rules defined below.  Note that certain services can be
# further filtered by xinetd.
#
# DENY all other TCP SYN packets.
#
# ACCEPT all other TCP packets that are part of existing connections
#
# DENY all other TCP packets.
#
# In other words, we allow any TCP packet through that is part of an
# established TCP connection, but we are very selective in just which
# connections we permit to be made to start off with.
#
# A brief explanation of SYN packets goes as follows.  TCP connections
# are initiated via a hand shaking protocol between the client and server
# programs at either end of the connection.  The very first TCP packet
# is sent by the client to the server and is called a SYN packet,
# because it has the SYN flag set to 1 in the TCP packet header.  We
# only allow SYN packets for the specific servers running on specific
# ports of specific hosts.  Subsequently, we only permit further TCP
# packets in that are determined to be part of a connection whose
# initial SYN packet was already accepted and responded to by one of our
# servers.  This is done via ‘Stateful Packet Inspection’ provided by the
# netfilter functionality added to linux as of kernel 2.4.  By stopping all
# other packets in their tracks, we limit attempts to attack our internal
# network.
#
# There are subtle ways that Denial of Service attacks can be performed
# if an attacker is able to somehow gain access to a machine inside our
# network or otherwise hijack a connection.  However, even in such
# cases, current research is leading to ways to greatly limit the effect
# of such attacks. For further reading, see: http://www.cs3-inc.com/ddos.html.
#
# For detailed background reading about iptables, please refer to:
# http://www.netfilter.org/documentation/HOWTO/packet-filtering-HOWTO.html
#

# begin oceanpark.com firewall rules (using iptables)
# —————————————————

# Here we go…

#
# Configure default policies (-P), meaning default rule to apply if no
# more specific rule below is applicable.  These rules apply if a more specific rule below
# is not applicable.  Defaults are to DROP anything sent to firewall or internal
# network, permit anything going out.
#
iptables -P INPUT DROP
iptables -P FORWARD DROP
iptables -P OUTPUT ACCEPT

#
# Flush (-F) all specific rules
#
iptables -F INPUT
iptables -F FORWARD
iptables -F OUTPUT
iptables -F -t nat

# The rest of this file contains specific rules that are applied in the order
# listed.  If none applies, then the above policy rules are used.

#
# Forward all packets from eth1 (internal network) to eth0 (the internet).
#
iptables -A FORWARD -i eth1 -o eth0 -j ACCEPT

#
# Forward packets that are part of existing and related connections from eth0 to eth1.
#
iptables -A FORWARD -i eth0 -o eth1 -m state –state ESTABLISHED,RELATED -j ACCEPT

#
# Permit packets in to firewall itself that are part of existing and related connections.
#
iptables -A INPUT -i eth0 -m state –state ESTABLISHED,RELATED -j ACCEPT

# Note, in the above two rules, a connection becomes ESTABLISHED in the
# iptables PREROUTING chain upon receipt of a SYNACK packet that is a
# response to a previously sent SYN packet. The SYNACK packet itself is
# considered to be part of the established connection, so no special
# rule is needed to allow the SYNACK packet itself.

#
# Allow all inputs to firewall from the internal network and local interfaces
#
iptables -A INPUT -i eth1 -s 0/0 -d 0/0 -j ACCEPT
iptables -A INPUT -i lo -s 0/0 -d 0/0 -j ACCEPT

#
# Enable SNAT functionality on eth0
#
# SNAT (Source NAT) is used to map private source IP numbers of
# interfaces on the internal LAN to one of my public static IP numbers.
# SNAT performs this mapping when a client running on one of the
# internal hosts (x.y.z.c) initiates a TCP connection (SYN) through
# eth0.
#
iptables -A POSTROUTING -t nat -s 192.168.0.0/24 -o eth0 -j SNAT –to-source x.y.z.c

#
# Alternative to SNAT — MASQUERADE
#
# If your firewall has a dynamic IP number because it connects to the
# internet itself via DHCP, then you probably cannot predict what the IP
# number is of your firewall’s interface connected to the internet. In
# this case, you need a rule like the following that assigns the (an) IP
# number associated with eth0 to outgoing connections without you needing
# to know in advance (at time of writing this rule) what that IP number is:
#
# iptables -A POSTROUTING -t nat -o eth0 -j MASQUERADE
#
# Note that the above SNAT and MASQUERADE rules are applicable
# independent of how a host on the internal network is assigned its own
# internal IP number.  The host could be assigned a static IP number on
# an internal nonpublic network (e.g. 10. or 192.168.)  or it could be
# itself assigned a dynamic IP number from your own DHCP server running
# on the firewall, or it could even have a public static IP number.
# However, it seems unlikely that one would want to assign a public IP
# number to a host and then proceed to hide that number from the public.
#

#
# Deny any packet coming in on the public internet interface eth0
# which has a spoofed source address from our local networks:
#
iptables -A INPUT -i eth0 -s x.y.z.s/32 -j DROP
iptables -A INPUT -i eth0 -s x.y.z.c/32 -j DROP
iptables -A INPUT -i eth0 -s 192.168.0.0/24 -j DROP
iptables -A INPUT -i eth0 -s 127.0.0.0/8 -j DROP

#
# Accept all tcp SYN packets for protocols SMTP, HTTP, HTTPS, and SSH:
# (SMTP connections are further audited by our SMTP server)
#
iptables -A INPUT -p tcp -s 0/0 -d x.y.z.m/32 –destination-port 25 –syn -j ACCEPT
iptables -A INPUT -p tcp -s 0/0 -d 0/0 –destination-port 80 –syn -j ACCEPT
iptables -A INPUT -p tcp -s 0/0 -d 0/0 –destination-port 443 –syn -j ACCEPT
iptables -A INPUT -p tcp -s 0/0 -d 0/0 –destination-port 22 –syn -j ACCEPT

#
# Notice that the above rules are all INPUT rules.  My current network
# does not require me to make use of FORWARD rules, since I run all
# publicly accessible servers directly on my firewall machine.  But I
# promised above in the description of my network to give examples of
# rules used when there are servers running on machines on the internal
# network.  Following are examples of FORWARD rules I would use if I ran
# mail, web, and ssh servers on machines on the internal network inside
# the firewall.
#
# iptables -A FORWARD -p tcp -s 0/0 -d x.y.z.m/32 –destination-port 25 –syn -j ACCEPT
# iptables -A FORWARD -p tcp -s 0/0 -d x.y.z.w/32 –destination-port 80 –syn -j ACCEPT
# iptables -A FORWARD -p tcp -s 0/0 -d x.y.z.w/32 –destination-port 443 –syn -j ACCEPT
# iptables -A FORWARD -p tcp -s 0/0 -d 0/0 –destination-port 22 –syn -j ACCEPT
#
#
# The first three of the above four rules would be used if my routing
# delivered packets having destination IP x.y.z.m, port 25, or IP
# x.y.z.w, port 80 or 443, to an interface connected to my internal
# network (i.e. the packet was being FORWARDed). The fourth of the above
# four rules is similar but operates on any destination IP, port 22.
#
# The difference between an INPUT rule and a FORWARD rule is that an
# INPUT rule applies to packets that are ‘input’ to this machine (the
# machine on which these iptables firewall rules are installed), whereas
# a FORWARD rule applies to packets that are being ‘fowarded’, i.e. to
# packets that are passing through this machine to some other machine,
# such as a machine on my internal network.
#
# If I ran my mail server on an internal machine, I would no longer
# need my previous INPUT rule for x.y.z.m and would use the above
# FORWARD rule instead.
#

#
# Begin Caveat, More about NAT and routing
#
# The above talk of routing is independent of the rules defined here.
# I.e., routing is determined by ifconfig, route, et. al.  I have not
# yet seen any very good explanation of how to setup the static routing
# table (what you see as output from the `route` command).  I will not
# attempt to remedy that lacuna at this time.  If you know of some
# good documenation that completely and accurately explains the
# semantics of the ifconfig and route commands, i.e., explains what
# affect each has such that I can reliably predict what the output
# of `route` will be after executing a sequence of ifconfig and
# route commands, then please do let me know.
#
# What *can* be done by IPTABLES rules that has the ‘feel’ of routing is
# DNAT (Destintion NAT) and SNAT (Source NAT).  DNAT and SNAT rules are,
# respectively, mechnisms to map the incoming destination IP number and
# outgoing source IP number to different IP numbers.  For example, SNAT
# can be used to map an internal source IP number to any one of your
# external public IP numbers so that a workstation on your internal
# network will appear to servers on the internet to which it connects to
# have a source IP number equal to the mapped public IP number.
#
# DNAT goes the other way. It is a mechanism used typically to map
# public destination IP numbers to internal private IP numbers.  (In
# fact, DNAT could also map public to public or private to private or
# private to public, but that is left as an exercise for the reader).
# So, for example, if you run a mail server on a machine configured with
# an internal IP number but wish to expose that service to the external
# world via a public IP number, DNAT is for you.
#
# Now, DNAT and SNAT are *not* routing but can *interact* with routing.
# Routing decides whether a packet is going to be INPUT to this machine
# or be FORWARDed to another machine.  That decision is done by routing.
# Once that decision is made, and only then, are the IPTABLES filtering
# rules (FORWARD and INPUT rules) applied to a given packet.  On the
# other hand DNAT is applied by a PREROUTING rule and SNAT by a POSTROUTING
# rule.  It is now time for you to read the following Packet Filtering
# HOWTO section:
#
# http://www.netfilter.org/documentation/HOWTO/packet-filtering-HOWTO-9.html
#
# which states:
#
#     It’s common to want to do Network Address Translation (see the
#     NAT HOWTO) and packet filtering. The good news is that they mix
#     extremely well.  [editor- The NAT HOWTO can be found at:
#     http://www.netfilter.org/documentation/HOWTO/NAT-HOWTO.html%5D
#
#     You design your packet filtering completely *ignoring* any NAT you
#     are doing. The sources and destinations seen by the packet filter
#     will be the `real’ sources and destinations. For example, if you
#     are doing DNAT to send any connections to 1.2.3.4 port 80 through
#     to 10.1.1.1 port 8080, the packet filter would see packets going
#     to 10.1.1.1 port 8080 (the real destination), not 1.2.3.4 port 80.
#     Similarly, you can ignore masquerading: packets will seem to come
#     from their real internal IP addresses (say 10.1.1.1), and replies
#     will seem to go back there.
#
#
# Hence, INPUT/FORWARD rules would operate on destination IP numbers
# *after* a DNAT rule is applied.  But if you don’t have any DNAT rules,
# then INPUT/FORWARD would apply to the IP numbers as they are in the
# incoming packet.
#
# INPUT or FORWARD would be needed purely depending on whether your
# routing would cause the packet to stay on the machine where the
# firewall is installed or be forwarded to another machine.  THAT
# decision is done by routing and *not* by DNAT or SNAT or anything
# else in this firewall script.
#
# It is perfectly possible for the machine having the firewall to have
# both public and internal IPs configured and/or for some packets to be
# INPUT and others to be FORWARDed.
#
# DNAT is done by a PREROUTING rule, so you should think of things as
# proceeding in the following order:
#
#     1.  apply PREROUTING DNAT rules (if any) to map destination IP
#     2.  apply routing decisions (see ifconfig et. al.)
#     3a. apply INPUT rules to packets having a destination IP on this machine
#     3b. apply FORWARD rules to packets having a destination IP elsewhere
#     4.  apply POSTROUTING SNAT rules (if any) to map source IP
#
# (3a and 3b can be done in either order since they apply to a mutually
# exclusive set of packets)
#
# I *think* that’s correct.
#
# End Caveat, More about NAT and routing
#

#
# Sometimes I run older versions of SSH on port 2200:
#
iptables -A INPUT -p tcp -s 0/0 -d 0/0 –destination-port 2200 –syn -j ACCEPT

#
# For imapd via stunnel (instead of xinetd-based imapd):
#
iptables -A INPUT -p tcp -s 0/0 -d 0/0 –destination-port 993 –syn -j ACCEPT

#
# For xinetd-based IMAP server (see /etc/xinetd.conf for who can use it):
#
#iptables -A INPUT -p tcp -s 0/0 -d 0/0 –destination-port 143 –syn -j ACCEPT

#
# For DHCP server:
#
iptables -A INPUT -i eth1 -p tcp –sport 68 –dport 67 -j ACCEPT
iptables -A INPUT -i eth1 -p udp –sport 68 –dport 67 -j ACCEPT

#
# For LDAP clients:
#
#iptables -A INPUT -p tcp -s 0/0 -d 0/0 –destination-port 389 -syn -j ACCEPT
#dga- worry about LDAP later (after I decode LDAP documentation (-;)

#
# DNS queries:
#
# Permit responses from our ISP’s DNS server.  When a client running on our
# host makes a DNS query, the outgoing query is allowed since we permit all
# outgoing packets.  The reply will be a UDP connection back to the high
# numbered client port from which the query was made.  So we only need to
# permit UDP packets from our ISP’s DNS servers back to high numbered ports:
#
#iptables -A INPUT -p udp -s <ISP DNS server IP>/32 –source-port 53 -d 0/0 –destination-port 1024:65535 -j ACCEPT
#
# But since we trust our ISP DNS Server not not have been hacked and we may
# not be sure what our client IP range is, we loosen this to:
#
iptables -A INPUT -p udp -s <ISP DNS server IP>/32 –source-port 53 -d 0/0 -j ACCEPT

#
# Running a caching DNS Server
#
# We need to permit querying a remote DNS server.  Since I am running
# a caching DNS server on x.y.z.d that makes requests for DNS lookups
# to external DNS servers, those servers send back responses via UDP to
# the high numbered client port on x.y.z.d where the caching server listens.
# I could of course increase security by running the dns cache on its own
# machine/IP and restricting to just that machine/IP.
#
iptables -A INPUT -p udp -s 0/0 –source-port 53 -d x.y.z.d/32 –destination-port 1024:65535 -j ACCEPT

#
# Running a DNS server (tinydns)
#
# When we run a DNS server, we have to accept UDP from anywhere to port 53
#
iptables -A INPUT -p udp -s 0/0 -d 0/0 –destination-port 53 -j ACCEPT

#
# Running a Master DNS Server to update slave DNS servers
#
# You may have your server colocated at an ISP and may arrange to have your
# ISP provide your primary and secondary DNS with the ISP DNS servers slaving
# off of your master DNS server.  This has the advantage of letting you be
# in full control of the DNS zone files yet keeping the DNS servers exposed
# to the public outside of your network.  To achieve this, in addition to
# permitting vanilla DNS responses from the ISP DNS serves, you also need
# to allow TCP connections from the ISP Master DNS Server:
#
# Allow DNS zone transfers via TCP from ISP Master DNS server:
#
# iptables -A INPUT -p tcp -s <ISP Master DNS server IP>/32 -d 0/0 –destination-port 53 –syn -j ACCEPT

#
# For some other custom server running here listening on port <port number>:
#
iptables -A INPUT -p tcp -s 0/0 -d 0/0 –destination-port <port number> –syn -j ACCEPT

#
# For FTP server, restricted to specific local hosts (and see /etc/xinetd.conf):
# (for public file transfers we use scp, sftp, and related SSH file transfer tools)
#
iptables -A INPUT -p tcp -s x.y.z.s/32 -d 0/0 –destination-port 20 –syn -j ACCEPT
iptables -A INPUT -p tcp -s x.y.z.s/32 -d 0/0 –destination-port 21 –syn -j ACCEPT
iptables -A INPUT -p tcp -s 127.0.0.1/8 -d 0/0 –destination-port 20 –syn -j ACCEPT
iptables -A INPUT -p tcp -s 127.0.0.1/8 -d 0/0 –destination-port 21 –syn -j ACCEPT

#
# For Samba (smbd and nmbd), restricted to specific local client hosts (x.y.z.c):
#
iptables -A INPUT -p tcp -s x.y.z.c/32 -d x.y.z.s/32 –destination-port 139 –syn -j ACCEPT
iptables -A INPUT -p udp -s x.y.z.c/32 -d x.y.z.s/32 –destination-port 137 -j ACCEPT

#
#Special cable modem rules.  I used to have a third ethernet card,
#eth2, attached to a separate ISP via a cable modem and used the rules
#shown below to cause a specific Windows machine on my internal network
#(192.168.0.128) to send traffic out via DSL and get it back via cable.
#This violates ingres filtering rules but seems to work.  It was neat
#since my cable modem had higher inbound bandwidth and it permitted
#me to do downloads without impacting my DSL inbound bandwidth.
#I no longer have that third interface, so no longer use this technique.
#
#iptables -A INPUT -i eth2 -s 68.65.209.39/32 -j DROP
#iptables -A INPUT -i eth2 -s 127.0.0.0/8 -j DROP
#iptables -t nat -A POSTROUTING -s 192.168.0.128/32 -d 0/0 -j SNAT –to-source 68.65.209.39

#
# Finally, DENY all connection requests to any UDP port not yet provided
# for and all SYN connection requests to any TCP port not yet provided
# for.  Using DENY instead of REJECT means that no ‘ICMP port
# unreachable’ response is sent back to the client attempting to
# connect.  I.e., DENY just ignores connection attempts.  Hence, use of
# DENY causes UDP connection requests to time out and TCP connection
# requests to hang.  Hence, using DENY instead of REJECT may have
# the effect of frustrating attackers due to increasing the amount of
# time taken to probe ports.
#
# Note that there is a fundamental difference between UDP and TCP
# protocols.  With UDP, there is no ‘successful connection’ response.
# With TCP, there is.  So an attacking client will be left in the dark
# about whether or not the denied UDP packets arrived and will hang
# waiting for a response from denied TCP ports.  An attacker will not
# be able to immediately tell if UDP connection requests are simply
# taking a long time, if there is a problem with connectivity between
# the attacking client and the server, or if the packets are being
# ignored.  This increases the amount of time it takes for an attacker
# to scan all UDP ports.  Similarly, TCP connection requests to denied
# ports will hang for a long time.  By using REJECT instead of DENY, you
# would prevent access to a port in a more ‘polite’ manner, but give out
# more information to wannabe attackers, since the attacker can positively
# detect that a port is not accessible in a small amount of time from
# the ‘ICMP port unreachable’ response.

iptables -A INPUT -s 0/0 -d 0/0 -p udp -j DROP
iptables -A INPUT -s 0/0 -d 0/0 -p tcp –syn -j DROP

# end oceanpark.com firewall rules (using iptables)
# ————————————————-
——————————————————

FM40LLQI52CSZSN.MEDIUM

Freebasic is free and is available for most platforms.

compile with

fbc -lang qb filerdr.bas

filerdr.bas


open "file" for input as #1 

open "notes" for output as #2 

open "notes-cs" for output as #3 

do while not eof(1) 

input #1, a$ 

b$ = left$(a$,2) 

c$ = mid$(a$,4,2) 

print #2,"NOTE_";b$;", "; 

print #3, c$;", "; 

loop 

close #1 

close #2\

close #3

file
G3-3

F4-23

notes
NOTE_G3, NOTE_F4,

notes-cs

3 , 23,

—————-

Screenshot from 2015-05-09 09:05:01

——————————————————

Unfinished. Use at your own risk.

Minimal install ubuntu router

At least 2 nics wan(primary)/lan(secondary)

set hostname

set User name

set password for user and verify

encrypt home directory ?

set Timezone

Use “Guided” default disk partitions setup

Set proxy if needed

Configure updates for automatic install. Security            automatically)

Software install (just openssh server)

Boot loader (best for single os install) install brub to master boot record)

Reboot

Command line login with username and password

sudo will be used alot

Add  webmin repo

Test version of Webmin in Ubuntu Linux from its official repository.

As you may know, Webmin is a web-based interface for system administration for Unix. Using any modern web browser, you can setup user accounts, Apache, DNS, file sharing and much more. Webmin removes the need to manually edit Unix configuration files like /etc/passwd, and lets you manage a system from the console or remotely.

To get started, login your remote server and follow the steps below:

1. Run below command to edit the source file:

sudo vi /etc/apt/sources.list

2. Press i on keyboard to start editing the file and add this line into the end:

deb http://download.webmin.com/download/repository sarge contrib

Press Esc to exit edit. Shift + : and followed by wq to save the changes.

3. Now execute command to download and install the key:

wget -q http://www.webmin.com/jcameron-key.asc -O- | sudo apt-key add –

4. After that, you can always use below commands to install the latest version of Webmin:

sudo apt-get update

sudo apt-get install webmin

Install software

$ sudo apt-get install webmin bind9 perl dhcp3server openssl

sudo vim /etc/network/interfaces

Look at setup.

Add interface for lan

# wan network interface

auto eth0

iface eth0 inet dhcp

# lan network interface

auto eth1

iface eth0 inet static

address 10.1.10.1

netmask 255.255.255.0

broadcast 10.1.10.255

network 10.1.10.0

Enable ipv4

$ sudo vim /etc/sysctl.conf

scro0ll down and uncomment line for packetforwarding for ipv4

see running interfaces

$ ifconfig

eth1 may not be up

see interfaces

$ ifconfig -a

start lan interface

$ sudo ifup eth1

Should see both cards

$ ifconfig

Hook computer to lan interface and reget ip addess

Go to another machine and use web browser

for the url use 10.1.10.1:10000

https://10.1.10.1:10000

add security exception

Login

Change timezone if needed

Go to configuration

Go to ports and addresses

change any address to only listen on server address

Port 10000 is ok

save

Go back to configuration

Goto Ipaccess control

Goto  allowed addresses

Include local network

add current machine

Allow resolve hostnames

save

Go back to configuration

Goto Networking

Check interfaces in network configuration

Goto config dhcp server

Hostname and Dnsserver

Add router as primary dns server

Search domain as wanb address

save

Goto Server

Goto Dhcp server

Add new subnet

subnet and other infor from from /etc/net/interfaces file

Description to whatever you like.

Set address on same subnet for use with client machines.

Static addresses should not be part of dhcp addresses.

you can change default lease times

Edit client options

Add subnet

default router lan address

save

save

edit network interfaces

set eth1  (lan) as interface to give out addesses

start dhcp server

Reserve an address

need mac address and an address to use.

leave at top level

add hostname for resolving.

apply changes

Goto Configure firewall

Set nat translatiopn on external interface (eth0)

Enable firewall at boot time

setup firewall

Goto Packet filtering

Default action on incoming packets to drop

Set

Drop forwarded packets

Add rules to incoming packets

1 accept all incoming packets on loopback (lo) interface

create

2  accept all incoming packets on eth1

create

3 accept packets from eth1 needs to be related to established from internal or already established (connection state) related to eth0

4 forwarded packets accept input eth1 and output eth0

create

5 accept established and related traffic for eth0 to eth1

accept all outgoing packets

chain

log dropped packes if space

log packets

if eth0 for

if noit logged the dropped

view logfile

——————————————————

Here is a web based interface to control some low voltage lines via the
Arduino.  The web interface will let you either singly turn an led on of off. You can also turn all the leds on or off at one time. From there you can interface all kinds of equipment.  Thebasoc circuit for the project is:

Or to look at an Arduino board the relevant pins are:

Whether is is for a Personal computer or one of many microcontrollers, the interfacing technique is pretty much the same. Here are two links to consider:

http://www.instructables.com/id/Ubuntu-and-the-arduino/

 http://www.instructables.com/id/External-device-control-ie-coffee-machine/

Now you can remotely turn on for off many devices and a start at home automation.

The code:

#include <Ethernet.h>

#include <SPI.h>

//network NB: Pins 10, 11, 12 and 13 are reserved for Ethernet module.

byte mac[] = { 0xDE, 0xAD, 0xBE, 0xEF, 0xFE, 0xED };

byte ip[] = { 192, 168, 1, 200 };

byte gateway[] = { 192, 168, 1, 1 };

byte subnet[] = { 255, 255, 255, 0 };

String inString = String(35);

String Led;
String z;

int led[] = {00, 1, 2, 3, 4, 5, 6, 7, }; //Led pins num 0 in arry is not used

int numofleds = 7; //numofleds

String value[] = {"on","on","on","on","on","on","on","on","on"}; //startup all led are off

EthernetServer server(80);

String data;

void setup()

{

Serial.begin(9600);

Ethernet.begin(mac, ip,gateway,subnet);

server.begin();

//set pin mode

for (int j = 0; j < (numofleds + 1); j++){

pinMode(led[j], OUTPUT);

}

Serial.println("Serial READY");

Serial.println("Ethernet READY");

Serial.println("Server READY");

}

void loop()

{

EthernetClient client = server.available();

if(client){

// an http request ends with a blank line

boolean current_line_is_blank = true;

while (client.connected()) {

if(client.available()) {

char c = client.read();

// if we've gotten to the end of the line (received a newline

// character) and the line is blank, the http request has ended,

// so we can send a reply

if (inString.length() < 35) {

inString.concat(c);

}

if (c == '\n' && current_line_is_blank) {

// send a standard http response header

client.println("HTTP/1.1 200 OK");

client.println("Content-Type: text/html");

client.println();

client.println("<html><body><form method=get>");

client.println("<hr><center>");
client.println("<p>Led controller</p>");
client.println("</center><hr>");

client.println("<p>Each led</p>");

for(int i=2;i < (numofleds + 1) ;i++){

Led = String("Led") + i;
z = String("#") + i;
if(inString.indexOf(Led+"=on")>0 || inString.indexOf("all=on")>0){

Serial.println(Led+"on");

digitalWrite(led[i], HIGH);

value[i] = "off";

}else if(inString.indexOf(Led+"=off")>0 || inString.indexOf("all=off")>0 ){

Serial.println(Led+"off");

digitalWrite(led[i], LOW);

value[i] = "on";

}

client.println("<br> Led "+z+"  <input type=submit name="+Led+" value="+value[i]+">");

}

client.println("<p>All leds</p>");
client.println("<input type=submit name=all value=on><input type=submit name=all value=off>");

client.println("</form><html></body>");

break;

}

if (c == '\n') {

// we're starting a new line

current_line_is_blank = true;

} else if (c != '\r') {

// we've gotten a character on the current line

current_line_is_blank = false;

}

}

}

// give the web browser time to receive the data

delay(10);

inString = "";

client.stop();

}

}

——————————————————

This article is more about window dressing more than anything else. The Arduino comes with a nice bit of web server code that reports the results of some temperature sensors. Thought the code could use at least some minimal improvements. Also put the the Arduino web address on the dns so that it could be called by the hostname lookup instead of the ipaddress. The important part of the changed code is included. Normally you can not store images on the Arduino, but you can reference them from another site.


void loop() {
  // listen for incoming clients
  EthernetClient client = server.available();
  if (client) {
    Serial.println("new client");
    // an http request ends with a blank line
    boolean currentLineIsBlank = true;
    while (client.connected()) {
      if (client.available()) {
        char c = client.read();
        Serial.write(c);
        // if you've gotten to the end of the line (received a newline
        // character) and the line is blank, the http request has ended,
        // so you can send a reply
        if (c == '\n' && currentLineIsBlank) {
          // send a standard http response header
          client.println("HTTP/1.1 200 OK");
          client.println("Content-Type: text/html");
          client.println("Connnection: close");
          client.println();
          client.println("<!DOCTYPE HTML>");
          client.println("<html>");
                    // add a meta refresh tag, so the browser pulls again every 5 seconds:
          client.println("<meta http-equiv=\"refresh\" content=\"5\">");
          // output the value of each analog input pin
        
          client.println("<hr>");
          client.println("<center>");
          client.println("<h2>Analog sensor information page</h2>");
          client.println("</center>");
          client.println("<hr>");
          client.println("<br><br>");
          client.println("<img
src='http://cdn.instructables.com/FFO/DOLC/FVW22FQV/FFODOLCFVW22FQV.LARGE.gif'
 width='200' height='200'>");
          client.println("<table border='1'>");
          client.println("<tr>");
          client.println("<td>");
          client.println("Sensor number");
          client.println("</td>");
          client.println("<td>");
          client.println("Sensor value");
          client.println("</td>");
          client.println("</tr>");
          for (int analogChannel = 0; analogChannel < 6; analogChannel++) {
           client.println("<tr>");
            client.println("<td>");
            int sensorReading = analogRead(analogChannel);
                
            client.print(analogChannel);
         
            client.println("</td>");
            client.println("<td>");
            client.print(sensorReading);
            client.println("<br />");     
             client.println("</td>");
            client.println("</tr>");
                   
      }
        client.println("</table>");
          client.println("</html>");
          break;
        }
        if (c == '\n') {
          // you're starting a new line
          currentLineIsBlank = true;
        }
        else if (c != '\r') {
          // you've gotten a character on the current line
          currentLineIsBlank = false;
        }
      }
    }
    // give the web browser time to receive the data
    delay(1);
    // close the connection:
    client.stop();
    Serial.println("client disonnected");
  }

Example of how to the the temperature with an arduino.  From Ubuntu and the Arduino on http://www.instructables.com

 Temp sensor. Is it too hot for you or your equipment, so now you can tell. Using an ice cube  will gve you a good test of the unit.Could also be the start of a sous vide machine.<code.>

//declare variables
float tempC;
int tempPin = 0;

void setup()
{
Serial.begin(9600); //opens serial port, sets data rate to 9600 bps
}

void loop()
{
tempC = analogRead(tempPin);           //read the value from the sensor
tempC = (5.0 * tempC * 100.0)/1024.0;  //convert the analog data to temperature
Serial.print((byte)tempC);             //send the data to the computer
delay(1000);                           //wait one second before sending new data
}

</code>


——————————————————

Pasta drying stand

FHB2NO5H8RVM4N4.MEDIUM

Good day.

Moving on, I hope.

Leave a comment

Chit chat

======

The personal computer was actually invented by a Texas chicken farmer which was known as the glass teletype and the company became known as Datapoint.

Bad storm and the power went out. Had to use the UPS (on battery only) for the router and the palmtop to see when the electricity might be restored.

Shame the AT&T door to door harassment teams do not understand what the term “No soliciting” means..

The new Microcenter store makes Frys look like a Radio Shack store.

Playing Soduku more and more.

Screenshot from 2015-04-18 16:45:25

————————————————-

Quickie hints:

Set the path:

$ export PATH=/usr/local/bin:/usr/bin:/bin:/usr/local/games:/usr/games:/home/$USER/bc:/home/$USER/bin

Add icons and etc to desktop:

Run this command in your terminal (Applications > Accessories > Terminal):

# show files on desktop
gsettings set org.gnome.desktop.background show-desktop-icons true

# show shares on desktop
gsettings set org.gnome.nautilus.desktop volumes-visible true

# restart nautilus or logout and log back in.
nautilus -q
nautilus

————————————————-

Please keep your systems up to date!

For linux (depending on the distro:)

$ sudo apt-get update; sud apt-get upgrade
$ sudo yum update; sudo yum, upgrade
$ sudo pacman -Syu

etc
etc

————————————————-

Rp1 cases

There are a lot of diy cases on the net. Probably the most notable one is the cardboard case.  You can easily find them on the net by looking for RPi printable cases. Besure and tell the print program to not resize the image.


This next two were not real impressive and not so easily put together. Kind of flimsy?

This next one seemed a bit complicated.

Then there are the .dxf files with Librecad so you can use them a laser cutter or cnc router.


————————————————-

Cases can be expensive for micro-controllers, but if you can forgo the exactness you can use very inexpensive containers, This is especially true for controllers that might have several layer of capes, and or add-on boards

You can get inexpensive containers 3 or more for a dollar at a discount store.

Once you have your containers, you will want to modify them.

Then lastly you will want to bolt down the board. #4 machine screws should work fine for this. and viola you have your own case.

————————————————-

Screenshot from 2015-04-20 01:41:55

Setting up a network scanner:

Here are the steps to installing and accessing a network scanner from Ubuntu desktop client. It is assumed that the network scanner server is already up and running.

1) Let us first check whether there is a scanner available on our Ubuntu client host. Without any prior setup, you will see the message saying that “No scanners were identified.”

$ scanimage -L

2) Now we need to enable saned daemon which comes pre-installed on Ubuntu desktop. To enable it, we need to edit the /etc/default/saned file, and set the RUN variable to yes:

$ sudo vim /etc/default/saned
1
2
# Set to yes to start saned
RUN=yes

3) Let’s edit the /etc/sane.d/net.conf file, and add the IP address of the server where the scanner is installed:

4) Restart saned:

$ sudo service saned restart

5) Let’s see if the scanner is available now:

Now we can open “Simple Scan” (or other scanning utility) and start scanning documents. We can rotate, crop, and save the resulting image:

Note: most generic print servers do not support this feature.

————————————————-

How to download and install prebuilt OpenJDK packages
JDK 7
Debian, Ubuntu, etc.

On the command line, type:

Runtime
$ sudo apt-get install openjdk-7-jre

For development
$ sudo apt-get install openjdk-7-jdk

To make sure you are using the right version

$ sudo update-alternatives –config java

For the browser:

$ sudo apt-get install  icedtea-7-plugin

The openjdk-7-jre package contains just the Java Runtime Environment. If you want to develop Java programs then install the openjdk-7-jdk package.
Fedora, Oracle Linux, Red Hat Enterprise Linux, etc.

On the command line, type:
$ su -c “yum install java-1.7.0-openjdk”

The java-1.7.0-openjdk package contains just the Java Runtime Environment. If you want to develop Java programs then install the java-1.7.0-openjdk-devel package.
JDK 6
Debian, Ubuntu, etc.

On the command line, type:
$ sudo apt-get install openjdk-6-jre

The openjdk-6-jre package contains just the Java Runtime Environment. If you want to develop Java programs then install the openjdk-6-jdk package.
Fedora, Oracle Linux, Red Hat Enterprise Linux, etc.

On the command line, type:
$ su -c “yum install java-1.6.0-openjdk”

The java-1.6.0-openjdk package contains just the Java Runtime Environment. If you want to develop Java programs then install the java-1.6.0-openjdk-devel package.
BSD Port

For a list of pointers to packages of the BSD Port for DragonFly BSD, FreeBSD, Mac OS X, NetBSD and OpenBSD, please see the BSD porting Project’s wiki page.

————————————————-

Set up your own computer based radio. radiolocator.com is a good place to start for looking to find available stations.

Many radio stations will let you listen to their live stream, Sometimes you can find and use the link on their web page. Sometimes you have to venture through web page html to find it the file and download it from their server. So if that file gets updated, you will need to get the file again.

A play list might look like:

$ cat klolfmaac.pls

File1=http://2243.live.streamtheworld.com:80/KLOLFMAAC_SC
File2=http://2243.live.streamtheworld.com:3690/KLOLFMAAC_SC
File3=http://2243.live.streamtheworld.com:443/KLOLFMAAC_SC
Title1=KLOLFMAAC_SC
Title2=KLOLFMAAC_SC-Bak
Length1=-1
NumberOfEntries=3
Version=2

or

$ cat koda-fm.m3u
http://107.14.43.102:80/7/597/20097/v1/auth.akacast.akamaistream.net/koda-fm
http://koda-fm.ng.akacast.akamaistream.net:80/7/597/20097/v1/auth.akacast.akamaistream.net/koda-fm

So log in to the remote server and install your files (the shell file and the play lists). The modify the shell file for the location of the play lists. Make the shell file executable.

$ chmod +x radio,sh
What I do is install screen so I can let go of the script if I need to and then come back later to it.

$ screen
<ctrl>A d) to disconnect

Get screen sessions

$ screen -ls

Then reconnect with:

$ screen -r <session number or name>

Then just run it

$ ./radio.sh

Press q to quit
$ exit to leave screen session.

<pre>#!/bin/bash
#
# Script to emulate a radop.
#
while :
do
clear
echo "************************"
echo "* Radio tuner          *"
echo "************************"
echo "* [1] Alvin            *"
echo "* [2] 91.7 classical   *"
echo "* [3] 88.7 global      *"
echo "* [4] Kuhf news        *"
echo "* [5] KPFT             *"
echo "* [6] Koda             *"
echo "* [7] KTBZ             *"
echo "* [8] KSBJ             *"
echo "* [9] KGLT             *"
echo "*                      *"
echo "* [0] Exit/Stop        *"
echo "************************"
echo
echo "Enter your menu choice [1-9 or 0]: "
read -n 1 yourch
case $yourch in
1) mplayer -playlist http://www.kaccradio.com/images/KACCRadio.asx  ;;
2) mplayer -playlist  http://www.publicbroadcasting.net/kuhf/ppr/kuha_128.m3u  ;;
3) mplayer -playlist  http://www.publicbroadcasting.net/kuhf/ppr/kuhfglobal_128.m3u  ;;
4) mplayer -playlist http://www.publicbroadcasting.net/kuhf/ppr/kuhfnews_128.m3u  ;;
5) mplayer -playlist http://kpft.org/KPFT-hifi.wma ;;
6) mplayer -playlist koda-fm.m3u  ;;
7) mplayer -playlist ktbz-fm.m3u  ;;
8) mplayer -playlist ksbjfmaac.pls  ;;
9) mplayer -playlist kglkfmaac.pls ;;
0) exit 0;;
*) echo "Oopps!!! Please select choice 1,2,3,4,5,6,7,8, or 9"
echo "Press Enter to continue. . ." ; read ;;
esac
done

————————————————-

Slow ascii file reader

$ ./asccirdr.[filename]


#!/bin/sh

# A program to slowly cat file or standard input.

if [ "$1" ] ; then
file="$1"
else
file="-"
fi

cat "$file" | while read c ; do
echo "$c"

# change delay for speed of viewing.

sleep .005
done

————————————————-

iriiver

Ereader is optional by using your portable music player.

http://www.instructables.com/id/Ereader-is-optional-by-using-your-portable-music-p-1/

————————————————-

Simple python calender

$ python cal.py

Screenshot from 2015-04-26 23:30:20

$ cat cal.py
import calendar
calendar.prcal(2015)

————————————————-

Create a table with python for use in a web page.

Screenshot from 2015-04-26 23:37:43

$ python table.py
<table>
<tr><th></th><th>X</th><th>Y</th><th>Z</th></tr>
<tr><td style=”font-weight: bold;”>1</td><td>5572</td><td>4860</td><td>3289</td></tr>
<tr><td style=”font-weight: bold;”>2</td><td>7419</td><td>5313</td><td>4522</td></tr>
<tr><td style=”font-weight: bold;”>3</td><td>8962</td><td>7636</td><td>7714</td></tr>
<tr><td style=”font-weight: bold;”>4</td><td>8330</td><td>3408</td><td>3646</td></tr>
<tr><td style=”font-weight: bold;”>5</td><td>6894</td><td>2333</td><td>5806</td></tr>
</table>

save to file with:

python table.py > tabletest.html

import random
def rand9999():
return random.randint(1000, 9999)
def tag(attr='', **kwargs):
for tag, txt in kwargs.items():
return '<{tag}{attr}>{txt}</{tag}>'.format(**locals())
if __name__ == '__main__':
header = tag(tr=''.join(tag(th=txt) for txt in ',X,Y,Z'.split(','))) + '\n'
rows = '\n'.join(tag(tr=''.join(tag(' style="font-weight: bold;"', td=i)
+ ''.join(tag(td=rand9999())
for j in range(3))))
for i in range(1, 6))
table = tag(table='\n' + header + rows + '\n')
print(table)

————————————————-

Bachelor tortilla (a little rolling pin action).

SUNP0031

Good day.

Jupiter goes forward.

Leave a comment

Chit chat

======

Have not taken time yet to fix the email server..

Was able to get my old RP1 up and running again. Somehow it had a bad image. Put Openelec on the mm card for testing.

The Easter bunny brought me an RPi-2.

Finally getting used to connecting wireless with my nexus 7 tablet with much regret.

Hopefully Libreoffice will come out with their web based version soon. Saving a place on the server for it. Like the policy of install once but us many.

Keep getting messages about updating the Pogoplug. Since going to arch linux, we have not used that service in forever.

Raspberry Pi case?

SUNP0012

——————————————————-

Now let us take a look a remote music controller called mpd. With mplayer we could do everything from the command line, mpw we should be able to use the gui on the remote machine. We will not need to use ssh here either.

You will want to set up your host machines with speakers as before. Then we need to add a new piece of software called mpd. It is available for a wide variety of systems including android.

$ sudo apt-get install mpd.

Server does not have to have gui installed. Copy your music files to the server if they are not already there. Then you will want so edit the config file for you file settings and etc.

$ sudo vim /etc/mpd.conf

Once you have that done, you will need to go to the client machine and install the following:

$ sudo apt-get install mpc gmpc

Then go to the gui menu for the  sound and video.   Choose the gnome-music-okayer-client. Everything is gui form there. You will need to set the servername and the port number (usually 6600). In many cases it will autodetect it for you.

Start playing music from the server.

——————————————————-

Remember the old concentration game from many years ago. You can make your own version. you will need thirty clear plastic envelopes. They can be make from cheap clear plastic lunch bags and clear plastic tape. Poster board can be used for making the large frames. You will also need to make some blue cards with the embossed numbers for each of the bags. Of course you will need a frame to hold the puzzle background.

Lastly you will need a puzzle to use as the background. You can use your favorite drawing program the will let you import pictures. Gimp is what we like to use  There are thousands on-line that you can use or even use your own. Such as:

The sky is the limit with your imagination. More information at: http://en.wikipedia.org/wiki/Concentration_%28game_show%29

——————————————————-

Just an experiment to determine the amount of days between two dates. In this case it is the days left in the current presidency.

<pre>#!/bin/bash
D=`date +%Y-%m-%d`
D1=`date +%s -d "$D"`
D2=`date +%s -d "2017-01-20"`
((diff_sec=D2-D1))
echo - | awk -v SECS=$diff_sec '{printf "Number of days : %d",SECS/(60*60*24)}'
echo " till Obama leaves office."

Result:

$ ./datediff.sh
Number of days : 656 days till Obama leaves office.
$

or semigui:

#!/bin/bash
D=`date +%Y-%m-%d`
D1=`date +%s -d "$D"`
D2=`date +%s -d "2017-01-20"`
((diff_sec=D2-D1))
a=`echo - | awk -v SECS=$diff_sec '{printf "Number of days : %d",SECS/(60*60*24)}'`
a=$a" till Obama leaves office."
zenity --info --text="$a"

Screenshot from 2015-04-11 03:54:56

——————————————————-

Really feel for Mr. Banzi and the fact that everyone is making their own version of the Arduino. You can get the bare  chips and make your own. You can get the boards as low as ten dollars even at a retail outlet. Had a spare ethernet board I bought from Radio shack on sale. So when I saw a compatible board for only ten dollars, I had to get it.

The main reason, I wanted this version of the board is that I have some Arduino chips that that can be plugged and played on the board versus the surface mounted versions which will not plug and play.

For those systems that need acm

$ sudo apt-get install hal
$ sudo usermod -a -G tty $USER
$ sudo usermod -a -G dialout $USER

Speaking the Arduino, they have a newer IDE. When I downloaded a recent version, I had problems. The one I downloaded today seems to work. Tested the new Arduino board and the extra ethernet board we had. Seemed to work. The page for the new software is: http://arduino.cc/en/Main/Software

One thing I like about the new ide is that if gives you a basic form to start with, which saves time. In fact you cut and paste the minimal code in the old ide software/

void setup() {
// put your setup code here, to run once:

}

void loop() {
// put your main code here, to run repeatedly:

}
Time to go back and work on the Sous vide project.

The Nexus 7 has a neat little ide also

——————————————————-

Primer on ipv6

Intro

One of the main benefits of Internet Protocol version 6 (IPv6) over previously used Internet Protocol version 4 (IPv4) is the large address-space that contains (addressing) information to route packets for the next generation Internet.

IPv6 supports 128-bit address space and can potentially support 2128 or 3.4W1038 unique IP addresses (as opposed to 32-bit address space of IPv4). With this large address-space scheme, IPv6 has the capability to provide unique addresses to each and every device or node attached to the Internet.


IPv6

Why we need IPv6 Addressing

An escalating demand for IP addresses acted as the driving force behind the development of the large address space offered by the IPv6. According to industry estimates, in the wireless domain, more than a billion mobile phones, Personal Digital Assistants (PDA), and other wireless devices will require Internet access, and each will need its own unique IP address.

The extended address length offered by IPv6 eliminates the need to use techniques such as network address translation to avoid running out of the available address space. IPv6 contains addressing and control information to route packets for the next generation Internet.

IPv6 addresse formats are divided into three classes:

1) Unicast addresses A Unicast address acts as an identifier for a single interface. An IPv6 packet sent to a Unicast address is delivered to the interface identified by that address.

2) Multicast addresses A Multicast address acts as an identifier for a group/set of interfaces that may belong to the different nodes. An IPv6 packet delivered to a Multicast address is delivered to the multiple interfaces.

3) Anycast addresses Anycast addresses act as identifiers for a set of interfaces that may belong to the different nodes. An IPv6 packet destined for an Anycast address is delivered to one of the interfaces identified by the address.

(http://en.wikipedia.org/wiki/IPv6_address#Address_formats)

IPv6 Address Notation

IPv6 addresses are denoted by eight groups of hexadecimal quartets separated by colons in between them.

Following is an example of a valid IPv6 address: 2001:cdba:0000:0000:0000:0000:3257:9652

Any four-digit group of zeroes within an IPv6 address may be reduced to a single zero or altogether omitted. Therefore, the following IPv6 addresses are similar and equally valid:

2001:cdba:0000:0000:0000:0000:3257:9652

2001:cdba:0:0:0:0:3257:9652

2001:cdba::3257:9652

The URL for the above address will be of the form:

http://%5B2001:cdba:0000:0000:0000:0000:3257:9652%5D/

Network Notation in IPv6

The IPv6 networks are denoted by Classless Inter Domain Routing (CIDR) notation. A network or subnet using the IPv6 protocol is denoted as a contiguous group of IPv6 addresses whose size must be a power of two. The initial bits of an IPv6 address (these are identical for all hosts in a network) form the network s prefix. The size of bits in a network prefix are separated with a / . For example, 2001:cdba:9abc:5678::/64 denotes the network address 2001:cdba:9abc:5678. This network comprises of addresses rearranging from 2001:cdba:9abc:5678:: up to 2001:cdba:9abc:5678:ffff:ffff:ffff:ffff. In a similar fashion, a single host may be denoted as a network with a 128-bit prefix. In this way, IPv6 allows a network to comprise of a single host and above.

Special Addresses in IPv6

::/96 The zero prefix denotes addresses that are compatible with the previously used IPv4 protocol.

::/128 An IPv6 address with all zeroes in it is referred to as an unspecified address and is used for addressing purposes within a software.

::1/128 This is called the loop back address and is used to refer to the local host. An application sending a packet to this address will get the packet back after it is looped back by the IPv6 stack. The local host address in the IPv4 was 127.0.0.1 .

2001:db8::/32 This is a documentation prefix allowed in the IPv6. All the examples of IPv6 addresses should ideally use this prefix to indicate that it is an example.

fec0::/10 This is a site-local prefix offered by IPv6. This address prefix signifies that the address is valid only within the local organization. Subsequently, the usage of this prefix has been discouraged by the RFC.

fc00::/7 This is called the Unique Local Address (ULA). These addresses are routed only within a set of cooperating sites. These were introduced in the IPv6 to replace the site-local addresses. These addresses also provide a 40-bit pseudorandom number that reduces the risk of address conflicts.

ff00::/8 This prefix is offered by IPv6 to denote the multicast addresses. Any address carrying this prefix is automatically understood to be a multicast address.

fe80::/10 This is a link-local prefix offered by IPv6. This address prefix signifies that the address is valid only in the local physical link.

——————————————————-

ipv4 web calculator. You can find it on the web if you look.

Screenshot from 2015-04-10 00:49:58

Screenshot from 2015-04-10 00:47:56

Screenshot from 2015-04-10 00:51:03

Screenshot from 2015-04-10 00:52:18

Some ipv6 calculators also on the web

Screenshot from 2015-04-10 00:46:42

Screenshot from 2015-04-10 00:45:14

Screenshot from 2015-04-10 00:43:53

——————————————————-

Another ipv6 Calcer

Screenshot from 2015-04-12 22:16:34

Screenshot from 2015-04-12 22:17:15

——————————————————-

If you’re a Linux system administrator, chances are you’ve got more than one machine that you’re responsible for on a daily basis. You may even have a bank of machines that you maintain that are similar — a farm of Web servers, for example. If you have a need to type the same command into several machines at once, you can login to each one with SSH and do it serially, or you can save yourself a lot of time and effort and use a tool like ClusterSSH.

ClusterSSH is a Tk/Perl wrapper around standard Linux tools like XTerm and SSH. As such, it’ll run on just about any POSIX-compliant OS where the libraries exist — I’ve run it on Linux, Solaris, and Mac OS X. It requires the Perl libraries Tk (perl-tk on Debian or Ubuntu) and X11::Protocol (libx11-protocol-perl on Debian or Ubuntu), in addition to xterm and OpenSSH.

Installation

Installing ClusterSSH on a Debian or Ubuntu system is trivial — a simple sudo apt-get install clusterssh will install it and its dependencies. It is also packaged for use with Fedora, and it is installable via the ports system on FreeBSD. There’s also a MacPorts version for use with Mac OS X, if you use an Apple machine. Of course, it can also be compiled from source.

Configuration

ClusterSSH can be configured either via its global configuration file — /etc/clusters, or via a file in the user’s home directory called .csshrc. I tend to favor the user-level configuration as that lets multiple people on the same system to setup their ClusterSSH client as they choose. Configuration is straightforward in either case, as the file format is the same. ClusterSSH defines a “cluster” as a group of machines that you’d like to control via one interface. With that in mind, you enumerate your clusters at the top of the file in a “clusters” block, and then you describe each cluster in a separate section below.

For example, let’s say I’ve got two clusters, each consisting of two machines. “Cluster1” has the machines “Server1” and “Server2” in it, and “Cluster2” has the machines “Server3” and “Server4” in it. The ~.csshrc (or /etc/clusters) control file would look like this:

clusters = cluster1 cluster2

cluster1 = server1 server2
cluster2 = server3 server4

You can also make meta-clusters — clusters that refer to clusters. If you wanted to make a cluster called “all” that encompassed all the machines, you could define it two ways. First, you could simply create a cluster that held all the machines, like the following:

clusters = cluster1 cluster2 all

cluster1 = server1 server2
cluster2 = server3 server4
all = server1 server2 server3 server4

However, my preferred method is to use a meta-cluster that encompasses the other clusters:

clusters = cluster1 cluster2 all

cluster1 =Server1 server2
cluster2 = server3 server4
all = cluster1 cluster2

Figure 1: Lauching ClusterSSH

By calling out the “all” cluster as containing cluster1 and cluster2, if either of those clusters ever change, the change is automatically captured so you don’t have to update the “all” definition. This will save you time and headache if your .csshrc file ever grows in size.

Using ClusterSSH

Using ClusterSSH is similar to launching SSH by itself. Simply running cssh -l <username> <clustername> will launch ClusterSSH and log you in as the desired user on that cluster. In the figure below, you can see I’ve logged into “cluster1” as myself. The small window labeled “CSSH [2]” is the Cluster SSH console window. Anything I type into that small window gets echoed to all the machines in the cluster — in this case, machines “server1” and “server2”. In a pinch, you can also login to machines that aren’t in your .csshrc file, simply by running cssh -l <username> <machinename1> <machinename2> <machinename3>.

If I want to send something to one of the terminals, I can simply switch focus by clicking in the desired XTerm, and just type in that window like I usually would. ClusterSSH has a few menu items that really help when dealing with a mix of machines. As per the figure below, in the “Hosts” menu of the ClusterSSH console there’s are several options that come in handy.

“Retile Windows” does just that if you’ve manually resized or moved something. “Add host(s) or Cluster(s)” is great if you want to add another set of machines or another cluster to the running ClusterSSH session. Finally, you’ll see each host listed at the bottom of the “Hosts” menu. By checking or unchecking the boxes next to each hostname, you can select which hosts the ClusterSSH console will echo commands to. This is handy if you want to exclude a host or two for a one-off or particular reason. The final menu option that’s nice to have is under the “Send” menu, called “Hostname”. This simply echoes each machine’s hostname to the command line, which can be handy if you’re constructing something host-specific across your cluster.

Caveats with ClusterSSH

Like many UNIX tools, ClusterSSH has the potential to go horribly awry if you aren’t very careful with its use. I’ve seen ClusterSSH mistakes take out an entire tier of Web servers simply by propagating a typo in an Apache configuration. Having access to multiple machines at once, possibly as a privileged user, means mistakes come at a great cost. Take care, and double-check what you’re doing before you punch that Enter key.

Conclusion

ClusterSSH isn’t a replacement for having a configuration management system or any of the other best practices when managing a number of machines. However, if you need to do something in a pinch outside of your usual toolset or process, or if you’re doing prototype work, ClusterSSH is indispensable. It can save a lot of time when doing tasks that need to be done on more than one machine, but like any power tool, it can cause a lot of damage if used haphazardly.

——————————————————-

Homnemade SOS

SUNP0009

Good day.


Older Entries